
 pin it
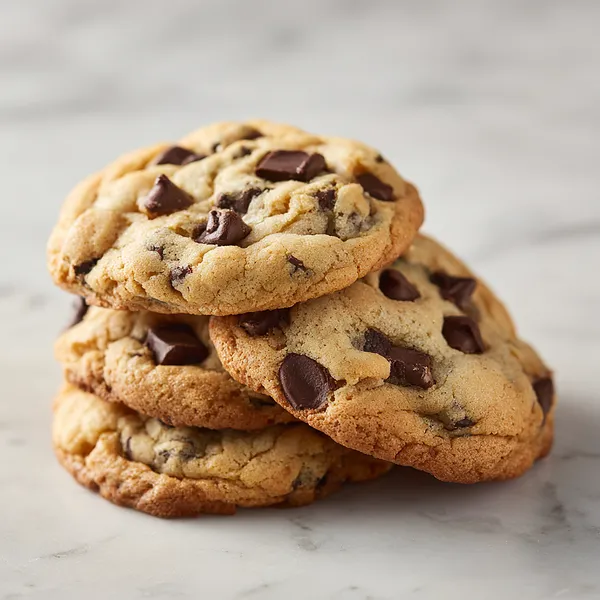
I remember the first time I bit into a truly perfect chocolate chip cookie at a small bakery in New York City. It was thick, almost cake-like in height, with crispy golden edges that gave way to the softest, most gooey center I'd ever experienced. The chocolate chunks were massive and melted into pools of dark, rich chocolate. That cookie changed my entire perspective on what a chocolate chip cookie could be. I spent months trying to recreate it at home, testing different flour ratios, butter temperatures, and baking times. This recipe is the result of all that experimentation. The key is in the technique: chilling the dough for at least 2 hours allows the flour to fully hydrate and prevents excessive spreading. Using both brown and white sugar creates the perfect balance of chewiness and crispness. The touch of sea salt on top isn't just for show – it enhances all the flavors and adds a gourmet touch that makes these cookies truly special.
Why I love this recipe
What I love most about this recipe is how it delivers bakery-quality results every single time, without any fancy equipment or hard-to-find ingredients. There's something incredibly satisfying about pulling a tray of these thick, gorgeous cookies out of your own oven. The texture is absolutely perfect – those crispy edges give you that satisfying crunch, while the center stays soft and chewy for days. The chocolate chunks create these beautiful melted pools that make every bite different. I also love that the dough can be made ahead and kept in the fridge for up to 3 days, or frozen for up to 3 months. This means I can have fresh-baked cookies whenever I want with minimal effort. The recipe is forgiving too – even if you slightly overbake them, they're still delicious. These cookies have become my go-to for everything from casual weeknight treats to impressive gifts for friends and family.
What You Need From Your Kitchen
- Unsalted butter: Bring to room temperature for easy creaming with the sugars
- Brown sugar: Adds moisture and chewiness to the cookies
- Eggs: Use large eggs at room temperature for better incorporation
- All-purpose flour: Measure by spooning into cups and leveling off for accuracy
- Chocolate chunks: Use high-quality dark or semi-sweet chocolate, roughly chopped for varying sizes
- Vanilla extract: Use pure vanilla extract for the best flavor
Let's Make These Together
- Prepare the dry mixture
- Start by whisking together your flour, baking soda, and salt in a medium bowl. This step ensures that the baking soda is evenly distributed throughout the flour, which will help your cookies rise uniformly. Set this bowl aside while you work on the wet ingredients.
- Cream butter and sugars
- In a large bowl using an electric mixer, beat the room temperature butter with both the brown and granulated sugars. Mix on medium-high speed for about 3-4 minutes until the mixture becomes light, fluffy, and pale in color. This creaming process incorporates air into the dough, which contributes to the cookie's texture. Add the eggs one at a time, mixing well after each addition, then stir in the vanilla extract.
- Combine and fold
- Gradually add the dry ingredients to the wet mixture, folding gently with a spatula or mixing on low speed until just combined. Be careful not to overmix, as this can lead to tough cookies. Fold in the chocolate chunks, reserving some to press on top later. The dough will be thick and slightly sticky.
- Chill the dough
- Cover the bowl tightly with plastic wrap and refrigerate for at least 2 hours, preferably overnight. This chilling period allows the flour to fully absorb the liquid ingredients and helps prevent the cookies from spreading too much during baking. Cold dough also bakes up thicker and chewier.
- Shape and bake
- Preheat your oven to 350°F and line baking sheets with parchment paper. Using a large cookie scoop, portion out the chilled dough into balls about 3 tablespoons each. Place them on the prepared sheets with plenty of space between each one. Press extra chocolate chunks on top of each dough ball for that signature bakery look. Bake for 11-13 minutes until the edges are golden but centers still look slightly soft.
- Cool properly
- As soon as the cookies come out of the oven, sprinkle them with flaky sea salt. Let them cool on the baking sheet for 5 minutes before transferring to a wire rack. This cooling time on the sheet allows them to finish setting while maintaining their thick, chewy texture.
 pin it
Switch Things Up
I first attempted these cookies on a rainy Sunday when I was craving something from my favorite bakery but didn't want to leave the house. I experimented with different chocolate ratios and chilling times until I achieved that signature thick, tall cookie that doesn't spread too much. The game-changer was using room temperature butter mixed with melted butter – it creates the perfect texture. I also learned that using a mix of chocolate chips and hand-chopped chocolate chunks gives you those beautiful chocolate pools you see in bakery cookies. Now I make a double batch every time because they disappear so quickly. My neighbor actually knocked on my door once asking if I'd opened a bakery because the smell was so incredible!
Perfect Pairings
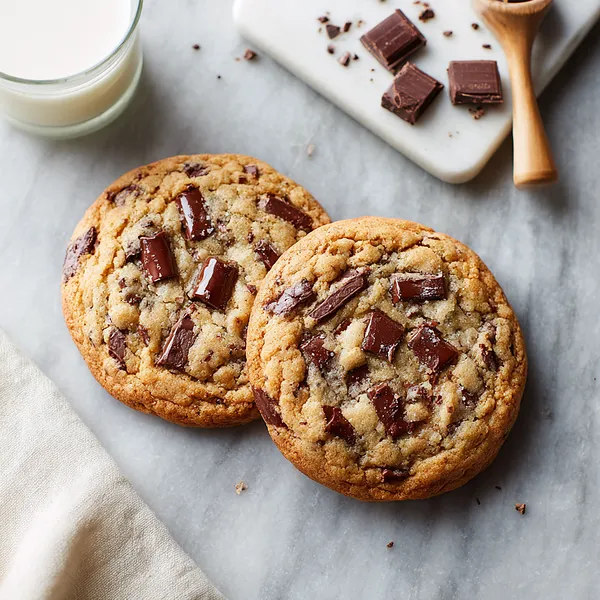
These cookies pair beautifully with a tall glass of cold whole milk, which is absolutely classic and perfect for dunking. For a more sophisticated pairing, try them with a rich espresso or cappuccino – the coffee cuts through the sweetness wonderfully. They're also incredible served warm with a scoop of vanilla ice cream for an indulgent dessert. For a fun twist, sandwich two cookies together with some Nutella or peanut butter in the middle.
 pin it
Frequently Asked Questions
- → Why do I need to chill the dough?
Chilling the dough is crucial for achieving thick, bakery-style cookies. When the dough is cold, it doesn't spread as quickly in the oven, allowing the cookies to bake up taller. The chilling time also allows the flour to fully hydrate, which improves the texture and flavor. For best results, chill for at least 2 hours, but overnight is even better.
- → Can I use chocolate chips instead of chunks?
Yes, you can use chocolate chips, but chunks give you those beautiful melted chocolate pools that make these cookies look bakery-perfect. For the best results, use a combination of chocolate chips and hand-chopped chocolate bars. The varied sizes create more visual interest and different textures throughout each cookie.
- → How do I know when the cookies are done?
The cookies are done when the edges are golden brown and set, but the centers still look slightly underbaked and soft. They will continue to cook on the hot baking sheet after you remove them from the oven. If you wait until the centers look fully baked in the oven, they'll be overdone and crispy rather than chewy.
- → Can I freeze the cookie dough?
Absolutely! These cookies freeze beautifully. After portioning the chilled dough into balls, place them on a baking sheet and freeze until solid (about 1 hour). Then transfer to a freezer bag and store for up to 3 months. You can bake them directly from frozen – just add 1-2 minutes to the baking time.
- → Why add sea salt on top?
The flaky sea salt on top isn't just decorative – it actually enhances the flavor of the chocolate and balances the sweetness of the cookies. The salt crystals also add a pleasant textural contrast. Use a good quality flaky sea salt like Maldon for the best results.
- → How should I store these cookies?
Store the cooled cookies in an airtight container at room temperature for up to a week. To keep them extra soft, you can add a slice of bread to the container – it helps maintain moisture. If you want to refresh them, warm them in the microwave for 10-15 seconds.
Conclusion
These Ultra Thick Bakery-Style Chocolate Chip Cookies are the ultimate treat for cookie lovers. With their perfect texture contrast between crispy edges and gooey centers, loaded with melted chocolate chunks, they're everything a chocolate chip cookie should be. The addition of flaky sea salt elevates them from homemade to bakery-quality. They store beautifully for up to a week, though they rarely last that long in my house!