
 pin it
I describe these Strawberry Crunch Cookies as pure happiness in cookie form. The first time I encountered a similar cookie was at a small bakery in Portland, where they charged five dollars per cookie – and they were worth it. That experience inspired me to recreate something similar at home, and after several attempts, I landed on this recipe. What makes these cookies special is the layers of texture and flavor. You start with a rich, buttery dough that's sweetened just enough to let the strawberry shine through. Then comes the strawberry jam, which bakes into the cookie and creates these beautiful pockets of fruity goodness. The vanilla wafer crumb coating is my secret weapon – it adds this incredible crunch that contrasts perfectly with the soft cookie. Finally, that pink glaze ties everything together with a sweet finish and makes them look absolutely bakery-worthy. Every bite is a journey from crispy exterior to soft, strawberry-filled center, and I never get tired of making them.
Why I love this recipe
I love this recipe because it transforms simple pantry ingredients into something that looks and tastes like it came from a fancy bakery. The process is straightforward enough for beginners, but the results are impressive enough to wow experienced bakers. What really wins me over is the texture contrast – that crunchy coating against the soft, buttery cookie is addictive. I also appreciate how versatile these cookies are. You can make them for a kids' party and they'll be a hit, or serve them at an elegant brunch and receive compliments all around. The recipe is forgiving too – if your jam layer is a bit thicker or thinner, they still turn out great. And let's talk about how they make your house smell! The combination of butter and strawberries baking is absolutely heavenly. Plus, they're beautiful cookies. That pink glaze drizzle makes them Instagram-worthy without requiring any special decorating skills. I've made these cookies dozens of times, and they never disappoint.
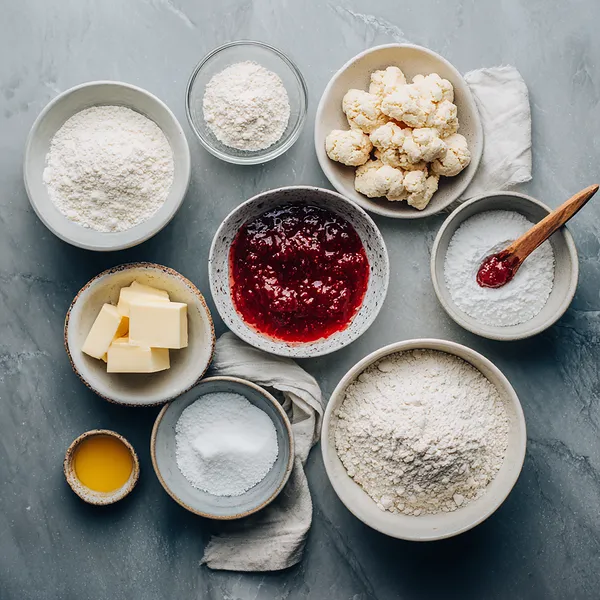
What You Need From Your Kitchen
- All-purpose flour: Forms the base structure of the cookies, providing the perfect texture
- Unsalted butter: Cream with sugar until fluffy for a rich, tender cookie base
- Granulated sugar: Sweetens the dough and helps create a light texture when creamed with butter
- Egg: Binds the ingredients together and adds richness to the cookie dough
- Strawberry jam: Fill the center indentations to create fruity pockets in each cookie
- Vanilla wafer crumbs: Press into the jam topping to create the signature crunchy coating
- Powdered sugar: Mix with milk and food coloring to create the sweet pink glaze drizzle
Let's Make These Together
- Prepare the Cookie Dough
- Begin by preheating your oven and lining your baking sheets. Cream the softened butter and sugar together until the mixture becomes light and fluffy, which should take about three minutes with an electric mixer. This step is crucial as it incorporates air into the dough, making your cookies tender. Add your egg and vanilla, then gradually incorporate the flour until you have a smooth, workable dough.
- Shape and Add Strawberry Centers
- Roll the dough into uniform balls and arrange them on your prepared baking sheets with adequate spacing. Create indentations in each cookie using your thumb or a small spoon, being careful not to press all the way through to the bottom. Carefully spoon strawberry jam into each indentation, filling them generously but not overflowing.
- Apply the Crunchy Coating
- Take each jam-topped cookie and gently press it into your vanilla wafer crumbs. The jam will act as an adhesive, causing the crumbs to stick and create that beautiful crunchy topping. This layer not only adds texture but also creates visual appeal with its golden color.
- Bake to Golden Perfection
- Place your cookies in the preheated oven and bake until the edges just begin to turn golden. The centers might look slightly underdone, but they'll continue cooking as they cool. Let them rest on the baking sheet briefly before transferring to a cooling rack to prevent breakage.
- Finish with Pink Glaze
- Prepare your pink glaze by whisking together powdered sugar, milk, and food coloring until smooth. Once your cookies are completely cool, drizzle this beautiful pink glaze over them in artistic patterns. Allow the glaze to set before serving for the best presentation and texture.
 pin it
Switch Things Up
I first made these cookies on a rainy Saturday afternoon when I was craving something sweet but didn't want to run to the store. I had strawberry jam in the pantry and some vanilla wafers that needed using up, so I started experimenting. The first batch was good, but when I added that crunchy coating pressed into the jam before baking, everything changed. The texture became incredible – crispy on the outside, soft and buttery inside. My neighbor stopped by just as they came out of the oven, and after trying one, she insisted I write down the recipe immediately. Now I make them whenever I need to bring something impressive to a gathering. The pink glaze was my daughter's idea, and honestly, it took these cookies from homemade to bakery-level gorgeous. Sometimes the best recipes come from just playing around in the kitchen with what you have!
Perfect Pairings
These Strawberry Crunch Cookies pair beautifully with a cold glass of milk or a hot cup of coffee. For a more sophisticated pairing, try them with vanilla ice cream or fresh whipped cream for a simple but elegant dessert. They also work wonderfully alongside fresh strawberries and other berries for a summer dessert platter. If you're serving them at a party, consider pairing them with lemon bars or chocolate chip cookies for variety. The sweet strawberry flavor also complements Earl Grey tea perfectly, making them ideal for an afternoon tea service.
 pin it
Frequently Asked Questions
- → Can I use a different type of jam?
Absolutely! While strawberry jam is traditional, you can substitute raspberry, blackberry, or even apricot jam. Each will give the cookies a slightly different flavor profile but will work equally well with the buttery cookie base and crunchy topping.
- → How do I prevent the cookies from spreading too much?
Make sure your butter is softened but not melted, and chill the shaped cookies for 15 minutes before baking if your kitchen is warm. Also, ensure your oven is fully preheated before baking, as starting with a hot oven helps the cookies set properly.
- → Can I make these cookies ahead of time?
Yes! You can bake the cookies and store them unglazed in an airtight container for up to 3 days, then add the glaze just before serving. You can also freeze the baked cookies for up to 2 months and thaw them before glazing.
- → What if I don't have vanilla wafers for the crumb topping?
Graham cracker crumbs work wonderfully as a substitute and will give a slightly different but equally delicious flavor. You could also use crushed shortbread cookies or even finely ground almonds for a nutty variation.
- → Why did my glaze turn out too thick or too thin?
The consistency of your glaze depends on the powdered sugar-to-liquid ratio. If it's too thick, add milk one teaspoon at a time until it reaches a drizzling consistency. If too thin, add more powdered sugar a tablespoon at a time. The glaze should flow slowly off a spoon but not be watery.
Conclusion
These Strawberry Crunch Cookies are the perfect combination of texture and flavor. The buttery cookie base provides a soft foundation, while the strawberry jam adds fruity sweetness and the crunchy coating creates an irresistible contrast. The pink glaze not only makes them visually stunning but also adds that final touch of sweetness. Whether you're baking for a party, a bake sale, or just because you deserve something special, these cookies deliver every time. They store well in an airtight container for up to five days, though they rarely last that long in my house!