
 pin it
I'll never forget the first time I encountered bacon bombs at a friend's backyard cookout five summers ago. They were passed around on a platter, and I grabbed one without really knowing what I was getting into. That first bite was a revelation—the crispy, caramelized bacon gave way to this incredibly juicy meatball, and then came the surprise of molten cheddar cheese in the center. I immediately asked for the recipe and have been making my own version ever since. What I love about this recipe is how it takes three simple ingredients that everyone loves—bacon, beef, and cheese—and transforms them into something that feels special and indulgent. The BBQ glaze adds that perfect sweet and tangy finish that ties everything together. These bacon bombs represent everything I love about comfort food: they're hearty, satisfying, and bring people together. Every time I make them, I'm transported back to that summer cookout, standing around with friends, laughing and enjoying good food. They've become my signature dish at gatherings, and I take pride in watching people's faces light up when they take that first bite and discover the melted cheese center.
Why I love this recipe
There are so many reasons why these Cheddar-Stuffed BBQ Bacon Bombs have become one of my all-time favorite recipes. First, they're incredibly versatile—perfect as an appetizer, main course, or party snack. I love that they can be prepared ahead of time and baked when needed, which takes so much stress out of entertaining. The combination of textures is what really gets me: that crispy, slightly chewy bacon exterior contrasting with the tender, juicy meatball and the creamy, melted cheese center. It's a textural experience in every bite. The flavor profile is also perfectly balanced—the smoky bacon, tangy BBQ sauce, savory beef, and sharp cheddar all work together harmoniously. What really makes me love this recipe is how it never fails to impress. Whether I'm serving them to my family on a weeknight or bringing them to a potluck, they always get rave reviews. They're also surprisingly easy to make despite looking and tasting gourmet. I appreciate that I can customize them with different cheeses, seasonings, or glazes depending on my mood. Most importantly, these bacon bombs bring joy to everyone who tries them, and that's what cooking is all about for me.
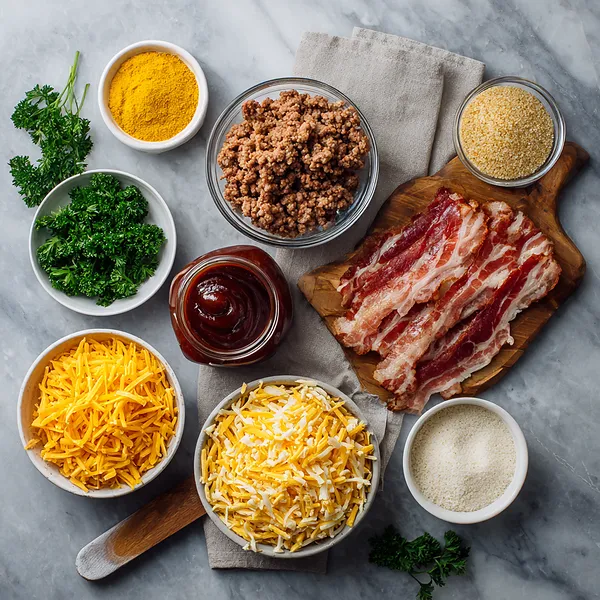
What You Need From Your Kitchen
- Ground Beef: Use 80/20 ground beef for the best flavor and juiciness. Leaner beef can result in dry meatballs.
- Cheddar Cheese: Sharp cheddar provides the best flavor, but use what you prefer. Cut into small cubes or use shredded for easier stuffing.
- Bacon: Regular cut bacon works best. Thick-cut bacon may not cook through properly, while thin bacon can become too crispy.
- BBQ Sauce: Use your favorite brand or homemade BBQ sauce. Sweet and smoky varieties work particularly well.
- Breadcrumbs: Helps bind the meat mixture and keeps the meatballs tender. Can substitute with crushed crackers or gluten-free breadcrumbs.
- Egg: Acts as a binder to hold the meat mixture together.
Let's Make These Together
- Mix the Perfect Meat Base
- Start by combining your ground beef with breadcrumbs, egg, and seasonings in a large bowl. The key here is to mix gently—overworking the meat will result in tough, dense meatballs. Use your hands to incorporate everything until just combined, leaving some texture in the mixture. This ensures your bacon bombs will be tender and juicy once baked.
- Stuff with Melty Cheese
- Take about 2 tablespoons of meat mixture and flatten it in your palm like a small patty. Place a generous amount of shredded cheddar in the center—don't be shy with the cheese! Carefully fold the meat around the cheese, making sure to seal it completely. Roll it into a smooth ball between your palms. The cheese must be fully enclosed or it will leak out during baking.
- Wrap in Crispy Bacon
- Take one strip of bacon and begin wrapping it around your meatball in a spiral pattern, starting at one end and working your way around. The bacon should overlap slightly to ensure full coverage. Place the wrapped ball seam-side down on your prepared baking sheet—this helps keep everything in place. If the bacon won't stay put, secure it with a toothpick, but make sure to remove it before serving.
- Bake Until Golden
- Pop your bacon bombs into a 375°F oven for about 25 minutes. During this time, the bacon will render its fat and start to crisp while the meat cooks through. The aroma will be absolutely incredible. After 25 minutes, carefully drain off any excess grease from the pan—this helps the bacon get extra crispy in the final stage.
- Glaze to Perfection
- Now comes the best part—brushing on that BBQ sauce! Use a pastry brush to generously coat each bacon bomb with your favorite BBQ sauce. Make sure to get all sides for maximum flavor. Return them to the oven for another 10 minutes. The sauce will caramelize into a beautiful, glossy glaze while the bacon finishes crisping up. Let them rest for 5 minutes before serving to allow the cheese to set slightly and prevent any tongue-burning incidents!
 pin it
Switch Things Up
I first made these bacon bombs for a Super Bowl party three years ago, and they've been requested at every gathering since. I remember being skeptical about whether the cheese would stay inside during baking, but I was amazed at how perfectly they turned out. The trick is to really seal that meatball around the cheese cube. Now I make these at least once a month because my kids absolutely love them for dinner. I've experimented with different cheeses—pepper jack adds a nice kick, and smoked gouda gives them a gourmet twist. One time I ran out of BBQ sauce and used a honey-sriracha glaze instead, which was incredible. My neighbor always asks me to bring these to block parties, and I've shared the recipe with at least a dozen people. They're also fantastic for meal prep—I'll make a big batch, freeze them uncooked, and then just pop them in the oven whenever we need a quick protein-packed snack or appetizer.
Perfect Pairings
These BBQ Bacon Bombs pair beautifully with classic sides that complement their smoky, savory flavors. Serve them alongside creamy coleslaw to cut through the richness, or offer crispy potato wedges and ranch dip for a complete appetizer spread. For drinks, an ice-cold beer or a sweet iced tea balances the savory bacon perfectly. If you're making these for a party, set out some pickled jalapeños, extra BBQ sauce for dipping, and a fresh garden salad to round out the menu. They also work wonderfully as part of a larger BBQ spread with baked beans, cornbread, and grilled vegetables.
 pin it
Frequently Asked Questions
- → Can I make these ahead of time?
Absolutely! You can assemble the bacon bombs up to 24 hours in advance and store them covered in the refrigerator. When ready to bake, add an extra 5-10 minutes to the cooking time since they'll be going in cold. You can also freeze them unbaked for up to 3 months—just bake from frozen, adding 10-15 minutes to the total time.
- → Why is my cheese leaking out?
The most common reason for cheese leakage is not fully sealing the meat around the cheese. Make sure the cheese is completely enclosed with no gaps. Also, don't overfill—use about a tablespoon of cheese per meatball. If you're still having issues, try using cheese cubes instead of shredded cheese, as they hold their shape better during cooking.
- → Can I use turkey or chicken instead of beef?
Yes! Ground turkey or chicken work great as substitutes. Since these meats are leaner, consider adding a tablespoon of olive oil to the mixture to keep them moist. You may also want to add extra seasonings as poultry has a milder flavor than beef. The cooking time should remain the same, but always check that the internal temperature reaches 165°F for poultry.
- → How do I get the bacon extra crispy?
For super crispy bacon, you can partially pre-cook the bacon strips for 3-4 minutes before wrapping them around the meatballs. This renders some of the fat and makes the bacon more pliable. Also, make sure to drain the excess fat after the initial 25 minutes of baking—this allows the bacon to crisp up rather than steam in its own fat during the final glazing stage.
- → What other cheeses work well in this recipe?
While cheddar is classic, you can experiment with many different cheeses! Pepper jack adds a nice kick of heat, mozzarella creates an extra gooey center, smoked gouda adds sophistication, and even blue cheese works for adventurous eaters. Just make sure whatever cheese you choose melts well. Avoid hard cheeses like parmesan as the main filling, though they can be mixed into the meat mixture.
- → Can I cook these in an air fryer?
Yes! Air frying is a great option for bacon bombs. Preheat your air fryer to 375°F and cook for 18-20 minutes, flipping halfway through. Brush with BBQ sauce during the last 5 minutes of cooking. The bacon gets incredibly crispy in the air fryer, and you'll have less grease to deal with. Just make sure not to overcrowd the basket—work in batches if necessary.
Conclusion
These Cheddar-Stuffed BBQ Bacon Bombs are the ultimate crowd-pleaser that combines everything we love—bacon, cheese, and BBQ flavor in one incredible bite. They're perfect for entertaining, game day parties, or when you want to impress your family with something special. The crispy bacon exterior gives way to a juicy, flavorful meatball with a molten cheddar center that's absolutely irresistible. Make them ahead of time and reheat when needed, or serve them fresh from the oven with extra BBQ sauce for dipping. Once you try these, they'll become your go-to appetizer for every occasion!