
 pin it
I first discovered the magic of beef and cheese burritos during a road trip through California years ago. We stopped at this tiny taqueria in San Diego, and I ordered what looked like the simplest thing on the menu – just beef and cheese. But when I took that first bite, I was blown away by how something so straightforward could be so incredibly satisfying. The beef was perfectly seasoned with cumin and chili powder, the cheese was melted to gooey perfection, and the tortilla had been griddled until it had these beautiful golden spots. Since then, I've been on a mission to recreate that experience at home. This recipe is the result of years of tweaking and testing. I've tried different cheese blends, various spice combinations, and multiple cooking methods. What I've landed on is a version that captures that original magic while being simple enough for a weeknight dinner. The key is using quality ground beef and not skimping on the seasoning. I brown the beef with diced onions until it's deeply flavorful, then I fold in the cheese while everything's still hot so it melts beautifully. When I wrap these burritos, I make sure to get a good seal and then give them a quick toast in a dry skillet. That final step creates a crispy exterior that contrasts perfectly with the soft, cheesy interior.
Why I love this recipe
This recipe holds a special place in my heart because it represents everything I love about home cooking – it's simple, satisfying, and brings people together. I love how forgiving these burritos are; you can adjust the seasonings to your taste, add vegetables if you're feeling virtuous, or keep it pure and simple when you just want comfort food. What really makes me happy is watching my family's faces light up when I serve these. There's something about that first bite, when you hit that perfect combination of crispy tortilla, savory beef, and melted cheese, that just makes people smile. I also appreciate how this recipe has evolved with my cooking journey. When I first started making these, I used pre-packaged taco seasoning. Now I blend my own spices, adjusting the heat level and flavors to create something uniquely mine. These burritos have been there for me through busy work weeks, lazy Sunday brunches, and impromptu gatherings with friends. They're proof that you don't need complicated techniques or exotic ingredients to create something truly delicious. Sometimes the best recipes are the ones that feel like a warm hug, and that's exactly what these beef and cheese burritos are to me.
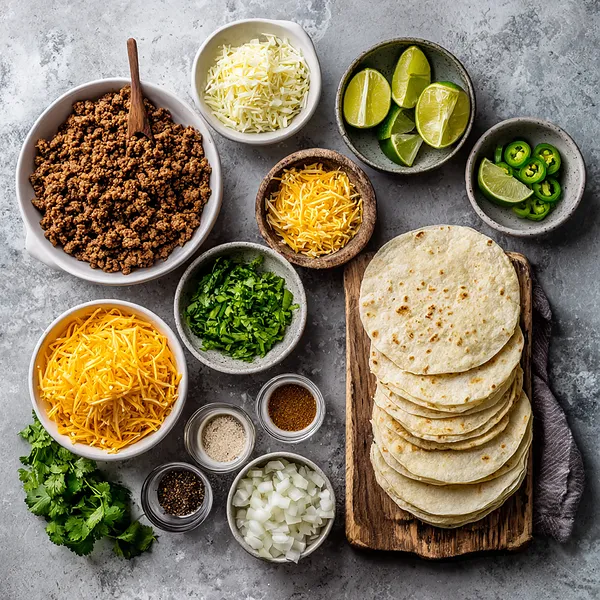
What You Need From Your Kitchen
- Ground Beef: Brown thoroughly with onions until no pink remains, then season generously
- Cheddar Cheese: Use freshly shredded for best melting; divide between mixing into beef and topping
- Flour Tortillas: Warm before using to make them pliable and prevent tearing during rolling
- Onion: Dice finely and cook with the beef until softened and translucent
- Salsa: Mix into the beef for moisture and additional flavor depth
- Taco Seasoning: Add to the beef mixture for authentic Mexican-inspired flavor
Let's Make These Together
- Brown the Beef Mixture
- Start by heating your skillet over medium-high heat and adding the ground beef along with diced onions. Break up the meat as it cooks, ensuring even browning. This should take about 6-8 minutes. You'll know it's ready when there's no pink remaining and the onions have softened beautifully. Don't skip draining the fat – this keeps your burritos from getting soggy.
- Season and Add Cheese
- Once your beef is perfectly browned, it's time to build those flavors. Stir in your taco seasoning and salsa, letting everything simmer together for a few minutes. The mixture will thicken slightly and the spices will bloom. Remove from heat and fold in half of your cheese while the mixture is still hot. The residual heat will melt it into a creamy, cohesive filling.
- Prep Your Tortillas
- This step is crucial for preventing torn burritos! Warm each tortilla either in a dry skillet or wrapped in a damp paper towel in the microwave. A warm, pliable tortilla is your best friend when it comes to rolling. Take your time with this step – it makes all the difference.
- Assemble with Care
- Lay out your warm tortilla and spoon that delicious beef mixture right into the center. Don't overfill – about a quarter of the mixture per burrito is perfect. Top with remaining cheese and a dollop of sour cream. Now comes the fold: sides in first, then roll from bottom to top, keeping everything tight and secure.
- Create That Golden Crisp
- Here's where the magic happens. Place your rolled burritos seam-side down in your heated skillet. Let them cook undisturbed for 2-3 minutes per side until you get those gorgeous golden-brown spots. This final toasting not only adds texture but ensures all that cheese inside is perfectly melted and gooey. Garnish with fresh cilantro and get ready for those cheese pulls!
 pin it
Switch Things Up
I remember the first time I made these burritos for a last-minute dinner party. I had completely forgotten about my commitment until 5 PM, and panic set in. But then I remembered I had ground beef in the fridge and tortillas in the pantry. I quickly browned the beef with some onions and spices, melted in some cheese, and wrapped everything up. When I served them with a simple side of chips and guacamole, my guests couldn't stop raving about them. One friend even asked if I'd been secretly practicing Mexican cooking! The best part? The whole thing took me less than 30 minutes. Now, these burritos are my go-to for busy nights. Sometimes I add black beans for extra heartiness, or swap the cheddar for pepper jack when I'm craving heat. My kids have even started requesting them for their school lunches – I just wrap them tightly in foil and they reheat beautifully. What started as a panic dinner has become a beloved family staple.
Perfect Pairings
These beefy burritos pair beautifully with classic Mexican sides. Serve them alongside crispy tortilla chips with fresh guacamole and pico de gallo for a complete meal. Spanish rice or cilantro-lime rice makes an excellent accompaniment, soaking up any filling that escapes. For a lighter option, pair with a simple mixed green salad dressed with lime vinaigrette. Refried beans or black beans seasoned with cumin complement the beef perfectly. Don't forget the toppings bar – set out bowls of sour cream, salsa, pickled jalapeños, and extra cheese so everyone can customize their burrito. For beverages, ice-cold Mexican beer, horchata, or a tangy margarita round out the meal perfectly.
 pin it
Frequently Asked Questions
- → Can I make these burritos ahead of time?
Absolutely! You can prepare the beef mixture up to 2 days in advance and store it in the refrigerator. When you're ready to eat, simply reheat the filling, warm your tortillas, and assemble. You can also make fully assembled burritos and refrigerate them for up to 24 hours before the final toasting step.
- → What's the best way to reheat leftover burritos?
For best results, reheat burritos in a 350°F oven wrapped in foil for about 15-20 minutes. This keeps them from drying out while ensuring the filling is heated through. Alternatively, you can microwave them for 1-2 minutes, but they won't have that crispy exterior. If you have time, re-toasting them in a skillet gives you back that perfect texture.
- → Can I use a different type of meat?
Definitely! Ground turkey or chicken work wonderfully as substitutes for beef. You can also use shredded rotisserie chicken for an even quicker version. For a vegetarian option, black beans or refried beans make an excellent protein-rich filling. Just adjust your seasoning accordingly – beans may need a bit more spice than meat.
- → How do I prevent my burritos from falling apart?
The key is using warm, pliable tortillas and not overfilling them. Make sure to fold the sides in securely before rolling, and always place them seam-side down when toasting. If your tortillas keep tearing, they might be too cold or too dry – a quick warm-up usually solves this problem. Also, letting the filling cool slightly before assembling helps prevent the tortillas from getting soggy.
- → What size tortillas should I use?
Large burrito-size flour tortillas (10-12 inches in diameter) work best for this recipe. They give you enough room to fold and roll without the filling spilling out. Smaller tortillas can work if you reduce the amount of filling per burrito, but you might end up making 6 smaller burritos instead of 4 larger ones.
- → Can these burritos be frozen?
Yes, they freeze exceptionally well! After assembling the burritos (but before the final toasting), wrap each one tightly in plastic wrap, then in foil. They'll keep in the freezer for up to 3 months. To reheat, remove the plastic wrap, keep the foil on, and bake at 350°F for 35-40 minutes from frozen, or thaw overnight in the refrigerator and bake for 20-25 minutes.
Conclusion
These beef and cheese burritos are the answer to your weeknight dinner prayers. They're quick, satisfying, and endlessly customizable to suit your family's tastes. The combination of perfectly seasoned beef and melted cheese wrapped in a warm tortilla is pure comfort food magic. Whether you're feeding hungry teenagers after practice or need a quick lunch solution, these burritos deliver every time. Make a double batch and freeze extras for those really busy days!