
 pin it
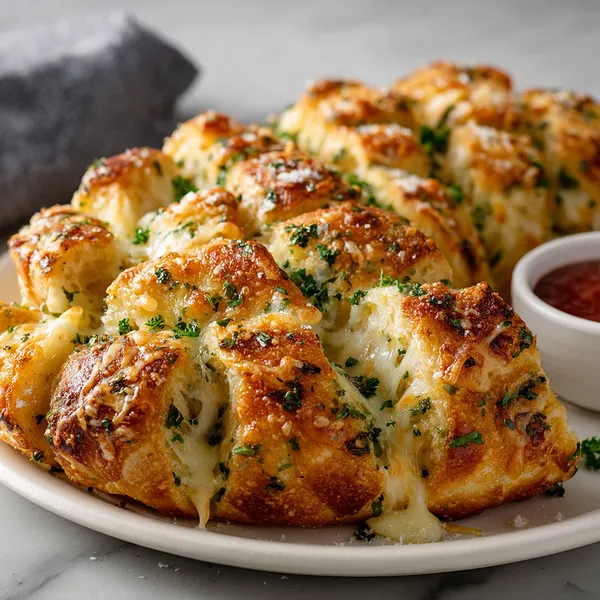
I describe this recipe as pure holiday magic in bread form. The first time I encountered pull-apart bread was at a friend's Super Bowl party, but it was just a basic garlic bread ring. When I decided to make a Christmas version, I knew I wanted to elevate it with that tree shape and really amp up the cheese factor. What makes this recipe special is the combination of textures and flavors – you've got the soft, pillowy dough that's been enriched with garlic butter, the stretchy mozzarella hiding inside each ball, and that golden parmesan crust on the outside. The fresh herbs add a pop of color and brightness that cuts through the richness. I love how interactive this bread is. Unlike a regular loaf where you slice it, this one invites people to just reach in and pull off a piece. There's something so satisfying about that cheese pull! The tree shape makes it feel special and festive, but the technique is straightforward enough that even novice bakers can pull it off. I've taught several friends to make this, and they all say the same thing: it looks way more complicated than it actually is. The key is working with room temperature dough and not overstuffing the cheese, which I learned the hard way my first attempt.
Why I love this recipe
I love this recipe because it brings joy to every gathering without requiring professional baking skills. There's something about the presentation – that Christmas tree shape covered in golden, bubbling cheese – that makes people's faces light up when you bring it to the table. It's a conversation starter, an Instagram moment, and most importantly, it's absolutely delicious. The recipe is also incredibly versatile. I've made it with different cheeses, added various herbs, and even created savory variations with pesto or sun-dried tomatoes. But what I love most is how it makes everyone feel included. The pull-apart format means there's no need for plates or utensils – people just grab a piece and enjoy. It's casual and fun, which is exactly the vibe I want at holiday gatherings. Plus, the aroma while it's baking is unbeatable. That combination of garlic, butter, and melting cheese fills your entire home and gets everyone excited. I also appreciate that most of the work can be done ahead – you can shape the tree and refrigerate it, then just brush with butter and bake when you're ready. It's a recipe that looks impressive but doesn't stress you out, and that's the kind of holiday cooking I'm all about.
What You Need From Your Kitchen
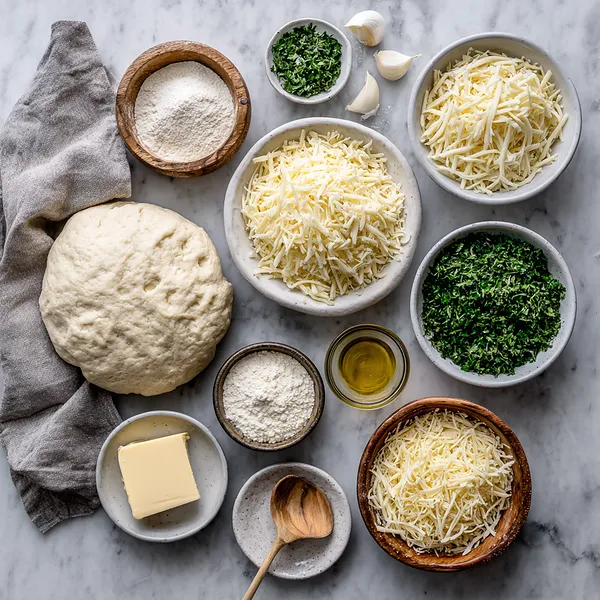
- Pizza dough: The base of the recipe; can be store-bought or homemade, should be at room temperature for easy handling
- Mozzarella cheese: Provides the signature cheese pull; shred from a block for best melting results
- Butter: Melted and mixed with garlic for brushing; creates the golden, flavorful exterior
- Garlic: Freshly minced and mixed into the butter for aromatic flavor throughout
- Fresh parsley: Chopped and used both in the butter mixture and as garnish for color and freshness
- Parmesan cheese: Grated and sprinkled on top before baking for extra cheesy, golden crust
- Marinara sauce: Warmed and served on the side for dipping each pull-apart piece
Let's Make These Together
- Prepare Your Workspace
- Start by preheating your oven and lining your baking sheet with parchment paper. This prevents sticking and makes cleanup easy. If you're using store-bought dough, let it come to room temperature while you prep your other ingredients. Room temperature dough is much more pliable and easier to shape into balls without tearing. Divide your dough into equal pieces – I find that 25-30 pieces work best for creating a nicely proportioned tree shape.
- Stuff and Seal
- This is where the magic happens. Flatten each piece of dough in your palm and place a small amount of mozzarella in the center. The key here is not to overstuff – about a teaspoon of cheese per ball is perfect. Carefully bring the edges up and over the cheese, pinching firmly to seal. Roll the ball between your palms to create a smooth, round shape. If you see any gaps where cheese is peeking through, pinch them closed. Properly sealed balls ensure you get that amazing cheese pull without losing cheese onto your baking sheet.
- Create the Tree Shape
- Now comes the fun part – arranging your tree. Start with one ball at the top for the star point. Then build rows underneath, increasing the number of balls in each row to create that classic Christmas tree triangular shape. Place the balls close together, almost touching, because they'll expand and fuse together as they bake. Don't forget to add a few balls at the bottom to form the tree trunk. Stand back and adjust the shape as needed before moving to the next step.
- Apply Garlic Butter
- Mix your melted butter with minced garlic, herbs, and parsley to create an incredibly aromatic coating. Use a pastry brush to generously apply this mixture all over the dough balls, getting into every nook and cranny. Don't be shy with the butter – it's what creates that irresistible golden crust and carries all those delicious flavors into every bite. Finish by sprinkling parmesan cheese over the entire tree for an extra layer of cheesy goodness.
- Bake to Perfection
- Slide your tree into the preheated oven and bake until golden brown and fragrant. You'll know it's ready when the top is beautifully golden and you can see the cheese bubbling between the balls. The aroma will be absolutely incredible. If the top starts browning too quickly, just tent it loosely with foil. Once baked, brush with any remaining garlic butter, sprinkle with fresh parsley, and serve immediately while it's still warm and the cheese is at peak stretchiness. Have your marinara sauce ready for dipping!
 pin it
Switch Things Up
I first made this Christmas tree bread three years ago when I was looking for something more exciting than the usual cheese and crackers for our holiday party. I'd seen pull-apart breads before but never in a festive shape. The first time I arranged those dough balls into a tree pattern, I wasn't sure it would work – but when it came out of the oven all golden and gorgeous, I actually gasped. My niece said it looked like something from a bakery window. Now it's become our tradition. I make two because one tree is never enough. Last year, I experimented with adding some crumbled cooked bacon between the dough balls, and let me tell you, that was a game-changer. I've also tried tucking in some sun-dried tomatoes for extra flavor. The beauty of this recipe is how forgiving it is – even if your tree shape isn't perfect, once it's baked and golden, it looks amazing. Just remember to really seal in that cheese when you're forming the balls, or you'll have a cheesy mess (which, honestly, still tastes incredible).
Perfect Pairings
This Cheesy Christmas Tree Bread pairs beautifully with warm marinara sauce for dipping, but don't stop there. Serve it alongside a fresh Caesar salad to balance the richness, or offer it as part of a larger appetizer spread with antipasto, olives, and cured meats. It's also fantastic with a creamy spinach artichoke dip on the side. For beverages, try it with a crisp white wine like Pinot Grigio, or for a festive touch, serve with sparkling cranberry cocktails. If you're making this for a casual gathering, pair it with your favorite craft beer or a light Italian red wine.
 pin it
Frequently Asked Questions
- → Can I make this Christmas tree bread ahead of time?
Yes! You can shape the entire tree, cover it tightly with plastic wrap, and refrigerate for up to 4 hours before baking. When ready to bake, let it sit at room temperature for 10 minutes, brush with the garlic butter mixture, and bake as directed. You may need to add 2-3 extra minutes to the baking time if starting from cold.
- → What if I don't have pizza dough?
You can use refrigerated biscuit dough as a shortcut, or make a simple bread dough from scratch using flour, yeast, water, and a pinch of sugar. Frozen bread dough (thawed) also works well. The texture will vary slightly depending on which option you choose, but all will be delicious.
- → Can I add other ingredients besides mozzarella?
Absolutely! Try adding small pieces of pepperoni, cooked bacon bits, sun-dried tomatoes, or different cheeses like cheddar or provolone. Just make sure any additions are finely chopped so they fit inside the dough balls and don't prevent proper sealing. Some people love adding a small basil leaf with the cheese for extra flavor.
- → Why is my cheese leaking out during baking?
This usually happens when the dough balls aren't sealed properly. Make sure you're pinching the seams tightly closed and there are no gaps in the dough. Also, don't overstuff the balls – less cheese is better for preventing leaks. If you do have some leakage, don't worry – it'll create crispy cheese bits that are delicious!
- → How do I store and reheat leftovers?
Store leftover bread in an airtight container in the refrigerator for up to 3 days. To reheat, place on a baking sheet and warm in a 350°F oven for 8-10 minutes until heated through and the cheese is melty again. Avoid microwaving as it can make the bread tough and rubbery. You can also freeze the baked bread for up to 1 month.
- → Can I make this in different shapes besides a Christmas tree?
Definitely! This technique works for any shape you can imagine. Try a wreath shape for holidays, a heart for Valentine's Day, or just a simple circle for year-round enjoyment. You can also make individual mini versions by using fewer balls and creating smaller, personal-sized portions. The baking time may need slight adjustment for different shapes.
Conclusion
This Cheesy Christmas Tree Bread is the ultimate holiday appetizer that combines fun presentation with incredible flavor. The pull-apart format makes it perfect for sharing, while the garlic butter and melted cheese ensure every bite is absolutely delicious. Whether you're hosting a Christmas party or looking for a festive addition to your holiday dinner, this bread will steal the show. It's a recipe that brings people together – quite literally as they gather around to pull off piece after cheesy piece!