
 pin it
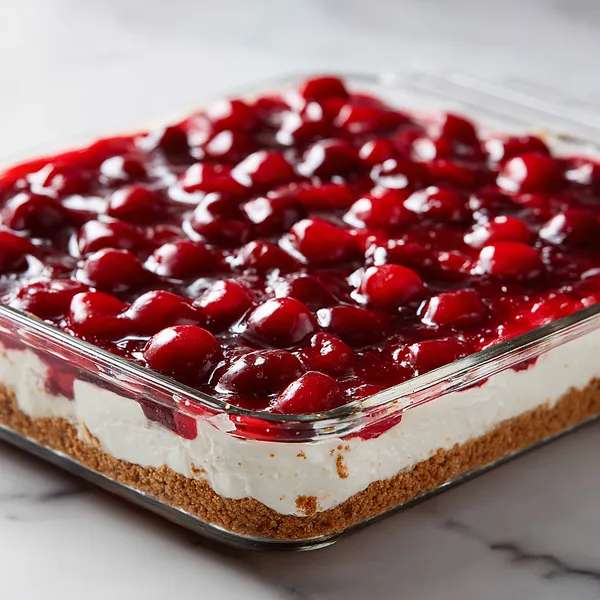
I first encountered Cherry Delight at a church potluck when I was a teenager, and I was immediately captivated by its stunning appearance. The dessert sat proudly on the dessert table in a crystal dish, those glossy red cherries catching the light and drawing everyone's attention. When I finally got a slice, I was blown away by the contrast of textures and flavors. The buttery, slightly crunchy graham cracker crust provided the perfect foundation for the impossibly smooth and tangy cream cheese layer. Then came that sweet, fruity cherry topping with its thick, glossy sauce coating each plump cherry. It was love at first bite. I tracked down the recipe and discovered it was surprisingly simple—no fancy techniques or hard-to-find ingredients required. What makes this dessert so special is how each layer complements the others. The crust adds a necessary crunch and buttery richness, the cream cheese layer provides tang and creaminess that prevents the dessert from being too sweet, and the cherry topping delivers that fruity brightness and beautiful color. It's a perfectly balanced dessert that looks like it took hours to create but actually comes together in about twenty minutes of active work. The hardest part is waiting for it to chill!
Why I love this recipe
I love this recipe because it's foolproof yet impressive, which is the ultimate combination for any home cook. There's no risk of overbaking, no worry about whether your oven temperature is accurate, and no stress about timing. You simply layer, chill, and serve. But despite its simplicity, this dessert always gets rave reviews. People see those beautiful layers and assume you spent hours in the kitchen, when really you just spent twenty minutes assembling three simple components. I also love how versatile it is—you can swap the cherry topping for strawberry, blueberry, or even lemon curd if you want to change things up. The recipe is forgiving too; if your cream cheese layer isn't perfectly smooth or your crust isn't completely even, it still tastes amazing. It's the kind of recipe that makes you look like a dessert genius without requiring genius-level skills. Plus, it's make-ahead friendly, which means you can prepare it the night before a gathering and have one less thing to worry about on the day of your event. Every time I make it, I'm reminded that the best recipes aren't always the most complicated ones—sometimes simple ingredients, thoughtfully combined, create the most memorable dishes.
What You Need From Your Kitchen
- Graham Cracker Crumbs: Mix with melted butter and press into the bottom of your baking dish to create the crust layer
- Cream Cheese: Beat until smooth with powdered sugar and vanilla, then fold in whipped topping for the middle layer
- Whipped Topping: Gently fold into the cream cheese mixture to create a light and fluffy filling
- Cherry Pie Filling: Spread evenly over the cream cheese layer as the final topping
- Powdered Sugar: Sweeten the cream cheese layer and help create a smooth, silky texture
- Butter: Melt and combine with graham cracker crumbs to bind the crust together
Let's Make These Together
- Create the Crust Foundation
- Begin by combining your graham cracker crumbs with melted butter in a medium bowl. Mix thoroughly until the texture resembles wet sand and every crumb is coated with butter. Press this mixture firmly into the bottom of your 9x13 inch baking dish, using the back of a measuring cup to create an even, compact layer. Pop it in the fridge while you prepare the cream cheese layer. This crust provides that essential buttery crunch that contrasts beautifully with the creamy layers above.
- Whip Up the Cream Layer
- Take your softened cream cheese and beat it with an electric mixer until it's completely smooth and fluffy with no lumps remaining. Add the powdered sugar and vanilla extract, continuing to beat until everything is well incorporated and the mixture is light and airy. The key here is to make sure your cream cheese is truly at room temperature—this prevents lumps and creates that silky texture. Gently fold in your whipped topping, being careful not to deflate the mixture. You want to maintain that light, cloud-like consistency.
- Layer and Top
- Retrieve your chilled crust from the refrigerator and spread the cream cheese mixture evenly over it, making sure to reach every corner and edge. Smooth the top with your spatula to create a level surface. Then comes the grand finale—carefully spoon your cherry pie filling over the cream cheese layer. Take your time to distribute the cherries evenly for the most beautiful presentation. The thick, glossy cherry sauce will naturally settle and create that gorgeous red top layer that makes this dessert so visually stunning.
- Chill to Perfection
- Cover your masterpiece with plastic wrap and refrigerate for at least four hours, though overnight is even better. This crucial chilling time allows all the layers to set properly and the flavors to meld together beautifully. When you're ready to serve, use a sharp knife to cut clean squares that showcase those gorgeous distinct layers. Your Cherry Delight is now ready to steal the show at any gathering!
 pin it
Switch Things Up
I remember the first time I made this Cherry Delight for a family barbecue. I was nervous because my aunt is known for her incredible desserts, and I wanted to impress everyone. I carefully layered each component, making sure the cream cheese filling was perfectly smooth and the cherries were arranged beautifully on top. When I pulled it out of the fridge and sliced into it, revealing those gorgeous layers, everyone gathered around. My aunt took one bite and declared it was going into her recipe collection. That moment of validation meant everything! Since then, I've made this dessert countless times, and I've learned a few tricks—like making sure your cream cheese is really soft before mixing, and not skimping on the chill time. The anticipation of waiting for it to set is always worth it. Now it's my signature dish, and people actually request it specifically. There's something so satisfying about creating a dessert that looks this impressive but is actually incredibly easy to make.
Perfect Pairings
This Cherry Delight pairs beautifully with a hot cup of freshly brewed coffee or a glass of cold milk. For a more elegant presentation, serve it alongside a scoop of vanilla bean ice cream that melts into the cherry topping. If you're hosting a brunch, it works wonderfully after a savory quiche or egg casserole. For summer gatherings, pair it with fresh lemonade or iced tea. The dessert also complements other fruit-based treats—consider serving it with fresh strawberries or blueberries on the side. If you're feeling indulgent, a drizzle of chocolate sauce over individual portions adds a delightful twist.
 pin it
Frequently Asked Questions
- → Can I make this dessert ahead of time?
Absolutely! Cherry Delight is actually perfect for making ahead. You can prepare it up to 2 days in advance and keep it covered in the refrigerator. In fact, it tastes even better the next day after all the flavors have had time to meld together. Just wait to cut and serve until you're ready.
- → Can I use fresh cherries instead of pie filling?
While you can use fresh cherries, you'll need to create a thickened cherry sauce to get the proper consistency and sweetness. Cherry pie filling is recommended because it's already sweetened and thickened to the perfect consistency. If you want to use fresh cherries, cook them with sugar and cornstarch until thickened, then cool completely before adding to the dessert.
- → What can I substitute for the whipped topping?
You can make your own whipped cream by beating heavy whipping cream with a bit of powdered sugar until stiff peaks form. Use about 2 cups of whipped cream in place of the 8 oz whipped topping. Keep in mind that homemade whipped cream may not hold up quite as long as commercial whipped topping, so plan to serve the dessert within a day or two.
- → Why is my cream cheese layer lumpy?
Lumpy cream cheese layers happen when the cream cheese isn't softened enough before mixing. Make sure to leave your cream cheese at room temperature for at least 30-60 minutes before using it. If you're in a hurry, you can microwave it in short 10-second bursts, but be careful not to melt it. Beat the cream cheese thoroughly before adding other ingredients.
- → How do I get clean slices when serving?
The key to clean slices is using a sharp knife that you've run under hot water and dried between each cut. Wipe the knife clean after each slice to prevent the layers from smearing together. You can also use a thin metal spatula to lift the slices out of the pan neatly. Chilling the dessert thoroughly also helps achieve cleaner cuts.
- → Can I use a different type of crust?
Definitely! While graham crackers are traditional, you can experiment with vanilla wafer crumbs, digestive biscuits, or even crushed Oreos for a chocolate twist. You can also use a premade graham cracker crust if you're really short on time, though making your own gives you better control over the thickness and texture.
Conclusion
This Classic Cherry Delight is the ultimate no-bake dessert that brings joy to any gathering. With its three distinct layers of buttery graham cracker crust, fluffy cream cheese filling, and sweet cherry topping, it delivers both visual appeal and incredible flavor. The beauty of this recipe lies in its simplicity—no baking required means less stress and more time to enjoy with loved ones. Whether you're preparing for a holiday celebration, a summer potluck, or just treating yourself to something special, this dessert never disappoints. Make it ahead, let it chill, and watch it disappear!