
 pin it
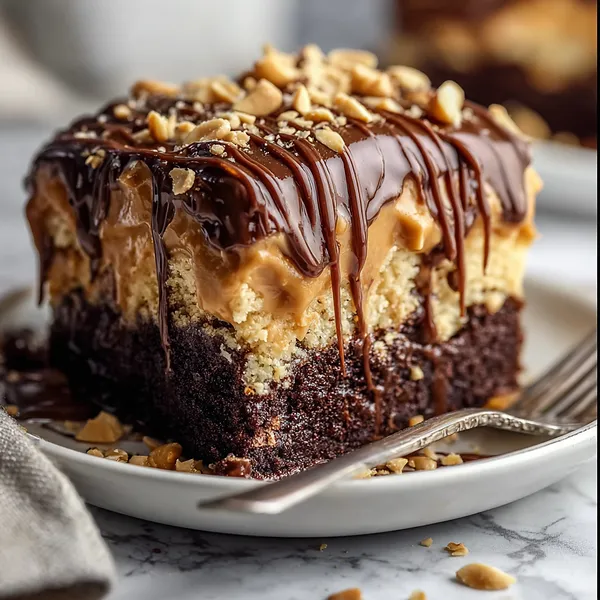
I'll never forget the first time I encountered a poke cake at a potluck dinner years ago. I was skeptical – why would anyone poke holes in a perfectly good cake? But one bite changed everything. This Chocolate Peanut Butter version takes that concept and elevates it to something truly spectacular. The foundation is a deeply chocolatey, incredibly moist cake that gets its richness from both cocoa powder and brewed coffee. Once baked and cooled, you poke holes throughout using the end of a wooden spoon, creating little pockets for the magic to happen. The peanut butter mousse filling is where things get serious – it's whipped with cream cheese and heavy cream until it's cloud-like and dreamy. When you spread it over those holes, it seeps down into the cake, creating pockets of creamy peanut butter heaven in every single bite. The final layer of chocolate ganache adds a glossy, professional finish, while the crushed peanuts provide that essential crunch. What I love most is how the cake stays incredibly moist for days thanks to that peanut butter filling. It's the kind of dessert that actually gets better as it sits in the refrigerator, with all the flavors melding together beautifully.
Why I love this recipe
This recipe holds a special place in my heart because it proves that impressive doesn't have to mean complicated. Sure, there are multiple components, but each one is straightforward and forgiving. I love how the cake batter comes together in just one bowl – no fancy techniques required. The poke cake method is genius because it ensures every single bite is flavor-packed; there's no dry cake here. What really gets me is the combination of textures: that tender, moist cake against the silky mousse and glossy ganache, finished with crunchy peanuts. It's a sensory experience. I also appreciate how make-ahead friendly this recipe is. You can bake the cake a day in advance, prepare the mousse separately, and assemble everything the day of serving. This flexibility makes it perfect for entertaining without the stress. But beyond the practical benefits, this cake simply makes people happy. I've served it at birthday parties, holiday gatherings, and casual weekend dinners, and it never fails to elicit genuine excitement. There's something about the chocolate-peanut butter combination that's universally beloved, and this cake delivers it in the most decadent, beautiful way possible.
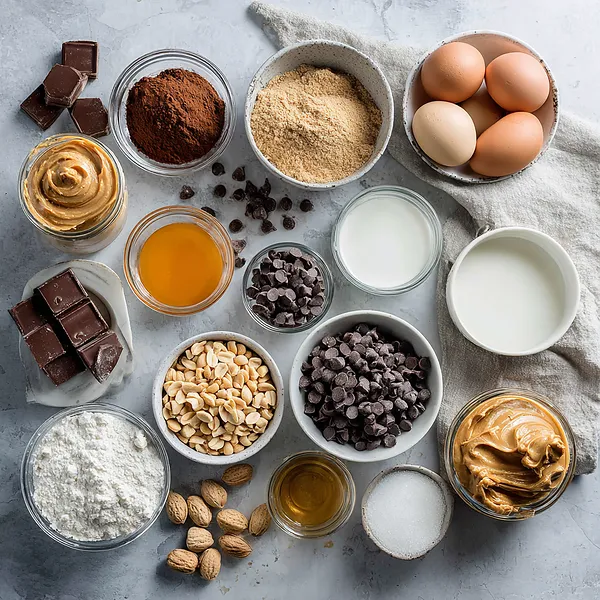
What You Need From Your Kitchen
- All-purpose flour: Forms the base structure of the moist chocolate cake
- Unsweetened cocoa powder: Provides deep, rich chocolate flavor throughout the cake
- Creamy peanut butter: Creates the signature nutty mousse filling layer
- Cream cheese: Adds tanginess and helps stabilize the peanut butter mousse
- Heavy whipping cream: Used for both the light mousse and silky chocolate ganache
- Semi-sweet chocolate chips: Melted into a glossy ganache topping
- Strong brewed coffee: Intensifies the chocolate flavor without adding coffee taste
- Buttermilk: Keeps the cake incredibly moist and tender
Let's Make These Together
- Mix the chocolate cake batter
- Start by combining all your dry ingredients in a large bowl, then add the wet ingredients and mix until smooth. The batter will be surprisingly thin, almost like hot chocolate, but don't worry – this is what creates that incredibly moist texture we're after. Make sure everything is well incorporated, but don't overmix.
- Bake and create the poke holes
- Pour your batter into a greased 9x13 pan and bake until a toothpick comes out clean. The hardest part is waiting those 10 minutes for it to cool slightly before poking. Use the round end of a wooden spoon and poke holes about an inch apart all over the cake. Press all the way down to the bottom – these holes are going to be filled with that amazing peanut butter mousse.
- Whip up the peanut butter mousse
- Beat your cream cheese and peanut butter until they're completely smooth with no lumps. Add the powdered sugar, then fold in freshly whipped cream to create this cloud-like mousse. Spread it over your poked cake, making sure to press it gently into all those holes. This is where the magic happens as the filling seeps into the cake.
- Make the chocolate ganache
- Heat your cream until it's just about to simmer, then pour it over your chocolate chips. Wait a couple minutes without touching it, then whisk it into the smoothest, glossiest chocolate ganache you've ever seen. Let it cool just slightly so it thickens to the perfect consistency for pouring.
- Assemble and chill your masterpiece
- Pour that beautiful ganache over your chilled peanut butter layer and watch it cascade down the sides. Quickly sprinkle your crushed peanuts on top before the ganache sets. Then comes the hardest part – refrigerating it for at least an hour before you can dive in. Trust me, it's worth the wait.
 pin it
Switch Things Up
I first made this cake for my best friend's birthday last spring, and honestly, I was a bit nervous about the whole "poke cake" concept. Would the filling really seep into all those little holes? Spoiler alert: it absolutely did, and the result was magical. I remember standing in my kitchen at midnight, drizzling that warm chocolate ganache over the chilled peanut butter layer, watching it cascade down the sides. When I sprinkled those crushed peanuts on top, I knew I'd created something special. The next day, watching my friend's face light up as she cut into it was priceless. Now, I make this cake whenever I need to impress someone or just want to treat myself. Sometimes I use crunchy peanut butter instead of creamy for extra texture, or I'll add a handful of chocolate chips to the peanut butter layer. The beauty of this recipe is that it's flexible – you can make it your own while still getting that perfect chocolate-peanut butter combination that everyone loves.
Perfect Pairings
This rich Chocolate Peanut Butter Poke Cake pairs beautifully with a tall glass of cold milk or a steaming cup of coffee to balance its sweetness. For an adults-only twist, serve alongside a glass of dessert wine or port. If you're serving this at a party, consider offering fresh berries like raspberries or strawberries on the side – their tartness cuts through the richness perfectly. Vanilla ice cream is another classic pairing that never disappoints, especially when it starts melting into the warm ganache. For a complete dessert spread, serve with salted caramel sauce on the side for those who want an extra flavor dimension.
 pin it
Frequently Asked Questions
- → Can I make this cake ahead of time?
Absolutely! This cake is actually perfect for making ahead. You can bake the cake layer up to 2 days in advance and store it covered at room temperature. You can even assemble the entire cake with all layers up to 24 hours before serving. Just keep it refrigerated and add the crushed peanuts right before serving if you want them extra crunchy.
- → Can I use natural peanut butter instead of regular?
I recommend sticking with regular creamy peanut butter for this recipe. Natural peanut butter has a different consistency and oil content that can make the mousse too runny or grainy. Regular peanut butter blends better with the cream cheese and creates that perfect smooth texture we're looking for.
- → Why does the recipe call for coffee in a chocolate cake?
The coffee is a secret weapon that intensifies the chocolate flavor without making the cake taste like coffee at all. It acts as a flavor enhancer that makes the chocolate taste deeper and richer. If you're really opposed to using coffee, you can substitute hot water, but I highly recommend trying it with coffee first – you won't taste it, I promise!
- → How do I get clean slices when cutting the cake?
The key to clean slices is using a sharp knife that you dip in hot water and wipe clean between each cut. The heat from the knife helps it glide through the chocolate ganache without dragging. Also, make sure the cake is well-chilled before slicing – at least 3 hours in the refrigerator is ideal.
- → Can I freeze this poke cake?
Yes, this cake freezes beautifully! Wrap individual slices tightly in plastic wrap, then aluminum foil, and freeze for up to 3 months. Let the slices thaw in the refrigerator overnight before serving. The texture stays remarkably similar to fresh. I actually love eating it partially frozen on a hot day – it's like a peanut butter chocolate ice cream cake!
- → What can I use instead of a wooden spoon to poke the holes?
You can use the handle of a thick wooden spoon, a chopstick, or even a thick straw. The key is making holes that are wide enough for the filling to flow through but not so large that you compromise the cake's structure. Whatever tool you use, make sure it reaches all the way to the bottom of the pan.
Conclusion
This Chocolate Peanut Butter Poke Cake is the ultimate crowd-pleaser that combines two beloved flavors in one stunning dessert. The moist chocolate cake base provides the perfect foundation, while the creamy peanut butter mousse filling adds richness and depth. The glossy chocolate ganache and crunchy peanut topping create textural contrast that makes every bite interesting. Whether you're celebrating a special occasion or simply treating yourself, this cake delivers bakery-quality results with straightforward home baking techniques. It's a show-stopping dessert that tastes even better than it looks.