
 pin it
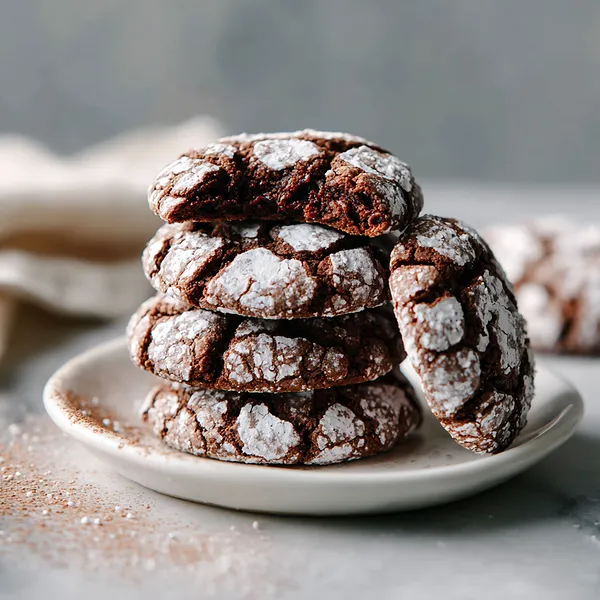
I first discovered chocolate crinkle cookies at a neighborhood bake sale when I was a teenager, and I was immediately captivated by their striking appearance. The contrast between the dark chocolate and the white powdered sugar looked almost too perfect to eat. When I finally took a bite, I was amazed by the texture - crispy on the outside yet incredibly fudgy in the center, like a brownie and a cookie had the most delicious baby. I begged the baker for the recipe, and she generously shared it with me. Over the years, I've made these cookies countless times, tweaking the recipe here and there until it became absolutely foolproof. What I love most is how the simple ingredients transform into something so visually stunning. The magic happens when the cookies bake and expand, causing the powdered sugar coating to crack and reveal the rich chocolate beneath. Every time I make them, I'm reminded of that first bite at the bake sale and how a simple cookie can create such a lasting memory.
Why I love this recipe
I love this recipe because it delivers maximum impact with minimal effort. The ingredients are pantry staples, yet the end result looks like something from a fancy bakery. There's something deeply satisfying about rolling the dough balls in powdered sugar and watching them transform in the oven - it never gets old, even after making them dozens of times. The texture is absolutely perfect - that crispy exterior gives way to a center that's almost fudge-like in its richness. They're also incredibly versatile; I've made them for holiday parties, birthday celebrations, and simple Tuesday afternoons when I needed a chocolate fix. The recipe is forgiving enough for beginners but impressive enough to serve to the toughest critics. Plus, they photograph beautifully, which might sound silly, but it genuinely brings me joy to share them on social media and have people ask for the recipe. Most importantly, they taste exactly how a chocolate cookie should taste - intensely chocolatey without being overwhelming, sweet without being cloying, and satisfying without being heavy.
What You Need From Your Kitchen
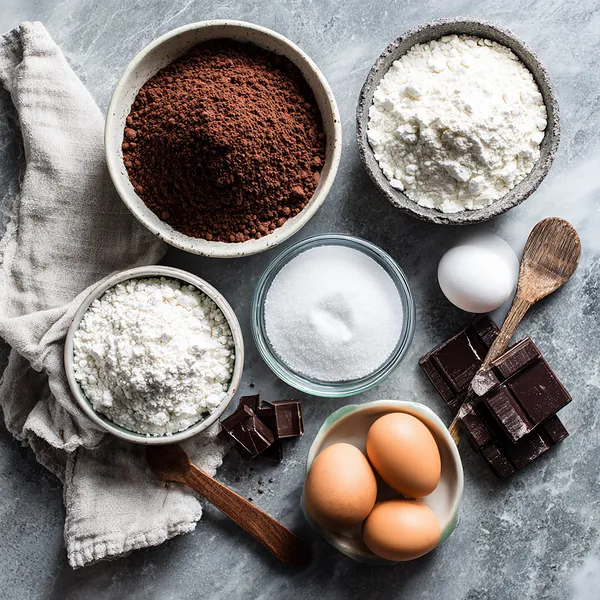
- Unsweetened cocoa powder: Use high-quality cocoa for the richest chocolate flavor - Dutch-process or natural both work beautifully
- Granulated sugar: Provides sweetness and helps create the cookie structure
- Eggs: Bring to room temperature before using for better incorporation into the dough
- All-purpose flour: Measure correctly by spooning into the cup and leveling off for accurate results
- Vegetable oil: Creates a tender, fudgy texture - can substitute with melted coconut oil
- Powdered sugar: Essential for coating - the generous layer creates those dramatic cracks
- Vanilla extract: Pure vanilla extract enhances the chocolate flavor beautifully
Let's Make These Together
- Prepare the chocolate dough
- Start by whisking all your dry ingredients together in a large bowl, making sure there are no lumps of cocoa powder hiding in there. In another bowl, beat together the oil, eggs, and vanilla until they're smooth and glossy. Pour the wet ingredients into the dry and stir until you have a thick, gorgeous chocolate dough. It'll be quite sticky at this point, which is exactly what you want. Cover it up and let it chill in the fridge for at least 2 hours - patience is key here!
- Shape and coat the cookies
- Once your dough is thoroughly chilled, preheat your oven and get your workspace ready. Scoop out portions of dough and roll them into smooth balls between your palms. Have a bowl of powdered sugar ready and roll each ball generously in it - don't be shy with the sugar! Make sure they're completely covered in that snowy coating. Place them on your lined baking sheets with plenty of space between each one.
- Bake and enjoy
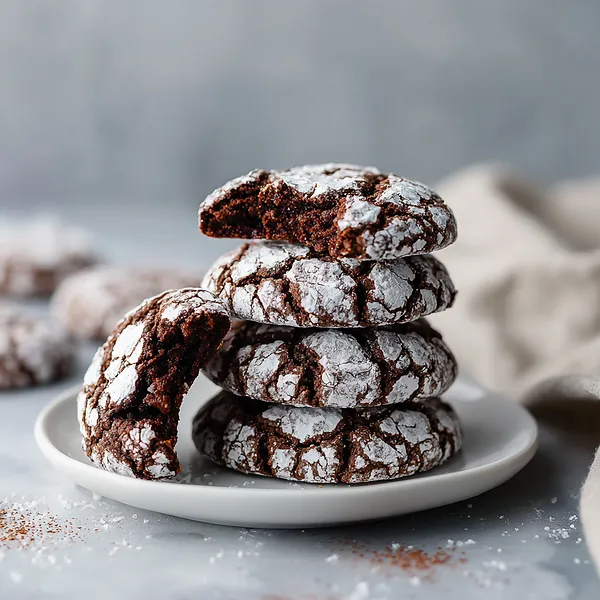
- Pop those beauties in the oven and watch the magic happen through the oven window. After about 10-12 minutes, you'll see those gorgeous cracks forming as the dark chocolate peeks through the white sugar. The edges should be set but the centers still soft. Let them cool on the pan for a few minutes - this helps them firm up perfectly - then transfer to a cooling rack. Now comes the hardest part: waiting for them to cool before devouring them!
 pin it
Switch Things Up
I'll never forget the first time I made these cookies for a holiday party. I was nervous because I'd never achieved that perfect crinkle effect before, but when I pulled the first batch from the oven, I actually gasped. The powdered sugar had cracked beautifully, revealing those gorgeous dark chocolate lines underneath. My kitchen smelled like a chocolate dream, and I may have eaten three cookies while they were still warm - purely for quality control purposes, of course. Now I make them every December, and they've become my signature cookie. The dough is so forgiving that even on rushed mornings, they turn out perfectly. I've experimented with adding espresso powder and peppermint extract, and both variations were incredible. These cookies have this magical way of making your kitchen feel cozy and festive, and the compliments you'll get are just the cherry on top.
Perfect Pairings
These chocolate crinkle cookies pair beautifully with cold milk or hot coffee for a classic combination. For something more elevated, serve them alongside vanilla ice cream or fresh whipped cream. They're also wonderful with hot chocolate, creating an ultra-decadent chocolate experience. During the holidays, I love pairing them with peppermint bark or gingerbread for a festive cookie platter. The rich chocolate flavor also complements fruit beautifully - try serving them with fresh raspberries or sliced strawberries for a delightful contrast.
 pin it
Frequently Asked Questions
- → Why did my cookies spread too much and not crack?
The most common reason is not chilling the dough long enough. The dough needs to be thoroughly cold for at least 2 hours, or preferably overnight. Warm dough spreads too quickly in the oven and doesn't have time to develop those beautiful cracks. Also make sure you're using enough powdered sugar when coating.
- → Can I make the dough ahead of time?
Absolutely! The dough can be refrigerated for up to 3 days or frozen for up to 3 months. If freezing, shape the dough into balls before freezing, then coat with powdered sugar when ready to bake. You can bake them straight from frozen, just add 1-2 minutes to the baking time.
- → My cookies turned out cakey instead of fudgy - what happened?
This usually means the cookies were overbaked. Remember, they should look slightly underdone when you remove them from the oven - the centers should still be soft. They'll continue to cook and firm up as they cool on the baking sheet. Also make sure you're measuring your flour correctly by spooning it into the measuring cup rather than scooping.
- → Can I use Dutch-process cocoa instead of natural cocoa powder?
Yes, both types work beautifully in this recipe! Dutch-process cocoa will give you a darker color and slightly milder chocolate flavor, while natural cocoa provides a more intense, slightly acidic chocolate taste. Choose based on your preference - both deliver delicious results.
- → How should I store these cookies?
Store cooled cookies in an airtight container at room temperature for up to 5 days. They actually taste even better the next day as the flavors develop. For longer storage, freeze them in a freezer-safe container or bag for up to 3 months. Thaw at room temperature for about 30 minutes before serving.
- → Can I add mix-ins like chocolate chips or nuts?
Definitely! Fold in up to 1 cup of chocolate chips, chopped nuts, or even peppermint chips after mixing the dough and before chilling. Just be aware that mix-ins may affect the crackle pattern slightly, but they'll still taste amazing. Mini chocolate chips work particularly well.
Conclusion
These chocolate crinkle cookies are the perfect combination of visual appeal and incredible taste. The dramatic crackled appearance makes them a stunning addition to any cookie platter, while the fudgy interior satisfies even the most intense chocolate cravings. They're surprisingly easy to make and store well for several days, making them ideal for gift-giving or holiday cookie exchanges. Whether you're baking for a special occasion or just treating yourself, these cookies deliver every single time.