
 pin it
I first discovered the concept of making homemade cereal when I was trying to find healthier breakfast options for my family. We all loved chocolate cereal, but I wasn't thrilled about the ingredient lists on most boxes. This recipe was born from experimentation in my kitchen, combining my love for chocolate with the desire to create something wholesome. The beauty of this cereal lies in its simplicity – puffed rice provides that essential crunch, cocoa powder delivers rich chocolate flavor, and a touch of honey brings just enough sweetness. When you melt the chocolate and toss everything together, magic happens. The cereal puffs get coated in this glossy chocolate mixture that bakes into the most satisfying crunch. What I love most is that you can taste each ingredient – there's nothing artificial or overly processed here. It's pure, simple, and absolutely delicious. Every time I make a batch, I'm reminded that the best foods don't need complicated ingredient lists.
Why I love this recipe
This recipe has become one of my absolute favorites for so many reasons. First, it takes less than 30 minutes from start to finish, which is perfect for busy mornings or when you want to prep breakfast for the week ahead. Second, I love that I can pronounce and recognize every single ingredient – no mystery additives or preservatives. The texture is phenomenal – each puff stays crispy even in milk for a good few minutes, giving you that perfect cereal-eating experience. I also appreciate how customizable it is; sometimes I add a pinch of sea salt for a sweet-salty contrast, other times I'll throw in some mini chocolate chips for extra indulgence. But beyond the practical benefits, this recipe represents something bigger to me: taking control of what my family eats and showing my kids that homemade is always better. When they help me make this cereal, they learn about real ingredients and develop a connection to their food. Plus, there's something deeply satisfying about creating something from scratch that could easily come from a box.
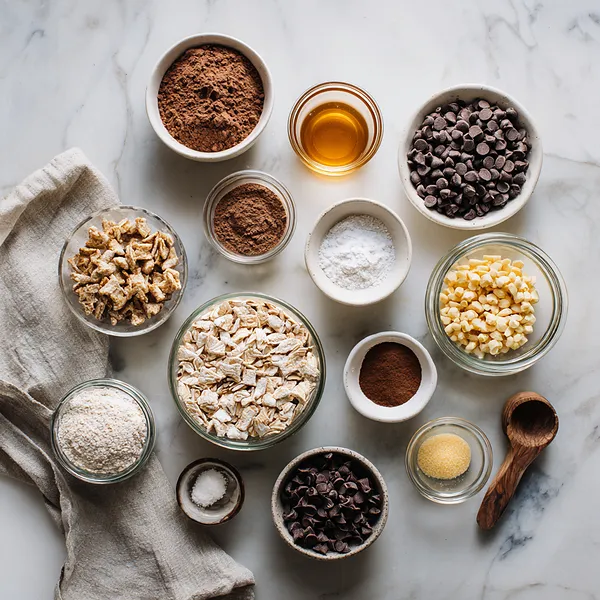
What You Need From Your Kitchen
- Puffed Rice Cereal: Provides the light, crispy base for the chocolate coating
- Cocoa Powder: Sift over the puffed rice for rich chocolate flavor without clumps
- Honey or Maple Syrup: Mix with melted chocolate to add natural sweetness and help bind the coating
- Dark Chocolate Chips: Melt in microwave to create the glossy chocolate coating
- Vanilla Extract: Stir into the chocolate mixture to enhance the overall flavor
Let's Make These Together
- Preheat and Prepare
- Start by setting your oven to 300°F and lining your baking sheet with parchment paper. This preparation step is crucial because the low temperature allows the cereal to crisp without burning, and the parchment prevents sticking while making cleanup a breeze.
- Create Chocolate Base
- Melt your dark chocolate chips carefully in the microwave using short intervals to prevent burning. Once smooth and glossy, blend in the honey, vanilla extract, and a pinch of sea salt. This creates a perfectly balanced sweet-salty chocolate coating that will make your cereal irresistible.
- Coat the Puffs
- Sift cocoa powder over your puffed rice to ensure no lumps, then drizzle the melted chocolate mixture over everything. Use a gentle folding motion to coat each puff evenly without crushing them. The goal is to have every piece beautifully glazed with chocolate.
- Bake to Perfection
- Spread your chocolate-coated puffs in a single layer on your prepared baking sheet and slide it into the oven. Bake for 12-15 minutes, giving the pan a gentle shake and stir halfway through. You'll know it's ready when the cereal looks slightly dry and the chocolate has set.
- Cool and Enjoy
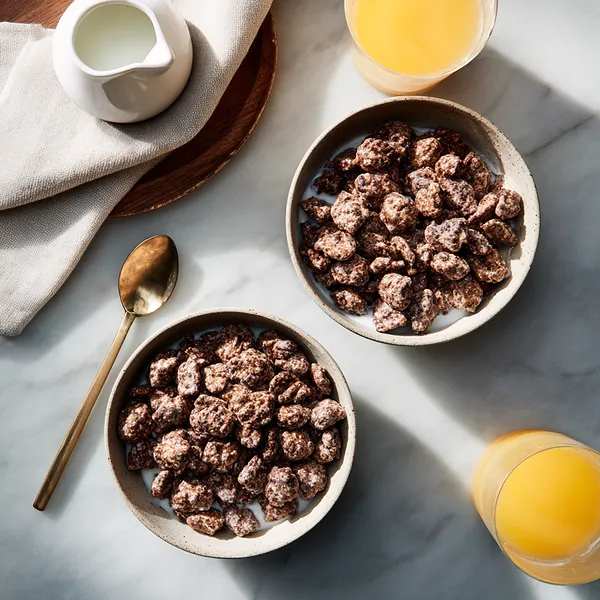
- This is the hardest part – waiting! Let your cereal cool completely on the baking sheet. As it cools, it transforms into those perfectly crunchy little chocolate puffs. Once cool, transfer to an airtight container and try not to eat it all before breakfast tomorrow!
 pin it
Switch Things Up
I started making this cereal on a rainy Sunday morning when I realized we were out of breakfast options and the kids were getting restless. I had some puffed rice in the pantry and thought, why not try making our own cereal? The kitchen filled with the most amazing chocolate aroma as these little puffs baked in the oven. My daughter helped me mix everything together, and she was so proud when we poured milk over our homemade creation. Now it's become our weekend tradition. Sometimes we add a touch of cinnamon or swap honey for maple syrup depending on what we have. The best part is watching my kids choose this over the sugary cereals at the store – they genuinely prefer what we make together at home.
Perfect Pairings
This chocolate puff cereal pairs beautifully with cold whole milk, almond milk, or oat milk for a classic cereal experience. For a more indulgent breakfast, serve it with Greek yogurt and fresh berries. It also makes an excellent topping for smoothie bowls or ice cream. Try sprinkling it over banana nice cream for a healthy dessert, or mix it into trail mix with nuts and dried fruit for a crunchy snack. For a weekend brunch, serve it alongside fresh fruit salad and scrambled eggs for a balanced meal that kids and adults will enjoy.
 pin it
Frequently Asked Questions
- → Can I use regular rice instead of puffed rice?
No, regular rice won't work for this recipe. Puffed rice cereal is already cooked and has the light, airy texture needed to absorb the chocolate coating and become crispy. You can find puffed rice cereal in most grocery stores in the cereal or health food aisle.
- → How long does this cereal stay fresh?
When stored in an airtight container at room temperature, this homemade chocolate puff cereal will stay fresh and crispy for up to 2 weeks. Make sure it's completely cooled before storing to prevent condensation and sogginess.
- → Can I make this recipe vegan?
Absolutely! Simply use maple syrup instead of honey and choose dairy-free dark chocolate chips. Check the puffed rice cereal label to ensure it doesn't contain any animal-derived ingredients. The result will be just as delicious.
- → Why did my cereal turn out soggy?
Sogginess usually occurs if the cereal wasn't baked long enough or wasn't allowed to cool completely before storage. Make sure to bake until the coating looks dry and let it cool fully on the baking sheet. If it does get soggy, you can re-crisp it in a low oven.
- → Can I add other flavors or ingredients?
Yes! This recipe is very customizable. Try adding a pinch of cinnamon, espresso powder, or orange zest to the chocolate mixture. You can also toss in some mini marshmallows, chopped nuts, or dried fruit after baking for variety.
- → Is this healthier than store-bought chocolate cereal?
Yes, this homemade version is significantly healthier because you control the ingredients. It has less sugar than most commercial cereals, no artificial flavors or preservatives, and you can adjust the sweetness to your preference. Plus, using dark chocolate adds antioxidants.
Conclusion
This Healthy Homemade Chocolate Puff Cereal proves that breakfast can be both nutritious and delicious. With only four main ingredients and minimal effort, you can create a cereal that rivals any store-bought brand without all the processed sugars and additives. It's perfect for meal prep too – make a big batch on Sunday and enjoy it throughout the week. Your family will love the rich chocolate flavor and satisfying crunch, and you'll love knowing exactly what's in their breakfast bowl.