
 pin it
I remember the first time I encountered the idea of turning brownies into Christmas presents – it was at a holiday potluck, and these adorable little squares caught my eye immediately. The hostess had arranged them on a silver platter, and they looked like tiny wrapped gifts ready to be opened. When I took my first bite, I was blown away by how incredibly fudgy and rich they were, nothing like those cakey brownies that sometimes disappoint. The icing on top added just the right amount of sweetness without being overwhelming. I asked for the recipe right then and there, and she generously shared her secrets. What I love most about this recipe is how it transforms a classic dessert into something festive and special. The process is surprisingly simple – you make a traditional brownie base with plenty of chocolate and cocoa for that deep, intense flavor, then let your creativity shine with the decorations. The icing bows can be as neat or as whimsical as you like, and honestly, the slightly imperfect ones have the most character. Every time I make these, I'm transported back to that first holiday party, remembering how something so simple can bring so much joy to a celebration.
Why I love this recipe
I absolutely love this recipe because it hits that perfect sweet spot between impressive and achievable. You don't need to be a professional baker or decorator to make these look amazing – just a steady hand and a little patience with the piping bags. The brownie base is incredibly forgiving; it comes together quickly with basic pantry ingredients, and it bakes up perfectly fudgy every single time. What really makes my heart happy is how these brownies bring people together. Kids love helping with the decorating part, choosing which colors to use and deciding on bow patterns. Adults appreciate the sophisticated chocolate flavor that isn't too sweet or cloying. I love that you can customize them to match your holiday color scheme – traditional red and green, elegant gold and silver, or even winter blues and whites. The recipe is also wonderfully flexible; you can add mix-ins like peppermint chunks or white chocolate chips if you want to change things up. But mostly, I love the smiles these create. There's something about that gift-wrapped presentation that makes everyone feel special, like each brownie was made just for them. It's become my signature holiday contribution, and I genuinely look forward to making them every December.
What You Need From Your Kitchen
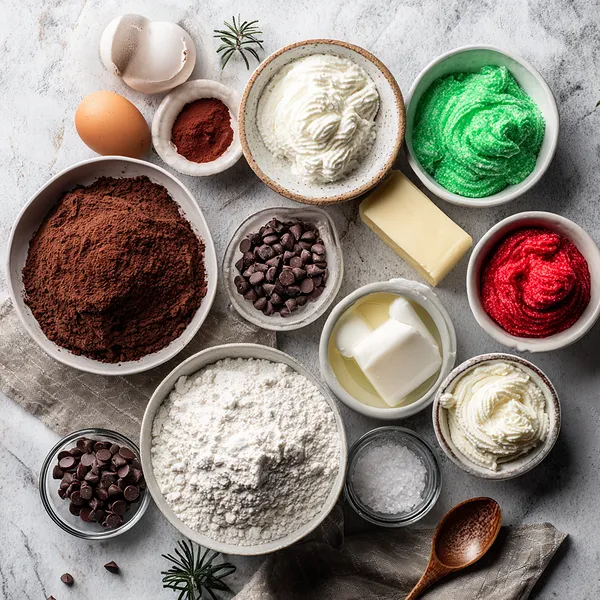
- Unsalted butter: Melt and let cool slightly before mixing into the batter for rich chocolate flavor
- Eggs: Bring to room temperature before using to ensure they incorporate smoothly into the batter
- Unsweetened cocoa powder: Sift before adding to remove lumps and ensure even distribution throughout the batter
- All-purpose flour: Measure accurately using the spoon-and-level method to avoid dense brownies
- Chocolate chips: Fold gently into the batter at the end for pockets of melty chocolate throughout
- Powdered sugar: Sift before making icing to create a smooth, lump-free consistency for piping
- Food coloring: Use gel-based colors for vibrant reds, greens, and whites that won't thin out your icing
Let's Make These Together
- Prepare your baking setup
- Start by preheating your oven to 350°F and preparing your 9x13-inch pan with parchment paper. This step is crucial because it makes removing and cutting the brownies so much easier later. Make sure to leave some overhang on the sides – think of it as handles for lifting out your finished brownies.
- Create the brownie base
- Whisk together your melted butter and sugar until they're beautifully combined, then add eggs one at a time. This gradual addition helps create that perfect fudgy texture we're after. The mixture should look glossy and smooth before you move on to adding your dry ingredients.
- Combine and bake
- Gently fold your sifted dry ingredients into the wet mixture, being careful not to overmix – we want fudgy brownies, not cakey ones! Fold in those chocolate chips for extra indulgence, then spread the batter evenly in your prepared pan. Bake until just set, watching carefully to avoid overbaking.
- Make festive icing decorations
- While your brownies cool completely (patience is key here!), prepare your colorful icings by mixing powdered sugar with milk to create a pipeable consistency. Divide into three bowls and create your festive palette with red, green, and white food coloring. Transfer to piping bags and get ready to transform ordinary brownies into adorable presents.
- Decorate like wrapped gifts
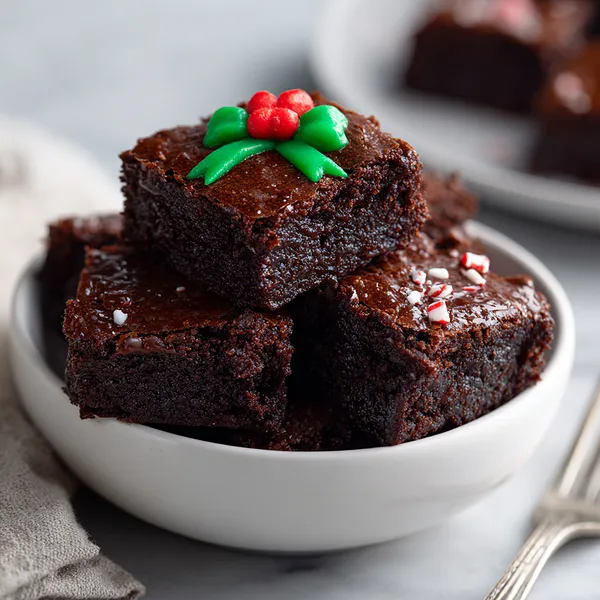
- Once your brownies are completely cool, cut them into neat squares and pipe your bow designs on top. Think of creating gift ribbons – make loops and tails that crisscross like real present wrapping. Don't worry about perfection; slightly wonky bows have character and charm that makes each brownie unique and special!
 pin it
Switch Things Up
I first made these brownies three years ago when my niece asked if we could make "present brownies" after seeing something similar on a baking show. We spent a cozy December afternoon in the kitchen, and I'll never forget how excited she was to pipe those first wobbly bows. Now it's become our annual tradition – we always make them together the weekend before Christmas. Last year, we got ambitious and added different flavors to the icing (peppermint in the white, a hint of raspberry in the red), and it was absolutely delicious. My sister now requests these instead of regular Christmas cookies. The best part is watching everyone's face light up when they see the platter – there's something about those little present decorations that just makes people smile. We've learned that using gel food coloring gives the brightest, most festive colors, and slightly warm brownies are actually easier to pipe on than completely cooled ones.
Perfect Pairings
These Christmas Present Brownies pair beautifully with a cup of hot chocolate topped with marshmallows or a rich espresso for the adults. For a complete holiday dessert spread, serve them alongside sugar cookies and peppermint bark. They also work wonderfully with vanilla ice cream – the cold creaminess contrasts perfectly with the fudgy brownie. If you're creating a dessert board, add some fresh raspberries or strawberries for a pop of natural color and a tart contrast to the sweet chocolate. A glass of cold milk is always a classic pairing, especially for the kids who can't get enough of these festive treats.
 pin it
Frequently Asked Questions
- → Can I make these brownies ahead of time?
Absolutely! You can bake the brownies up to 2 days in advance and store them undecorated in an airtight container at room temperature. Add the icing decorations a few hours before serving for the freshest appearance. The icing will set and hold up well for serving.
- → What if I don't have piping bags?
No problem! You can use a ziplock bag with a tiny corner snipped off as a makeshift piping bag. Alternatively, you can use a small spoon to create dollops of icing and shape them into bow-like designs with a toothpick. The result might be more rustic, but it'll still look festive and taste delicious.
- → How do I know when the brownies are done?
Insert a toothpick into the center of the brownies – it should come out with moist crumbs clinging to it, not wet batter. If it comes out completely clean, you've slightly overbaked them, but they'll still be delicious. Remember, brownies continue cooking slightly as they cool in the pan.
- → Can I use a different pan size?
Yes, but you'll need to adjust baking time. An 8x8-inch pan will give you thicker brownies that need 35-40 minutes of baking. A larger pan will result in thinner brownies that bake faster, around 20-25 minutes. Always check for doneness with the toothpick test regardless of pan size.
- → How should I store leftover brownies?
Store decorated brownies in a single layer in an airtight container at room temperature for up to 4 days. If you need to stack them, place parchment paper between layers to protect the icing decorations. They can also be frozen (without decoration) for up to 3 months.
- → Can I add other flavors to these brownies?
Definitely! Try adding 1/2 teaspoon of peppermint extract to the batter for a minty twist, or fold in crushed candy canes along with the chocolate chips. You can also add a teaspoon of espresso powder to intensify the chocolate flavor without making them taste like coffee.
Conclusion
These Festive Christmas Present Brownies are the ultimate holiday dessert that combines rich chocolate indulgence with cheerful presentation. Whether you're hosting a Christmas party, giving them as gifts, or simply want to add some festive fun to your dessert table, these brownies deliver both flavor and visual appeal. The fudgy texture pairs perfectly with the sweet icing decorations, creating a treat that's as delightful to eat as it is to look at. Make a double batch – they disappear faster than you'd think!