
 pin it
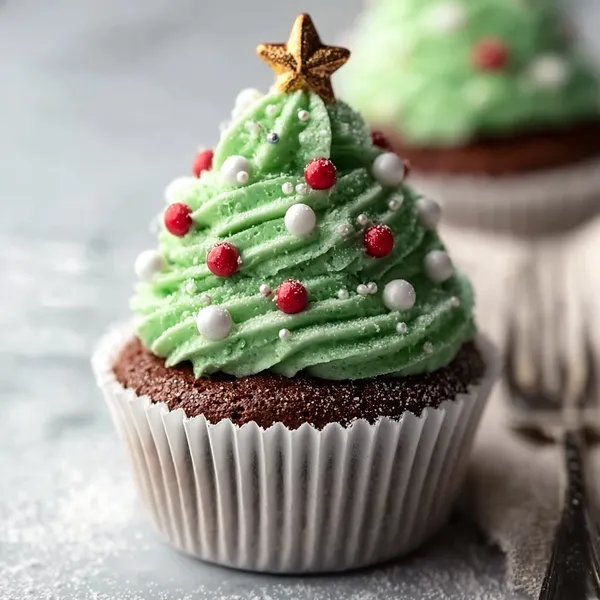
I'll never forget the first time I saw Christmas tree cupcakes at a holiday bake sale years ago – I was completely mesmerized by how adorable they were. The vendor had arranged them on a tiered stand, and they looked like a miniature Christmas forest. I bought two that day and immediately came home determined to recreate them. My first attempt was… let's just say the trees looked more like green blobs than anything recognizable! But I practiced my piping technique, watched tutorials, and eventually figured out the secret: it's all about the steady hand and consistent pressure when creating those swirls. The chocolate cupcake base itself is incredibly forgiving – it's a simple recipe that produces the most tender, moist crumb every single time. What I love about this recipe is how it combines baking skills with decorating creativity. The process is therapeutic: mixing the batter, watching the cupcakes rise in the oven, preparing that silky buttercream, and then comes the fun part – decorating! I use a large star piping tip and start from the bottom, creating wider swirls that gradually get smaller as I reach the top. The green food coloring transforms ordinary frosting into something magical, and those little sprinkles add just the right festive touch. When you place that golden star on top, it's like putting the final ornament on a real Christmas tree.
Why I love this recipe
What I absolutely love about this recipe is how it manages to be both impressive and approachable at the same time. These cupcakes look like they came from a fancy bakery, but the truth is, anyone can make them successfully with just a little patience. The chocolate cupcake recipe is foolproof – I've made it dozens of times and it never fails to produce perfectly moist, flavorful cupcakes. The buttercream is stable enough to hold intricate piping designs but still tastes light and not overly sweet. But beyond the technical aspects, what really makes me love this recipe is the joy it brings to people. I've seen kids' faces absolutely light up when they see these cupcakes, and adults get just as excited! They're conversation starters at parties and make people genuinely happy. There's something about their whimsical, playful design that captures the spirit of Christmas perfectly. I also appreciate how customizable they are – you can adjust the decorations, change the cake flavor, or even make them in different sizes. They're also perfect for involving kids in the kitchen; my nieces and nephews love helping decorate them, and it creates such wonderful memories. Every time I make these, I'm reminded that sometimes the simplest ideas – like turning a cupcake into a Christmas tree – can bring the most joy.
What You Need From Your Kitchen
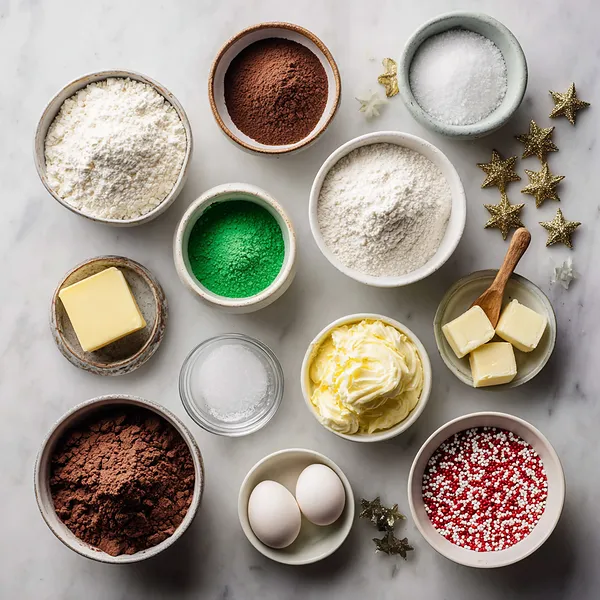
- All-purpose flour: Provides structure to the cupcakes; can substitute with gluten-free flour blend if needed
- Cocoa powder: Creates the rich chocolate flavor; use Dutch-processed for deeper color
- Buttermilk: Adds moisture and tender crumb; substitute with milk plus 1 tablespoon vinegar
- Eggs: Bind the ingredients together; room temperature eggs mix better
- Unsalted butter: For rich, creamy frosting; must be softened to room temperature
- Powdered sugar: Sweetens and thickens the buttercream frosting
- Green gel food coloring: Creates vibrant tree color; gel is better than liquid
- Pearl sprinkles: Decorative ornaments; can use any festive sprinkles you prefer
Let's Make These Together
- Prep Your Workspace
- Before you begin, gather all your ingredients and equipment. Preheat your oven and prepare your muffin tin with liners. Having everything ready makes the process smooth and enjoyable, especially when you're piping the frosting later.
- Create Moist Chocolate Base
- Mix your dry and wet ingredients separately, then combine them carefully. The batter will be quite thin due to the hot water addition, but don't worry – this is what creates those incredibly moist, tender cupcakes. Fill the liners two-thirds full and bake until springy.
- Whip Perfect Buttercream
- Beat your softened butter until it's pale and fluffy before adding sugar gradually. This creates air pockets that make your frosting light and easy to pipe. Add cream slowly until you reach the perfect consistency – it should hold peaks but still be smooth enough to pipe easily.
- Master the Tree Shape
- The secret to beautiful Christmas tree cupcakes is in the piping technique. Start at the base with wider swirls and gradually make them smaller as you work upward. Use steady pressure and a continuous motion for the most professional-looking results.
- Add Festive Finishing Touches
- Decorate while the frosting is still soft so sprinkles adhere properly. Place them strategically to look like ornaments on a real tree. The gold star on top is the crowning glory – position it carefully to complete your edible Christmas tree masterpiece.
 pin it
Switch Things Up
I first made these cupcakes three years ago when my niece asked if we could make "Christmas trees you can eat" for her school holiday party. We spent an afternoon in the kitchen, and I'll never forget how her eyes lit up when we piped that first swirl of green frosting. She insisted on placing every single sprinkle herself, creating the most enthusiastically decorated batch you've ever seen! Now it's become our annual tradition – the weekend after Thanksgiving, we clear the kitchen counter and spend hours making these together. Last year, we made 48 cupcakes for various holiday events, and I perfected my piping technique through sheer repetition. The key lesson I learned was to make the frosting a bit stiffer than you think – it holds the tree shape so much better. My secret trick is chilling the frosted cupcakes for 10 minutes before adding the decorations; the sprinkles stick perfectly and don't slide down. These cupcakes have become my go-to contribution for every holiday gathering, and friends now expect them. There's something magical about watching people smile when they see these adorable treats.
Perfect Pairings
These Christmas Tree Cupcakes pair beautifully with a variety of holiday beverages and treats. Serve them alongside hot chocolate topped with marshmallows or peppermint whipped cream for the ultimate festive combination. They're also wonderful with spiced apple cider, eggnog, or a classic glass of cold milk. For a dessert table spread, display them with sugar cookies, peppermint bark, and chocolate truffles to create a stunning variety. If you're hosting a holiday brunch, these cupcakes complement fresh fruit platters and make a sweet ending to a meal featuring quiche or breakfast casseroles. Coffee lovers will appreciate how well these pair with a rich cappuccino or peppermint mocha.
 pin it
Frequently Asked Questions
- → Can I make these cupcakes ahead of time?
Yes! You can bake the cupcakes up to 2 days in advance and store them unfrosted in an airtight container at room temperature. For best results, frost them the day you plan to serve them. Fully decorated cupcakes can be stored in the refrigerator for up to 5 days, but bring them to room temperature before serving for optimal flavor and texture.
- → What if I don't have buttermilk?
You can easily make a buttermilk substitute by adding 1 tablespoon of white vinegar or lemon juice to 1 cup of regular milk. Stir it together and let it sit for 5 minutes before using. This creates the same acidic reaction that makes the cupcakes tender and helps with leavening.
- → Why is my frosting too soft to pipe?
If your buttercream is too soft, it likely needs more powdered sugar or the butter was too warm. Try adding an additional ½ cup of powdered sugar and mixing well. Alternatively, refrigerate the frosting for 15-20 minutes to firm it up, then re-whip before piping. Make sure your butter is at room temperature (not melted) when starting.
- → Can I use a different frosting flavor?
Absolutely! While vanilla buttercream is traditional, you can add peppermint extract for a minty twist, or use cream cheese frosting for a tangy complement to the chocolate. Just ensure whatever frosting you choose is firm enough to hold the tree shape when piped.
- → What piping tip works best for the tree design?
A large open star tip works best – Wilton 1M or 2D are perfect choices. These tips create the textured, ridged look that resembles tree branches. If you don't have these specific tips, any large star tip will work; just practice on parchment paper first to get comfortable with the technique.
- → How do I prevent my cupcakes from doming too much?
To get flatter tops that are easier to frost, fill your cupcake liners only about halfway full instead of two-thirds, and bake at 325°F instead of 350°F for a few minutes longer. You can also reduce the oven temperature after the first 5 minutes of baking. If they do dome, simply level them with a serrated knife before frosting.
- → Can I freeze these cupcakes?
Yes! Unfrosted cupcakes freeze beautifully for up to 3 months. Wrap them individually in plastic wrap, then place in a freezer bag. Thaw at room temperature before frosting. I don't recommend freezing the decorated cupcakes, as the frosting and decorations don't maintain their appearance well after freezing.
Conclusion
These Christmas Tree Cupcakes are the perfect addition to any holiday celebration, bringing joy and festive cheer to your dessert table. They're surprisingly simple to make yet look professionally decorated, making them ideal for both experienced bakers and beginners. The combination of rich chocolate cake and smooth buttercream creates a delightful flavor that everyone will love. Whether you're hosting a Christmas party, bringing treats to a holiday gathering, or just want to create special memories with your family, these cupcakes deliver both in taste and presentation. Make them once, and they'll become a beloved tradition in your home.