
 pin it
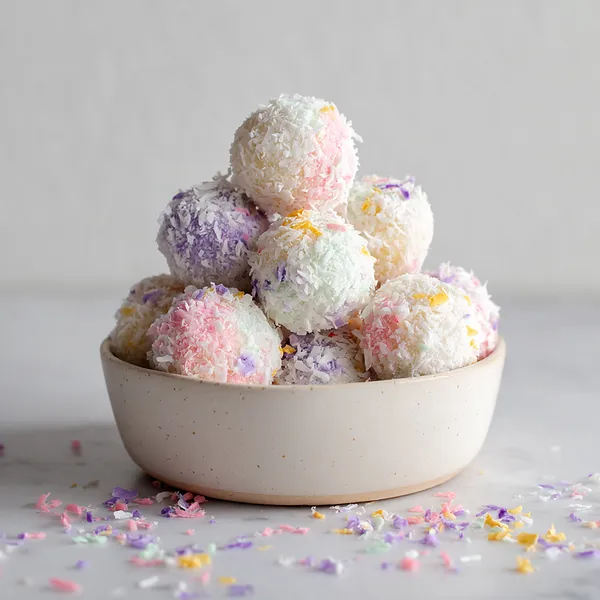
I first came across coconut snowball truffles at a little café that specialized in no-bake sweets — the kind of place with mismatched chairs and handwritten menus on chalkboards. There in a glass dome on the counter sat a pile of these perfectly round, snow-white coconut balls dusted in the softest pastel colors I had ever seen on food. I ordered two without even knowing what they were, and the moment I bit into one I was completely won over. The outside was lightly chewy and coconutty, and the inside was this silky, sweet cream cheese filling that tasted like a vanilla cloud. I went home and spent the afternoon figuring out how to recreate them. After a few tries I landed on a version that honestly might be even better than the original. They've been in my rotation ever since — for birthdays, baby showers, holidays, and random Tuesday cravings. Every single time I make them someone asks for the recipe.
Why I love this recipe
What I love most about these truffles is that they exist in that rare sweet spot of being both effortless and impressive. There's no baking, no special equipment, no complicated techniques — just mixing, rolling, and coating. And yet they look like something that requires serious pastry skill. The pastel coconut coating is endlessly customizable; you can match any color palette, any holiday, any mood. The texture is divine — that slight chew from the coconut on the outside giving way to the soft, creamy center is just so satisfying. They also hold up incredibly well in the fridge, which means I can make a big batch ahead of time without any stress. For me, a recipe this easy that delivers this much joy is an absolute keeper.
What You Need From Your Kitchen
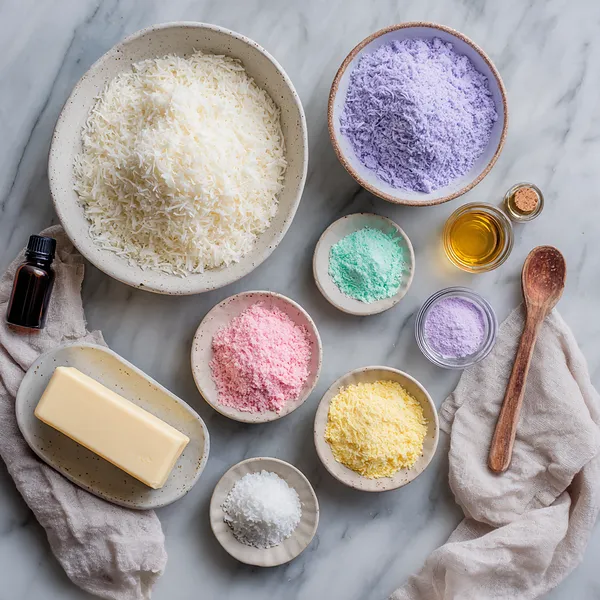
- Cream Cheese: Beat until completely smooth and fluffy — this is the creamy base of your truffle filling.
- Powdered Sugar: Sifted and folded in gradually to sweeten the filling without lumps.
- Shredded Sweetened Coconut: One cup mixed into the filling for texture, the rest divided and colored for the coating.
- Vanilla Extract: Stirred into the cream cheese mixture for a warm, aromatic depth of flavor.
- Pastel Food Coloring: Shaken into the coconut coating portions to create those stunning pastel shades.
- Coconut Milk: Added optionally to loosen the filling if it feels too dense before chilling.
Let's Make These Together
- Beat the cream cheese smooth
- Start with room temperature cream cheese and beat it until there are absolutely no lumps remaining. This step is the foundation of a silky truffle filling, so take your time here. Add the powdered sugar gradually on low speed, then turn it up to medium until the mixture is thick, smooth, and sweet.
- Mix in coconut and chill
- Fold one cup of shredded coconut into the filling — this adds chew and coconut flavor from the inside. Cover the bowl and refrigerate for a full hour. Don't skip the chill; it's what makes rolling possible without the mixture turning into a sticky mess on your hands.
- Color your coconut coating
- Divide the remaining coconut into bags or bowls and add your pastel food coloring. Shake or toss until every shred is coated in that soft dreamy hue. Spread on plates and let it air dry for 10 minutes so it doesn't bleed onto the truffles when you roll them.
- Scoop and roll into balls
- Portion the chilled filling with a cookie scoop and roll each piece between your palms into a smooth round ball. Work in batches and return the mixture to the fridge whenever it starts feeling too soft. Clean, chilled hands are your best friend here.
- Coat in pastel coconut
- Roll each truffle ball through your colored coconut, pressing softly so the shreds stick all around. Alternate colors freely — there are no rules. The more varied the colors, the more stunning the final bowl looks. Place each one on a lined tray as you finish.
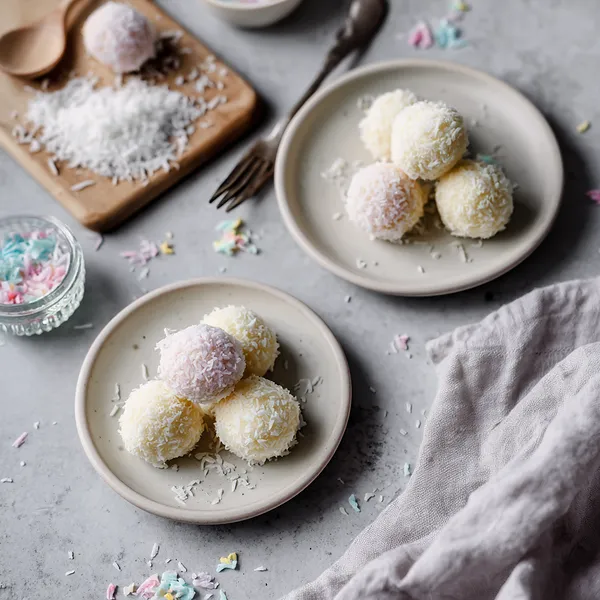
- Chill and plate beautifully
- Refrigerate the finished truffles for 30 minutes so everything firms up and the presentation holds. Pile them into a bowl, scatter extra pastel coconut around the edges, and serve straight from the fridge for the best texture and flavor.
 pin it
Switch Things Up
I once brought a big bowl of these to a spring potluck and set them on the table without saying a word. Within five minutes, three people came up asking if I had ordered them from a bakery. When I told them I made them at home in less than 30 minutes they genuinely didn't believe me. The trick is the pastel coconut coating — it just makes everything look so intentional and special. Now I color the coconut differently depending on the season. Orange and black for Halloween, red and green for Christmas. It's become my little signature move.
Perfect Pairings
These coconut snowball truffles pair beautifully with a light jasmine or chamomile tea, letting the floral notes complement the sweet coconut. For a more indulgent spread, serve them alongside fresh strawberries, a small pot of melted white chocolate for dipping, or a scoop of mango sorbet. They also shine on a dessert charcuterie board next to macadamia shortbread cookies and dried pineapple slices for a tropical theme.
 pin it
Frequently Asked Questions
- → Can I make these truffles ahead of time?
Absolutely! These coconut snowball truffles are actually better made a day ahead. Store them in an airtight container in the refrigerator for up to 4 days. The flavors meld beautifully overnight and the texture firms up perfectly.
- → What type of food coloring works best for the coconut?
Gel food coloring is highly recommended because it delivers vibrant, true pastel shades without adding excess liquid to the coconut. Liquid food coloring works in a pinch but use only 1–2 drops per batch to avoid making the coconut wet and clumpy.
- → Can I use unsweetened coconut instead of sweetened?
Yes, you can use unsweetened shredded coconut if you prefer a less sweet truffle. Just keep in mind the coating will be slightly drier and less sticky, so press the coconut firmly onto each ball to make sure it adheres well.
- → My filling is too soft to roll — what do I do?
Simply return the filling to the refrigerator for another 30 minutes. If it's still too soft after that, add a tablespoon more of powdered sugar and mix well before chilling again. The mixture firms up considerably with cold.
- → Can I freeze these coconut truffles?
Yes! These truffles freeze well for up to 6 weeks. Place them in a single layer on a tray to freeze solid first, then transfer to a freezer-safe bag. Thaw in the refrigerator overnight before serving — the coconut coating may look slightly different after freezing but the flavor is still delicious.
- → Can I add a filling inside the truffle center?
Definitely — for an extra surprise, press a small piece of white chocolate, a macadamia nut, or a frozen raspberry into the center of each ball before rolling it smooth. It adds a lovely hidden element that makes each bite even more exciting.
Conclusion
These Pastel Coconut Snowball Truffles are the kind of treat that looks like it took hours but comes together in minutes. They're creamy, sweet, and covered in a dreamy coconut shell that melts right in your mouth. Whether you're making them for a celebration or just because, they never fail to bring smiles. Store leftovers in an airtight container in the fridge for up to a week — if they last that long!