
 pin it
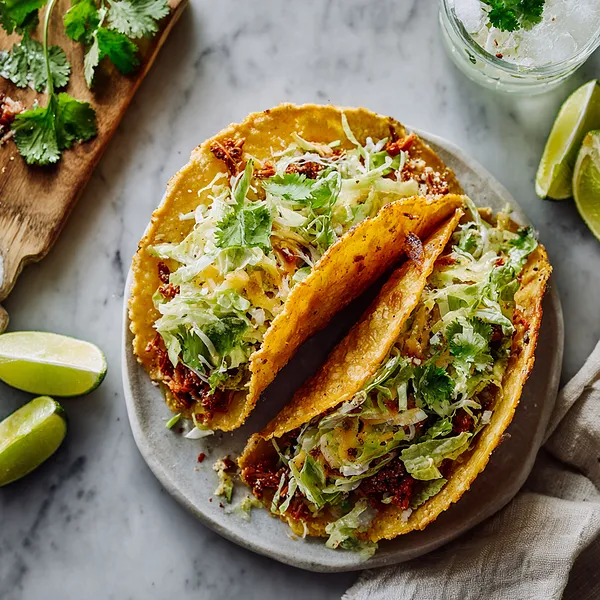
I first encountered oven-baked tacos at a friend's house during a casual weekend gathering, and I was immediately intrigued by the concept. She had this whole tray of perfectly standing tacos, all crispy and golden, and I couldn't believe how genius the idea was. After trying them, I knew I had to recreate this at home. What I love about this recipe is how it transforms the traditional taco-making process into something so much more efficient and reliable. Instead of the usual stovetop assembly line where shells break and fillings spill, you simply fill the shells, arrange them on a baking sheet, and let the oven work its magic. The result is a taco with a superior crispy texture that holds up much better than pan-fried shells. The cheese melts into every crevice of the seasoned beef, creating this incredible savory base, and then you top it with all the fresh, cool, crunchy vegetables that provide the perfect contrast. It's become my go-to method because it's foolproof, feeds a crowd easily, and honestly just tastes better than traditional tacos.
Why I love this recipe
There are so many reasons why this recipe has become a staple in my kitchen. First and foremost, the texture is absolutely incredible – those shells get so crispy and golden in the oven, creating the perfect vessel for all the delicious fillings. Unlike stovetop tacos where shells can get soggy or break easily, these maintain their structure beautifully. I also love how hands-off this method is; once everything is assembled and in the oven, I can focus on preparing the toppings or setting the table instead of babysitting individual tacos. It's perfect for entertaining because you can make a large batch all at once, ensuring everyone gets to eat together with hot, fresh tacos. The kids love being able to customize their own with different toppings, and I appreciate how it encourages them to eat more vegetables. From a practical standpoint, cleanup is minimal since everything cooks on one baking sheet. But beyond all the convenience factors, these tacos genuinely taste amazing – that combination of crispy shell, savory seasoned meat, melted cheese, and fresh toppings creates the ultimate flavor and texture experience that keeps everyone coming back for more.
What You Need From Your Kitchen
- Ground Beef: Brown thoroughly and drain excess fat before seasoning
- Taco Seasoning: Mix with water according to package directions for proper consistency
- Hard Taco Shells: Arrange standing upright on baking sheet for even baking
- Cheddar Cheese: Shred fresh for best melting quality and distribute evenly over beef
- Lettuce: Shred finely and add only after baking to maintain crispness
- Tomatoes: Dice into small uniform pieces and drain excess liquid before topping
- Purple Onion: Dice finely for a pop of color and sharp flavor contrast
Let's Make These Together
- Brown the Seasoned Beef
- Start by heating your skillet over medium-high heat and adding the ground beef. Break it apart as it cooks until no pink remains, which should take about 7-8 minutes. Drain any excess grease, then stir in your taco seasoning with the recommended amount of water. Let this simmer until it thickens into a beautifully seasoned mixture that will be the star filling of your tacos.
- Set Up Taco Shells
- While your oven preheats to 375°F, arrange your hard taco shells standing upright on a baking sheet. This is the key to getting them evenly crispy on all sides. If they're wobbling or falling over, don't worry – you can nestle them into a muffin tin or create little aluminum foil supports to keep them standing tall and proud.
- Fill and Top with Cheese
- Carefully spoon your seasoned beef mixture into each standing taco shell, filling them about three-quarters of the way up. Don't overfill or they might overflow in the oven. Then comes the best part – generously sprinkle that shredded cheddar cheese over the top of each taco, making sure to cover all that delicious beef so it gets beautifully melted and gooey.
- Bake to Crispy Perfection
- Slide your baking sheet into the preheated oven and let the magic happen for 12-15 minutes. You'll know they're ready when the cheese is bubbling and melted, and the taco shells have turned a gorgeous golden color with that irresistible crispy texture you're looking for.
- Add Fresh Toppings and Serve
- Once out of the oven, let your tacos cool for just a couple of minutes – you don't want to burn your tongue on that molten cheese! Then load them up with all your fresh toppings: crisp lettuce, juicy diced tomatoes, sharp purple onion, and fragrant fresh cilantro. Serve immediately while everything is at its absolute best, and watch them disappear!
 pin it
Switch Things Up
The first time I made these, I was skeptical about baking tacos instead of the traditional method. But after one bite of that perfectly crispy shell with the warm, melted cheese and seasoned beef, I was completely sold. Now I make these at least twice a month because my family requests them constantly. I love experimenting with different toppings – sometimes I add jalapeños for heat, other times I'll throw on some black beans or corn. The beauty of this recipe is how adaptable it is to whatever you're craving. I've even made breakfast versions with scrambled eggs and bacon. One time I had leftover pulled pork, so I used that instead of ground beef and it was phenomenal. The oven-baking method works with any filling you can imagine, and that crispy texture is just unbeatable.
Perfect Pairings
These Crispy Oven Baked Tacos pair wonderfully with classic Mexican sides. Serve them alongside some creamy refried beans and Spanish rice for a complete meal. A fresh guacamole or chunky pico de gallo makes an excellent addition, and don't forget the sour cream and salsa for those who want extra toppings. For drinks, I love pairing these with a cold Mexican beer, fresh lime agua fresca, or even a classic margarita for adults. If you want to round out the meal, add some tortilla chips with queso dip as an appetizer, or finish with churros or flan for dessert.
 pin it
Frequently Asked Questions
- → Can I make these tacos ahead of time?
You can prepare the seasoned beef ahead of time and store it in the refrigerator for up to 3 days. However, for best results, assemble and bake the tacos fresh just before serving to ensure maximum crispiness. If you must prepare them fully ahead, reheat in a 350°F oven for 5-7 minutes.
- → What other proteins can I use instead of ground beef?
This recipe works wonderfully with ground turkey, ground chicken, shredded chicken, pulled pork, or even seasoned black beans for a vegetarian option. Just make sure whatever protein you choose is well-seasoned and not too watery to prevent soggy shells.
- → How do I prevent the taco shells from getting soggy?
The key is to not overfill the shells with meat and to make sure your seasoned beef isn't too watery. Also, add fresh toppings like lettuce and tomatoes only after baking, never before. You can also lightly spray the shells with cooking oil before filling for extra crispiness.
- → Can I use soft tortillas instead of hard shells?
While this recipe is specifically designed for hard taco shells, you could adapt it by using soft tortillas to make baked taquitos or enchiladas instead. For traditional soft tacos, you'd want to use a different preparation method entirely.
- → How do I store and reheat leftovers?
Store leftover tacos in an airtight container in the refrigerator for up to 2 days. To reheat, place them on a baking sheet in a 350°F oven for 5-7 minutes to restore crispiness. Avoid microwaving as this will make the shells chewy instead of crispy.
- → What's the best way to keep the shells standing during baking?
You can use a muffin tin with the shells nestled between the cups, create aluminum foil supports by folding foil into accordion-style dividers, or purchase a special taco holder rack designed for this purpose. Some people also lean them against each other in a row.
- → Can I add other toppings or ingredients?
Absolutely! These tacos are very customizable. Try adding jalapeños, black olives, corn, black beans, different cheese varieties, avocado, or any of your favorite taco toppings. Just remember to add fresh ingredients after baking for the best texture.
Conclusion
These Crispy Oven Baked Tacos have completely revolutionized taco night in my kitchen. The convenience of baking them all at once means everyone eats together with hot, crispy tacos instead of waiting around. The shells get incredibly crunchy while the cheese melts perfectly into the seasoned beef. Whether you're feeding a crowd or meal prepping for the week, this method delivers consistently delicious results every single time.