
 pin it
I remember the first time I encountered Grinch-themed desserts at my neighbor's annual holiday open house about five years ago. They had traditional Grinch cupcakes, but I immediately thought about how amazing this concept would be as mini cheesecakes. The idea of transforming that beloved grumpy character into a no-bake dessert felt like pure genius. This recipe combines everything I love about cheesecake – the tangy cream cheese, the sweet graham cracker-style crust – but in an adorable, portable format that's perfect for parties. The vibrant green color always makes people smile before they even take a bite, and that's exactly what holiday baking should do. What makes this recipe special is how it captures the whimsy of the season while delivering serious flavor. The Oreo crust provides a rich chocolate base that contrasts beautifully with the bright, creamy filling. When you top each mini cheesecake with swirls of fluffy whipped cream and festive sprinkles, they transform into edible works of art. Every year when December rolls around, I find myself craving these little green gems, and they've become as much a part of my holiday tradition as decorating the tree. They represent everything I love about Christmas baking – fun, festive, delicious, and guaranteed to bring joy to everyone who sees them.
Why I love this recipe
I love this recipe because it takes the intimidation out of making cheesecakes while delivering bakery-quality results that impress everyone. Traditional cheesecakes require water baths, precise temperatures, and anxious waiting to see if they'll crack – these mini versions eliminate all that stress. The no-bake method means you can make them even in the middle of summer without heating up your kitchen, though they're perfect for the holiday season. What really wins me over is how customizable they are – you can adjust the green food coloring to get exactly the shade you want, add different extracts for flavor variations, or switch up the sprinkle colors for different occasions. The portion control aspect is genius too; everyone gets their own perfectly sized dessert without the need for slicing and serving. I also appreciate how these cheesecakes actually taste better after chilling overnight, which means you can prep them a day ahead and free up your schedule for other holiday tasks. The combination of textures – crunchy Oreo crust, smooth cheesecake filling, and airy whipped topping – creates such a satisfying eating experience. Plus, they're sturdy enough to transport to parties without falling apart, which is a huge bonus. Most importantly, these mini cheesecakes never fail to make people smile, and that's really what holiday baking is all about.
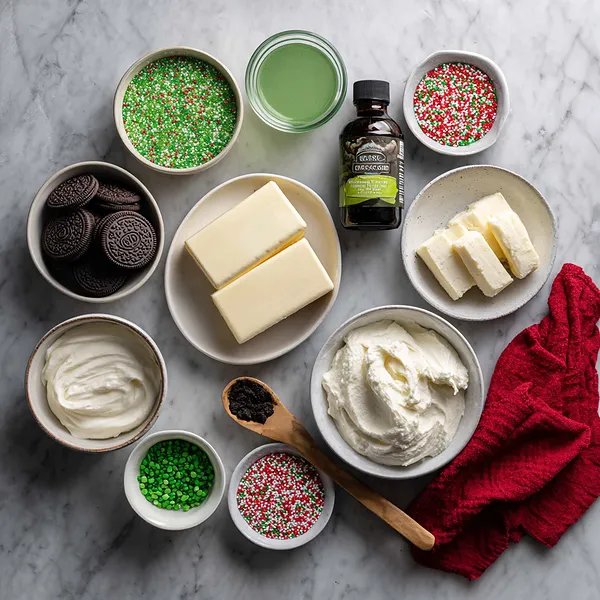
What You Need From Your Kitchen
- Oreo cookies: Crush them finely in a food processor to create a compact chocolate crust base for the mini cheesecakes
- Cream cheese: Soften to room temperature and beat until smooth for a creamy, luxurious cheesecake filling
- Heavy whipping cream: Divide into two portions - whip half for the filling and half for the fluffy topping
- Green gel food coloring: Add gradually to achieve the perfect vibrant Grinch-green shade without affecting texture
- Granulated sugar: Mix into the cream cheese mixture to sweeten the filling perfectly
- Festive sprinkles: Scatter red and green holiday sprinkles generously over the whipped cream topping for decoration
Let's Make These Together
- Create the chocolate cookie base
- Start by lining your muffin tin with festive cupcake liners, then pulse those Oreo cookies in a food processor until they transform into fine, dark crumbs. Press these crumbs firmly into the bottom of each liner to create a sturdy foundation that will hold your beautiful green filling. This step is crucial because a well-packed crust prevents your mini cheesecakes from falling apart when you remove them from the liners.
- Whip up the dreamy green filling
- Beat your room-temperature cream cheese until it's silky smooth and completely lump-free. This is where the magic happens – add your sugar and vanilla, then fold in freshly whipped cream to create an impossibly light and airy texture. When you add that vibrant green food coloring, watch as your mixture transforms into the most gorgeous Grinch-green shade. The key is to fold gently so you don't deflate all those beautiful air bubbles you just created.
- Fill and chill for perfection
- Carefully spoon or pipe your green filling over each Oreo crust, making sure to leave just enough room at the top for your whipped cream crown. Smooth the tops so they're nice and even, then cover everything with plastic wrap and let the refrigerator work its magic for at least three hours. Patience here pays off – these mini cheesecakes need time to set up properly so they have that perfect creamy-yet-firm texture.
- Crown with clouds of cream
- Once your cheesecakes are completely chilled and set, it's time for the fun part. Whip up fresh cream with powdered sugar until it forms stiff, glossy peaks, then load it into a piping bag fitted with your favorite star tip. Pipe generous swirls on top of each mini cheesecake, creating those beautiful peaks that look like fresh snow on a Christmas tree.
- Add the festive finishing touches
- While your whipped cream is still fresh and sticky, shower each mini cheesecake with red and green sprinkles. Don't be shy here – the more festive, the better! These colorful touches are what transform simple mini cheesecakes into show-stopping Grinch-themed treats that will have everyone reaching for their cameras before taking a bite.
 pin it
Switch Things Up
I first made these Grinch cheesecakes three years ago for my niece's Christmas school party, and they were an instant hit with both kids and adults. The teacher actually asked me for the recipe before I even left! What I love most is how forgiving this recipe is – even if your piping skills aren't perfect, these little guys still look absolutely adorable. I've experimented with different sprinkle combinations and even tried adding peppermint extract once, which was delicious but I prefer the classic vanilla version. My sister now requests these every year for her holiday cookie exchange, and they always get photographed more than any other dessert on the table. Last year, I made a double batch and they lasted exactly 15 minutes at our family gathering. The kids especially love how the bright green color makes them feel like they're eating something from Whoville. I've even caught my husband sneaking them straight from the fridge at midnight!
Perfect Pairings
These Grinch Mini Cheesecakes pair wonderfully with a cup of hot cocoa or peppermint tea for a complete holiday dessert experience. For an adults-only gathering, serve them alongside Irish coffee or a white chocolate martini to complement the creamy richness. If you're building a dessert spread, place them next to traditional sugar cookies, chocolate truffles, or gingerbread men for a festive variety. The tangy cream cheese filling also balances beautifully with the sweetness of candy canes or chocolate-covered pretzels on a holiday platter. For a brunch setting, serve these mini cheesecakes with fresh strawberries and a light vanilla coffee to create an elegant yet playful dessert course.
 pin it
Frequently Asked Questions
- → Can I make these mini cheesecakes ahead of time?
Absolutely! These Grinch Mini Cheesecakes are perfect for make-ahead baking. You can prepare the cheesecakes with their Oreo crusts and green filling up to 2 days in advance. Just keep them covered in the refrigerator and add the whipped cream topping and sprinkles right before serving for the freshest presentation and best texture.
- → Can I use regular food coloring instead of gel?
While you can use regular liquid food coloring, gel food coloring is highly recommended for this recipe. Gel coloring provides much more vibrant color without adding extra liquid to your cheesecake mixture, which could affect the texture and setting time. If you only have liquid coloring, use it sparingly and expect a slightly softer filling.
- → How do I remove the mini cheesecakes from the liners?
The easiest way is to peel the cupcake liners away from the sides of the cheesecake just before serving. You can also serve them directly in the liners for easier handling at parties. If you want a cleaner presentation, use foil liners which peel away more easily, or lightly spray paper liners with cooking spray before adding the crust.
- → Can I freeze these mini cheesecakes?
Yes! These mini cheesecakes freeze beautifully for up to 2 months. Freeze them without the whipped cream topping in an airtight container or wrapped individually in plastic wrap. Thaw in the refrigerator overnight, then add fresh whipped cream and sprinkles just before serving. Never freeze the whipped cream topping as it will become watery when thawed.
- → What can I substitute for the Oreo crust?
You can use graham cracker crumbs mixed with melted butter for a traditional cheesecake crust, or try chocolate graham crackers for a similar chocolate flavor. Crushed chocolate wafer cookies also work wonderfully. For a gluten-free option, use gluten-free chocolate sandwich cookies or gluten-free chocolate wafers instead.
- → Why is my cheesecake filling too soft?
The most common cause is not chilling the cheesecakes long enough. Make sure to refrigerate for at least 3 hours, though overnight is ideal. Also ensure your cream cheese was properly softened but not warm, and that you whipped the heavy cream to stiff peaks before folding it in. Using gel food coloring instead of liquid also helps maintain the proper consistency.
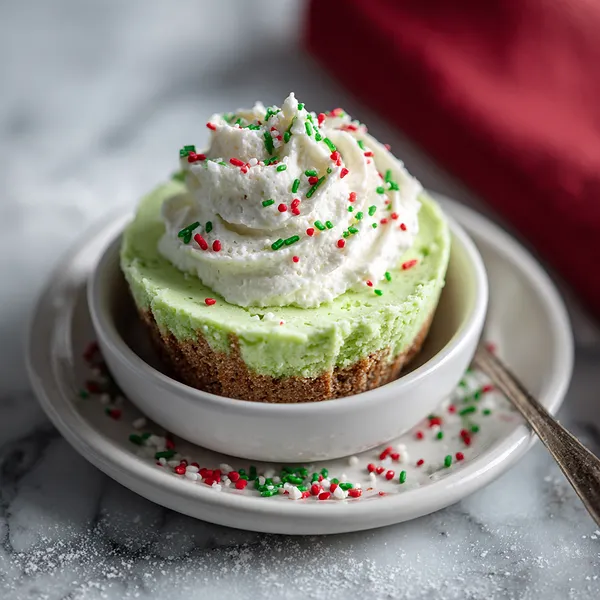
Conclusion
These Grinch Mini Cheesecakes are the perfect addition to any holiday gathering, combining festive fun with delicious flavors that everyone will love. The no-bake preparation makes them stress-free, while the adorable presentation guarantees they'll be the star of your dessert table. Whether you're hosting a Christmas party or looking for a fun baking project with kids, these mini cheesecakes deliver on both taste and visual appeal. The combination of chocolate Oreo crust, creamy green cheesecake filling, and fluffy whipped topping creates a delightful texture contrast in every bite. Make them ahead and watch them disappear faster than the Grinch stealing Christmas!