
 pin it
I first discovered the true potential of homemade crunchy tacos during a college potluck, where a friend's mom brought this massive taco bar setup. She had everything laid out buffet-style, and I watched in awe as she assembled each taco with such care and precision. That night changed my perspective on what I thought was just "simple" food. These tacos are my tribute to that experience – perfectly seasoned ground beef that's been simmered until every grain is coated in those warm spices, nestled in shells that crack with the most satisfying crunch. The magic happens when you layer everything just right: the hot beef goes in first, melting the cheese slightly, then comes the cool, crisp lettuce creating that temperature contrast, followed by juicy tomatoes and sharp onions. I've made these hundreds of times now, and each time I'm reminded that the best recipes aren't always the most complicated ones. It's about technique, quality ingredients, and understanding how flavors and textures play together. The key is getting that beef perfectly browned with those caramelized edges, not overcrowding the pan, and letting the taco seasoning bloom in the meat. When you nail it, you get tacos that rival anything you'd pay fifteen dollars for at a trendy taqueria.
Why I love this recipe
What I love most about this recipe is its incredible versatility wrapped in comforting familiarity. It's one of those rare dishes that works equally well for a quick solo dinner or feeding a crowd of hungry friends. There's something deeply satisfying about the ritual of assembling these tacos – it's interactive cooking at its finest, where everyone becomes part of the process. I love that you can prep everything ahead of time and just let people build their own perfect taco. The recipe is forgiving too; if you're out of one topping, you can easily substitute another. But beyond the practical aspects, these tacos just make me happy. That first bite, when the shell shatters and you get all the flavors and textures at once – the seasoned beef, the melted cheese, the cool crunch of lettuce, the burst of tomato – it's pure comfort food magic. I've served these at birthday parties, game nights, and random Tuesday evenings, and they never fail to put smiles on faces. Plus, there's an nostalgic element for me; they remind me of childhood dinners and simpler times, while still being sophisticated enough that I'm proud to serve them as an adult. They're proof that you don't need fancy ingredients or complex techniques to create something truly delicious.
What You Need From Your Kitchen
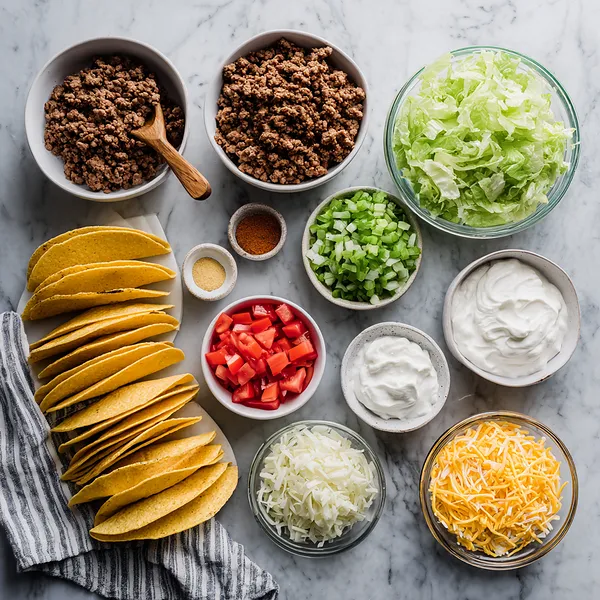
- Ground Beef: Brown in a large skillet over medium-high heat until no longer pink, breaking into small crumbles, then drain excess fat
- Taco Seasoning: Mix into the cooked beef with water and simmer until the mixture thickens and becomes fragrant
- Hard Taco Shells: Warm in a preheated 350 degree Fahrenheit oven for 3 to 5 minutes until crispy and heated through
- Cheddar Cheese: Shred and sprinkle generously over the hot beef filling so it melts slightly from the residual heat
- Iceberg Lettuce: Shred into thin strips for a crisp, refreshing contrast to the warm seasoned beef
- Tomatoes: Dice into small cubes, removing excess seeds to prevent the tacos from becoming soggy
- Red Onion: Finely dice for a sharp, pungent bite that cuts through the richness of the beef and cheese
Let's Make These Together
- Brown and Season the Beef
- Start by heating your skillet over medium-high heat and adding the ground beef. Break it apart as it cooks, browning it for about 6 to 8 minutes until no pink remains. Once fully cooked, drain most of the fat but leave a small amount for flavor. Add your taco seasoning and water, then simmer everything together for another 4 to 5 minutes. You'll know it's ready when the mixture has thickened and the beef is beautifully coated in those aromatic spices. The kitchen should smell absolutely incredible at this point.
- Prepare Your Toppings Station
- While your beef is working its magic on the stove, take this time to set up your toppings station. Shred your lettuce into thin, manageable strips – not too thick or they'll overpower the taco. Dice your tomatoes into small cubes, and try to remove some of the excess liquid and seeds so they don't make your tacos soggy. Finely chop that red onion for a nice sharp bite. Arrange everything in separate bowls along with your shredded cheese and sour cream. Having everything prepped and ready makes the assembly process so much smoother and more enjoyable.
- Warm Those Shells to Perfection
- Don't skip this step – warming your taco shells properly is crucial for achieving that ultimate crunch. Preheat your oven to 350 degrees Fahrenheit and arrange your shells on a baking sheet. You can stand them upright or lay them on their sides, whatever works best for your pan. Pop them in for just 3 to 5 minutes – you want them hot and crispy but not burnt. Keep a close eye on them because they can go from perfect to overdone very quickly. The warmth also helps them become more pliable and less likely to crack when you're filling them.
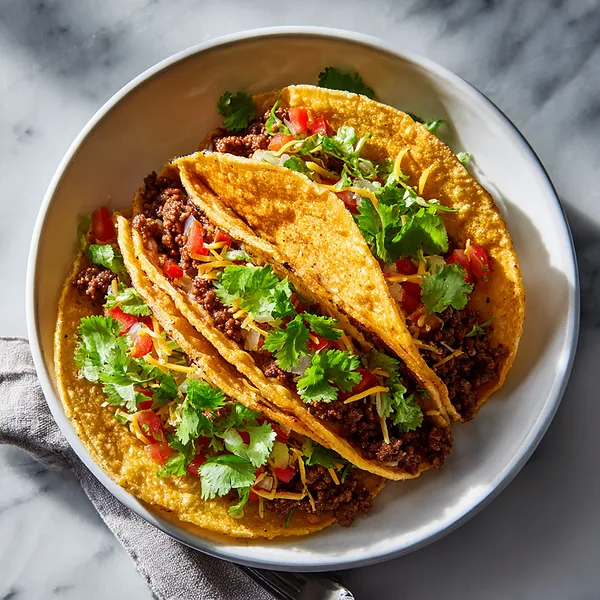
- Build Your Perfect Taco
- Now comes the best part – assembly time! Take your warm shell and start with a generous scoop of that seasoned beef, about 2 to 3 tablespoons per taco. Immediately top it with shredded cheddar cheese so the heat from the beef melts it slightly, creating a delicious, gooey layer. Then add your cool, crisp lettuce for that perfect temperature contrast. Follow with the diced tomatoes and red onions for freshness and crunch. Finish with a dollop of cool sour cream and a sprinkle of fresh cilantro. Don't forget those lime wedges on the side – a squeeze of fresh lime juice right before eating takes these tacos to the next level.
- Serve and Enjoy Immediately
- Timing is everything with crunchy tacos. Once assembled, serve them right away while the shells are still crispy and the beef is hot. The longer they sit, the more likely the shells will absorb moisture from the fillings and lose that satisfying crunch. Set everything out family-style and let everyone build their own tacos to their personal preference. Some people love extra cheese, others want more sour cream, and some adventurous souls will pile on all the toppings. That's the beauty of taco night – everyone gets exactly what they want, and the interactive nature makes it more than just a meal, it becomes an experience everyone can enjoy together.
 pin it
Switch Things Up
I'll never forget the first time I made these tacos at home after years of hitting up fast-food joints. I was skeptical – could homemade really beat the drive-through? But the moment I took that first bite, with the shell shattering perfectly under my teeth and that warm, spiced beef hitting my taste buds, I knew I'd never go back. Now, I make these every other week, and honestly, I've gotten so good at the assembly line that I can crank out a dozen tacos in minutes. My secret? I always toast the shells for an extra minute in the oven – it makes them even crunchier. Sometimes I'll add a dash of smoked paprika to the beef for a subtle kick, or swap in pepper jack cheese when I'm feeling adventurous. The best part is watching everyone build their perfect taco, piling on their favorite toppings without judgment. It's become our go-to comfort meal.
Perfect Pairings
These crunchy beef tacos pair beautifully with classic Mexican sides that round out the meal perfectly. Serve them alongside some creamy refried beans or cilantro-lime rice for a complete dinner spread. Mexican street corn (elote) makes an incredible companion with its smoky, tangy flavors complementing the savory beef. For drinks, nothing beats a cold Mexican lager, fresh margaritas, or for a non-alcoholic option, homemade horchata or agua fresca. Don't forget to set out some warm tortilla chips with fresh guacamole and salsa for pre-dinner snacking. If you want to go all out, add a side of queso fundido or black bean salad to the table.
 pin it
Frequently Asked Questions
- → Can I use ground turkey or chicken instead of beef?
Absolutely! Ground turkey or chicken work wonderfully in this recipe. Just keep in mind that they're leaner than beef, so you might want to add a tablespoon of oil to the pan to prevent sticking. The cooking time remains the same, but make sure to cook poultry to an internal temperature of 165 degrees Fahrenheit. You may also want to add a touch more seasoning since poultry has a milder flavor than beef.
- → How do I keep my taco shells from breaking?
The key is warming them properly before filling. Heat them in a 350 degree Fahrenheit oven for 3 to 5 minutes – this makes them more pliable and less brittle. Also, don't overfill your shells; about 2 to 3 tablespoons of meat is plenty. When assembling, hold the shell gently but firmly, and add toppings in layers rather than cramming everything in at once. If shells do crack, just consider it a taco salad in progress!
- → Can I make the beef mixture ahead of time?
Yes, the seasoned beef mixture actually tastes even better the next day as the flavors have more time to meld. Cook the beef completely, let it cool, then store it in an airtight container in the refrigerator for up to 3 days. When you're ready to eat, simply reheat it in a skillet over medium heat with a splash of water to prevent drying out. The taco shells and fresh toppings should always be prepared fresh for the best texture and flavor.
- → What's the best way to reheat leftover taco meat?
The stovetop method works best for maintaining texture and flavor. Place the leftover beef in a skillet over medium heat and add a tablespoon or two of water to restore moisture. Stir frequently for 3 to 5 minutes until heated through. Avoid using the microwave if possible, as it can make the meat rubbery and dry. If you must microwave, use 30-second intervals, stirring between each, and add a splash of water to keep it moist.
- → How can I make these tacos spicier?
There are several ways to add heat to your tacos! Mix in some cayenne pepper or red pepper flakes with the taco seasoning. Add diced jalapeños or serrano peppers to your toppings. Use pepper jack cheese instead of regular cheddar for a spicy kick. You can also offer hot sauce, salsa verde, or pickled jalapeños as optional toppings so everyone can customize their heat level. For maximum spice, sauté some fresh chili peppers directly into the beef mixture while cooking.
- → Can I freeze the cooked taco meat?
Yes, the seasoned beef freezes beautifully! Let it cool completely, then transfer to freezer-safe bags or containers, removing as much air as possible. Label with the date and freeze for up to 3 months. To thaw, move it to the refrigerator overnight, then reheat on the stovetop with a bit of water. This makes taco night even easier – just pull out the frozen meat in the morning and you're halfway done with dinner!
Conclusion
These Ultimate Crunchy Beef Tacos are everything a taco should be – crispy, flavorful, and loaded with all your favorite toppings. They're the kind of meal that brings everyone to the table with excitement, whether it's a busy weeknight or a casual weekend gathering. The beauty of this recipe lies in its simplicity and the fact that everyone can customize their tacos exactly how they like them. With just 30 minutes from start to finish, you'll have a restaurant-quality meal that satisfies every craving. Make a batch tonight and watch them disappear faster than you can say "pass the hot sauce!"