
 pin it
I still remember the first time I had real deep-dish pizza – I was visiting Chicago with friends, and we stumbled into this legendary pizzeria that had been around for decades. When that pizza arrived at our table, I was shocked by how different it was from anything I'd ever called pizza before. The crust was thick and buttery, almost like a savory pie crust, and the layers just kept going – cheese, meat, sauce, more cheese. It was less like pizza and more like a glorious Italian casserole. That experience stayed with me, and when I finally decided to recreate it at home, I spent weeks testing different dough recipes and layering techniques. This recipe is my love letter to that Chicago original, but adapted for home cooks who don't have a professional pizza oven. What makes this version special is how we build the layers – dough first, then cheese (which protects the crust from getting soggy), then the meat and sauce. It's all about that construction technique. The result is a pizza that's structurally sound enough to hold all those toppings while still delivering that perfect cheese pull with every slice.
Why I love this recipe
What I absolutely love about this Deep-Dish Pizza Pie is how it transforms pizza night from something quick and casual into an actual event. There's something deeply satisfying about making pizza from scratch – pressing that dough into the skillet, layering on the cheese and toppings, watching it transform in the oven. It's hands-on cooking at its best. Beyond the cooking process, this pizza just delivers on every level. The crust is crispy on the outside but soft and doughy where it meets the cheese. The layers create this incredible complexity in every bite – you get cheese, meat, sauce, and herbs all working together. And honestly, the leftovers might be even better than the original. I love having slices in the fridge for quick lunches or late-night snacks. This recipe also taught me that pizza doesn't have to mean thin and crispy – sometimes you want something more substantial, more filling, more comforting. This is the pizza I make when I want to impress people or when I need serious comfort food. It never disappoints.
What You Need From Your Kitchen
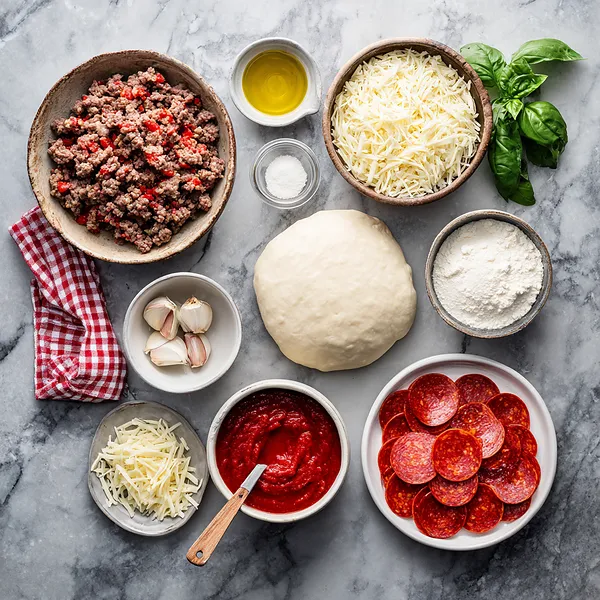
- Pizza Dough: Let come to room temperature for 30 minutes before using, then roll out to fit your pan with extra for the sides
- Ground Beef: Brown thoroughly and drain excess fat before adding to pizza
- Mozzarella Cheese: Use half as the first layer to protect the crust, and half as the top layer
- Pepperoni Slices: Layer evenly over the meat for consistent flavor in every bite
- Pizza Sauce: Spread evenly over all toppings to prevent dry spots
- Parmesan Cheese: Sprinkle on top for extra flavor and golden browning
- Fresh Basil: Add after baking as a fresh, aromatic garnish
Let's Make These Together
- Prepare Your Deep-Dish Base
- The foundation of great deep-dish pizza is properly prepared dough. Start by letting your dough rest at room temperature, which makes it pliable and easy to stretch. When you press it into your cast-iron skillet, take your time working it up the sides – you want at least an inch of dough above the rim. This creates that signature deep-dish wall that holds all your delicious toppings. Don't worry if it's not perfect; the dough will settle as it bakes.
- Brown and Season Your Meat
- Cooking the ground beef separately before adding it to the pizza is crucial. You want to develop flavor and remove excess grease that would otherwise make your pizza soggy. Season the meat well with Italian herbs while it cooks, and break it into small, bite-sized pieces. Once it's nicely browned and aromatic, drain it thoroughly and let it cool for a few minutes before layering.
- Build Strategic Layers
- Here's where deep-dish pizza differs from regular pizza: the layering order matters. Start with cheese directly on the dough – this creates a barrier that prevents the crust from getting soggy. Then add your cooked meat, followed by pepperoni, and finally the sauce. Top with more cheese and Parmesan. This reverse-engineering approach is what gives deep-dish its structure and keeps every component distinct.
- Fold and Seal the Edges
- Once all your toppings are in place, take that overhanging dough and fold it over the top layer, creating a thick, protective crust border. This not only looks professional but also seals in all the goodness and prevents overflow during baking. Brush the exposed dough with olive oil for a beautiful golden color.
- Bake to Perfection
- Deep-dish pizza needs time in the oven to cook through all those layers properly. Place your skillet on the middle rack where heat circulates evenly. Watch for the crust to turn golden and the cheese to bubble and brown slightly. If the top is browning too fast, cover it loosely with foil. The smell will be absolutely incredible – that's how you know it's ready!
 pin it
Switch Things Up
I first attempted making deep-dish pizza on a rainy Saturday afternoon when I was craving that classic Chicago-style experience but didn't want to leave the house. I'll be honest – my first attempt was a bit of a mess. I didn't press the dough up the sides properly, and the whole thing kind of collapsed into itself. But you know what? It still tasted incredible. The second time around, I learned to be more patient with the dough and really take my time building those layers. Now, I make this at least twice a month, and I've gotten creative with the toppings – sometimes adding sautéed mushrooms, bell peppers, or Italian sausage alongside the ground beef. The cast-iron skillet is key here; it gives you those crispy edges that make each slice absolutely perfect. My biggest tip? Don't skimp on the cheese between layers – that's where the magic happens.
Perfect Pairings
This Deep-Dish Pizza Pie pairs beautifully with a crisp Caesar salad or a simple arugula salad dressed with lemon vinaigrette to cut through the richness. For beverages, a robust red wine like Chianti or a cold Italian beer complements the savory flavors perfectly. If you're serving this for a casual gathering, garlic knots or cheesy breadsticks make excellent appetizers. For a complete Italian-American feast, start with some bruschetta or caprese skewers, and finish with a light tiramisu or cannoli for dessert.
 pin it
Frequently Asked Questions
- → Can I use store-bought pizza dough?
Absolutely! Store-bought pizza dough works perfectly for this recipe. Just make sure to let it come to room temperature for about 30 minutes before using, which makes it much easier to stretch and shape. Most grocery stores carry fresh pizza dough in the bakery or refrigerated section.
- → What if I don't have a cast-iron skillet?
No problem! You can use a deep-dish pizza pan, a springform pan, or even a 9x13 inch baking dish. The cast-iron gives you the crispiest crust, but other pans will still produce a delicious deep-dish pizza. Just make sure whatever you use is at least 2 inches deep to hold all the toppings.
- → Can I make this pizza ahead of time?
Yes! You can assemble the entire pizza, cover it tightly with plastic wrap, and refrigerate for up to 24 hours before baking. You may need to add 5-10 minutes to the baking time if you're starting with a cold pizza. You can also freeze the assembled unbaked pizza for up to 2 months – just thaw in the refrigerator overnight before baking.
- → Why does the recipe call for cheese first instead of sauce?
In deep-dish pizza, the cheese goes on the bottom to create a protective barrier between the wet toppings and the crust. This prevents the crust from getting soggy during the longer baking time. The sauce goes on top, which also helps keep the cheese from burning during the extended oven time.
- → How do I know when the pizza is fully cooked?
The pizza is done when the crust is golden brown, the cheese is bubbling vigorously, and you can see slight browning on top. The internal temperature should reach about 200°F. If you're unsure, you can carefully lift an edge with a spatula to check that the bottom crust is golden and crispy, not pale or doughy.
- → Can I customize the toppings?
Definitely! While this recipe uses ground beef and pepperoni, you can substitute Italian sausage, add vegetables like bell peppers, mushrooms, or onions, or make it vegetarian. Just remember that wet vegetables should be pre-cooked to remove excess moisture, and don't overload the pizza or it won't cook properly.
Conclusion
This Deep-Dish Pizza Pie is everything you want in a comfort meal – hearty, cheesy, and absolutely satisfying. It's the kind of recipe that brings people together around the table, where everyone reaches for seconds before they've even finished their first slice. The beauty of this pizza is in its versatility – you can customize the toppings to your family's preferences while still maintaining that signature deep-dish structure. Whether it's game day, movie night, or just a casual weeknight dinner, this pizza delivers every single time.