
 pin it
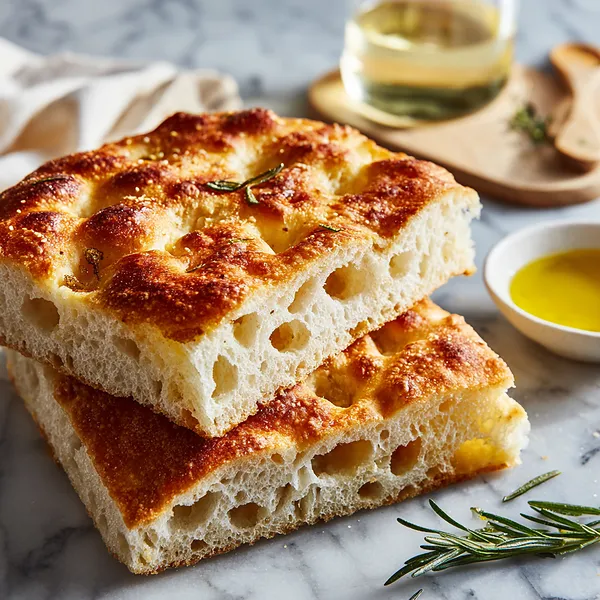
I first discovered focaccia during a trip to a small bakery in Italy, where I watched the baker press his fingers into the dough with such confidence, creating those signature dimples that would cradle pools of golden olive oil. When I came home, I was determined to recreate that magical bread, but every recipe seemed so complicated with multiple rises and constant kneading. Then I stumbled upon this no-knead method and everything changed. This focaccia is all about simplicity and time doing the work for you. You mix flour, yeast, salt, and water in one bowl, let it rest for a few hours while the gluten develops naturally, then stretch it into a pan, dimple it generously, and let it rise one more time before baking. The result is a bread with a golden, crispy bottom, edges that shatter when you bite into them, and an interior so light and airy it almost floats. The rosemary and olive oil aren't just toppings – they're essential elements that infuse every bite with herbaceous, fruity flavor. What I love most is how forgiving this recipe is; the long fermentation develops such deep flavor that even beginners get incredible results.
Why I love this recipe
I love this recipe because it proves that incredible bread doesn't require professional skills or fancy equipment. It's taught me that sometimes the best cooking happens when you step back and let time work its magic. The no-knead method means I can mix the dough in the morning, go about my day, and come back to perfectly developed dough ready to bake. There's something deeply satisfying about pressing your fingers into that soft, pillowy dough and watching the dimples fill with olive oil. The smell of rosemary and bread baking together is pure comfort. But what really makes me love this recipe is how it brings people together. I've made this for countless dinner parties, potlucks, and family gatherings, and it never fails to impress. People are always shocked when I tell them it's just five basic ingredients and barely any hands-on time. It's become my signature dish, the thing people request when they're coming over. And every time I pull that golden, fragrant bread from the oven, I feel that same excitement I felt the very first time. This focaccia has taught me that the simplest recipes often become the most beloved.
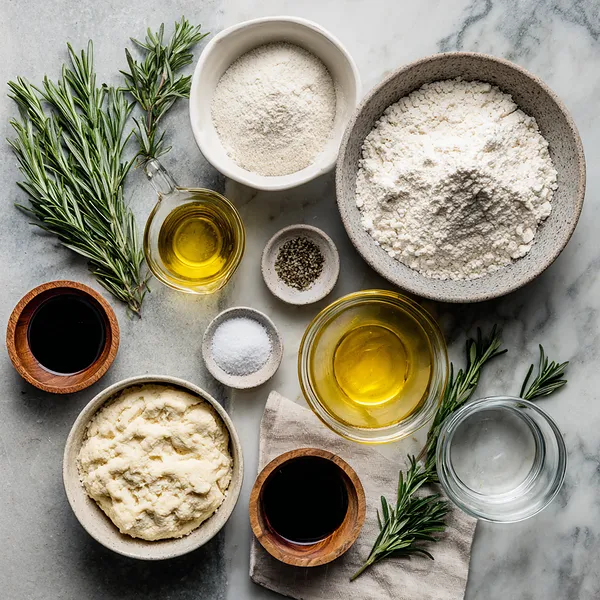
What You Need From Your Kitchen
- All-purpose flour: Forms the base structure of the bread; provides the perfect texture for focaccia
- Instant yeast: Creates the rise and airy texture without kneading; activates with the warm water
- Warm water: Hydrates the flour and activates the yeast; should be around 100-110°F
- Olive oil: Adds richness, creates the crispy crust, and provides authentic Italian flavor throughout
- Fresh rosemary: Infuses the bread with aromatic, herbaceous flavor that's essential to classic focaccia
- Flaky sea salt: Provides bursts of salty flavor and adds textural contrast to the soft bread
Let's Make These Together
- Mix the simple dough
- In your large bowl, whisk together the dry ingredients – flour, yeast, and salt – until everything is evenly distributed. This ensures the yeast and salt are properly dispersed throughout. Pour in the warm water and olive oil, then use a wooden spoon or your hands to bring everything together into a sticky, shaggy mass. Don't worry about it looking rough – this rustic texture is exactly what you want. The dough will be wetter and stickier than traditional bread dough, which is what creates those beautiful air pockets.
- Let time do the work
- Cover your bowl with plastic wrap or a damp towel and set it aside at room temperature. Over the next 3-4 hours, the yeast will work its magic, creating bubbles and developing gluten naturally without any kneading from you. You'll see the dough transform from a sticky mass into a bubbly, airy mixture that has doubled in size. This slow fermentation is the secret to focaccia's incredible flavor and texture. If you have the time, refrigerating the dough overnight after an hour of rising will develop even more complex flavors.
- Shape and create those iconic dimples
- Oil your baking pan generously – don't be shy! This oil creates that crispy, golden bottom crust. Turn the risen dough into the pan and use oiled hands to gently coax it toward the corners. Let it rest for 15 minutes if it resists, then stretch again. Now comes the fun part: press your fingertips firmly into the dough all over, creating those characteristic dimples. These little wells will catch olive oil and create pockets of flavor. Drizzle generously with more olive oil, scatter fresh rosemary leaves, and sprinkle with flaky salt.
- Final rise and bake to golden perfection
- Give the shaped focaccia one more rise – about 45-60 minutes covered at room temperature. You'll see it puff up beautifully. Meanwhile, preheat your oven to 425°F. When the focaccia is puffy and the oven is hot, slide it in and bake until the top is deeply golden and the edges are crispy and bronzed, about 22-28 minutes. The whole house will smell incredible! Let it cool briefly in the pan, then transfer to a rack. The hardest part is waiting to dig in!
 pin it
Switch Things Up
I remember the first time I made this focaccia on a lazy Sunday morning. I was skeptical about the no-knead method – how could bread be good without all that work? But when I pulled that golden, fragrant bread from the oven, I was absolutely blown away. The kitchen smelled like an Italian bakery, and that first bite of the crispy, olive oil-soaked crust giving way to the pillowy interior was pure magic. Now, I make this almost every week, sometimes adding cherry tomatoes and garlic, other times keeping it simple with just rosemary. My favorite moment is right before baking when I press my fingers into the dough to create those dimples and drizzle olive oil generously over the top. It's become my go-to recipe for impressing dinner guests – they never believe me when I tell them how easy it was!
Perfect Pairings
This focaccia is incredibly versatile and pairs beautifully with so many dishes. Serve it alongside a hearty minestrone soup or creamy tomato basil soup for dipping. It's perfect with Italian pasta dishes like spaghetti marinara or creamy carbonara. Use it to make incredible sandwiches filled with fresh mozzarella, tomatoes, and basil. It's also wonderful with charcuterie boards, antipasto platters, or simply with high-quality olive oil and balsamic vinegar for dipping. For breakfast, toast slices and top with avocado, eggs, or ricotta and honey. Pair with a crisp white wine like Pinot Grigio or a light Italian red for an authentic experience.
 pin it
Frequently Asked Questions
- → Can I make this focaccia ahead of time?
Absolutely! You can prepare the dough up to 24 hours in advance. After the initial mixing, let it rise for 1 hour at room temperature, then cover and refrigerate overnight. The next day, bring it back to room temperature (about 1-2 hours), then proceed with shaping and the final rise. This cold fermentation actually improves the flavor! You can also freeze baked focaccia for up to 3 months; thaw and reheat at 350°F for best results.
- → Why is my focaccia not rising?
The most common culprit is old or inactive yeast. Check the expiration date on your yeast package and consider proofing it in a bit of warm water with a pinch of sugar before using. Also, make sure your water isn't too hot (over 120°F) as this can kill the yeast, or too cold (under 95°F) which won't activate it properly. Finally, if your kitchen is very cold, rising will take longer – try placing the bowl in a slightly warm spot like near a sunny window or on top of your fridge.
- → Can I use different toppings besides rosemary?
Yes! Focaccia is incredibly versatile. Try cherry tomatoes (halved and pressed into the dough), thinly sliced garlic, kalamata olives, caramelized onions, sun-dried tomatoes, or different fresh herbs like thyme, oregano, or sage. You can also make sweet focaccia by topping with sliced grapes and rosemary, or figs and honey. Just make sure any wet toppings are patted dry first to prevent a soggy crust. Get creative – focaccia is very forgiving!
- → How do I store leftover focaccia?
Wrap cooled focaccia tightly in aluminum foil or place in an airtight container at room temperature for up to 2 days. Don't refrigerate it as this will make it stale faster. To refresh leftover focaccia, wrap it in foil and warm in a 350°F oven for 5-7 minutes, or toast individual slices. You can also cut it into cubes and make amazing croutons or breadcrumbs from day-old focaccia!
- → Do I really need to use so much olive oil?
Yes! The generous amount of olive oil is what makes focaccia special. It creates that incredibly crispy, golden bottom crust and keeps the interior moist and tender. The oil in the dimples infuses every bite with flavor. Don't skimp on it – this is not the recipe to be conservative with olive oil. Use a good quality extra virgin olive oil for the best flavor. If cost is a concern, you can use regular olive oil for the pan and dough, and save your best extra virgin for the final drizzle on top.
- → Can I make this recipe gluten-free or vegan?
This recipe is already vegan as written! For gluten-free, you'll need to use a gluten-free all-purpose flour blend designed for bread (like Bob's Red Mill 1-to-1 or King Arthur Measure for Measure). The texture will be slightly different and may not have the same large air pockets, but it will still be delicious. You may need to add 1-2 tablespoons of xanthan gum if your blend doesn't include it, and the dough may be slightly less elastic.
Conclusion
This no-knead focaccia is truly a game-changer for home bakers. The extended fermentation time develops incredible flavor while the technique creates that signature airy texture with minimal effort. Whether you're serving it alongside pasta, using it for sandwiches, or simply enjoying it warm with olive oil, this focaccia delivers bakery-quality results every single time. The beauty of this recipe is its flexibility – you can customize the toppings with cherry tomatoes, olives, garlic, or whatever you love. Once you master this basic technique, you'll find yourself making focaccia weekly!