
 pin it
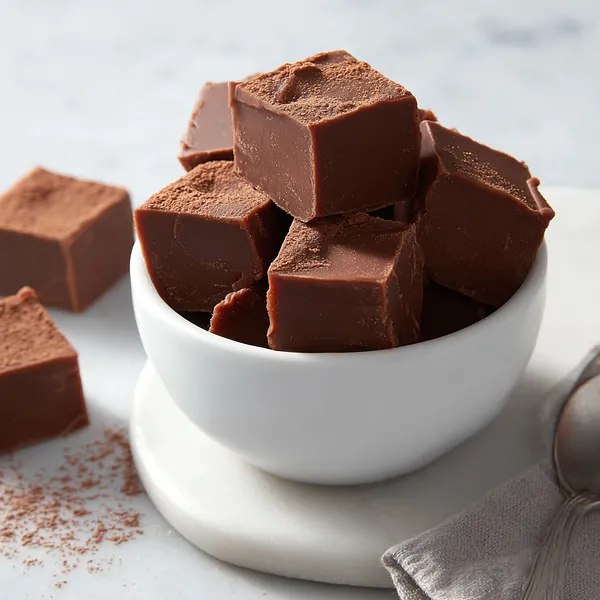
I remember the first time I tasted real Fannie May fudge at their flagship store in Chicago – it was a revelation. That impossibly smooth texture, the way it just dissolved on your tongue, the perfect balance of sweetness and rich chocolate flavor. I was determined to recreate it at home, and after several attempts, I finally cracked the code. The secret? It's all about the marshmallow creme. That ingredient is what gives the fudge its signature silky texture and prevents it from becoming grainy or crystallized. When you combine it with quality chocolate chips and sweetened condensed milk, magic happens. The butter adds richness and helps with the smooth consistency, while the vanilla extract rounds out all the flavors beautifully. What I love most about this recipe is how forgiving it is – even if you're new to candy making, you'll succeed. There's no need to worry about reaching specific temperatures or dealing with complicated techniques. You simply melt everything together, stir until smooth, pour it into a pan, and let it set. The result is professional-quality fudge that tastes exactly like the expensive stuff from the candy shop. Every time I make it, I'm transported back to that moment in Chicago, biting into that first piece of Fannie May fudge and thinking, 'This is what chocolate heaven tastes like.' Now I can have that experience whenever I want, right in my own kitchen.
Why I love this recipe
This recipe holds a special place in my heart for so many reasons. First, it's incredibly reliable – I've never had a batch fail, which is saying something for a candy recipe. The consistency is always perfect, the flavor is always spot-on, and it always sets up beautifully. Second, it's versatile. While the classic version is absolutely delicious, you can easily customize it by adding nuts, swirling in peanut butter, or sprinkling sea salt on top. I've made variations with crushed peppermint candies during Christmas and with chopped pecans for fall gatherings. Third, it's a recipe that makes me feel accomplished without requiring hours in the kitchen. In less time than it takes to drive to a candy store, I can have homemade fudge that tastes better than anything you can buy. But perhaps what I love most is how this recipe connects me to memories and creates new ones. Every time I make it, I think of my grandmother and her love of good chocolate. Every time I gift it, I see the genuine delight on people's faces. It's a recipe that brings joy – both in the making and the sharing. The fact that it tastes incredible is just the icing on the cake (or should I say, the chocolate on the fudge?). This is the kind of recipe that gets passed down through generations, and I'm proud to be part of that tradition.
What You Need From Your Kitchen
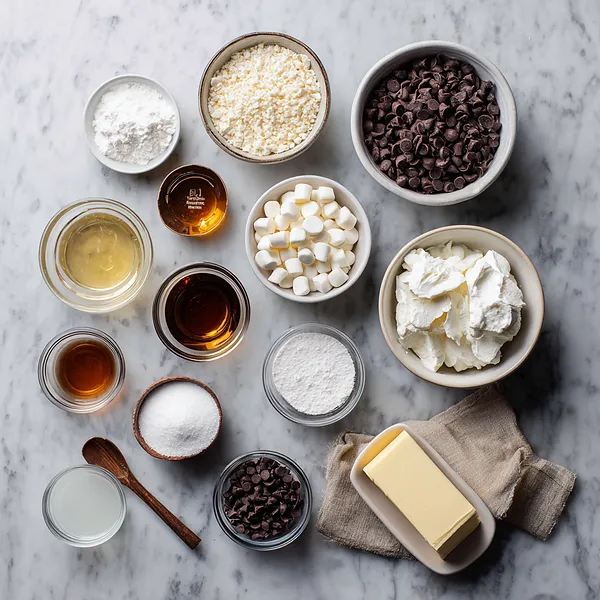
- Semi-sweet chocolate chips: Use high-quality chips for the best flavor and smooth melting consistency
- Sweetened condensed milk: Provides sweetness and creates the creamy base for the fudge
- Butter: Cut into tablespoons and add to the melting mixture for richness
- Marshmallow creme: Stir in after removing from heat for that signature silky texture
- Vanilla extract: Add at the end to enhance the chocolate flavor without cooking off the vanilla notes
Let's Make These Together
- Prepare Your Pan First
- Start by lining your baking pan with parchment paper, making sure to leave plenty of overhang on two sides. This overhang acts as handles that make it super easy to lift the fudge out later for cutting. Give the parchment a light coating of butter or cooking spray to ensure nothing sticks. Having your pan ready before you start cooking is crucial because once the fudge mixture is ready, you need to pour it immediately while it's still warm and pourable.
- Melt with Patience
- Combine your chocolate chips, sweetened condensed milk, and butter in a medium saucepan over the lowest heat setting your stove offers. The key here is patience – rushing this step with high heat will scorch your chocolate and ruin the smooth texture. Stir constantly in a figure-eight pattern to ensure even melting. You'll know it's ready when the mixture is completely smooth, glossy, and flows easily off your spoon. This should take about 5 minutes, but don't watch the clock – watch the texture instead.
- Incorporate the Marshmallow
- As soon as you remove the pan from heat, add your marshmallow creme, vanilla extract, and a pinch of salt. This is where the magic happens – the marshmallow creme creates that incredible melt-in-your-mouth texture that makes this fudge so special. Stir vigorously and continuously until every trace of white marshmallow disappears and you're left with a uniform, glossy chocolate mixture. This vigorous stirring also helps cool the mixture slightly and incorporates air for a lighter texture.
- Pour and Smooth
- Working quickly but carefully, pour the entire mixture into your prepared pan. Use a rubber spatula to spread it into all the corners and smooth the top surface. Don't worry about making it absolutely perfect – a few swirls and imperfections add character. If you want a perfectly flat top, you can gently tap the pan on the counter a few times to settle the mixture and release any trapped air bubbles.
- Set and Slice
- Place the pan in the refrigerator and let the fudge set for at least 2-3 hours. It needs to be completely firm before cutting, or you'll end up with messy, uneven pieces. Once firm, lift the entire slab out using the parchment paper handles and place it on a cutting board. Use a large, sharp knife to cut into squares, wiping the blade clean with a damp cloth between each cut for the neatest edges. If the fudge is too hard to cut cleanly, let it sit at room temperature for 10-15 minutes to soften slightly.
 pin it
Switch Things Up
I first made this fudge during a particularly busy December when I needed homemade gifts but was short on time. I remembered my grandmother talking about how easy good fudge could be if you had the right recipe, so I decided to give it a shot. The moment I poured that glossy chocolate mixture into the pan, I knew I was onto something special. When it set and I cut into those perfect squares, I couldn't believe how professional they looked. I packaged them up in little boxes with ribbon, and the reactions were incredible – everyone wanted the recipe! What struck me most was how the marshmallow creme created this incredibly smooth texture without any graininess. Since then, I've made this fudge countless times, tweaking it here and there, but the base recipe remains the same. It's become my go-to for everything from teacher gifts to potluck desserts. The beauty of this recipe is its consistency – it works perfectly every single time, no candy thermometer needed, no worrying about temperature stages. Just simple, foolproof deliciousness that tastes like it came from an expensive candy boutique.
Perfect Pairings
This fudge pairs beautifully with a hot cup of coffee or a cold glass of milk – the classic combinations never fail. For a more sophisticated pairing, try it with a robust espresso or even a glass of port wine for an after-dinner treat. If you're serving it at a party, consider placing it on a dessert board alongside salted caramels, peanut butter cups, and fresh berries. The fudge also works wonderfully crumbled over vanilla ice cream or brownies for an extra decadent dessert. During the holidays, I love serving it with peppermint bark and chocolate-covered pretzels for a beautiful candy platter that looks like it came from a gourmet shop.
 pin it
Frequently Asked Questions
- → Can I use milk chocolate chips instead of semi-sweet?
Absolutely! Milk chocolate will make the fudge sweeter and milder in flavor. You might want to reduce the amount of sweetened condensed milk slightly (use about 3/4 of the can) to prevent it from becoming too sweet. Dark chocolate chips also work beautifully if you prefer a more intense chocolate flavor.
- → Why is my fudge grainy instead of smooth?
Graininess usually happens when the chocolate is heated too quickly or at too high a temperature, causing the sugar to crystallize. Make sure to use low heat and stir constantly. Another cause can be not incorporating the marshmallow creme thoroughly enough. Stir vigorously until completely smooth and no white streaks remain.
- → Can I add nuts or other mix-ins to this fudge?
Yes! Stir in up to 1 cup of chopped walnuts, pecans, or almonds right after adding the marshmallow creme. You can also add crushed peppermint candies, dried cherries, or even swirl in peanut butter for variety. Just fold them in gently before pouring the mixture into the pan.
- → How long does homemade fudge stay fresh?
When stored properly in an airtight container at room temperature with parchment paper between layers, this fudge will stay fresh for up to 2 weeks. You can also freeze it for up to 3 months – just wrap individual pieces in plastic wrap, place in a freezer bag, and thaw at room temperature when ready to enjoy.
- → Do I really need marshmallow creme, or can I skip it?
The marshmallow creme is essential for achieving that signature smooth, creamy texture. It prevents crystallization and gives the fudge its melt-in-your-mouth quality. If you can't find marshmallow creme, use 2 cups of mini marshmallows instead, but make sure to stir very thoroughly until they're completely melted and incorporated. Skipping it entirely will result in a much denser, grainier fudge.
- → Can I make this fudge without a candy thermometer?
That's the beauty of this recipe – you don't need a candy thermometer at all! Unlike traditional fudge recipes that require precise temperature monitoring, this version relies on the stabilizing properties of the marshmallow creme and sweetened condensed milk. Just melt everything until smooth, and you're done. It's foolproof!
Conclusion
This Fannie May copycat fudge is proof that the best treats don't have to be complicated. With just a handful of ingredients and minimal effort, you can create something truly special that rivals any high-end candy shop. Whether you're making it for holidays, gifts, or just because you're craving something sweet, this fudge delivers every single time. The smooth, creamy texture and rich chocolate flavor make it absolutely irresistible. Store it in an airtight container, and it'll keep for up to two weeks – though I doubt it'll last that long once people get a taste!