
 pin it
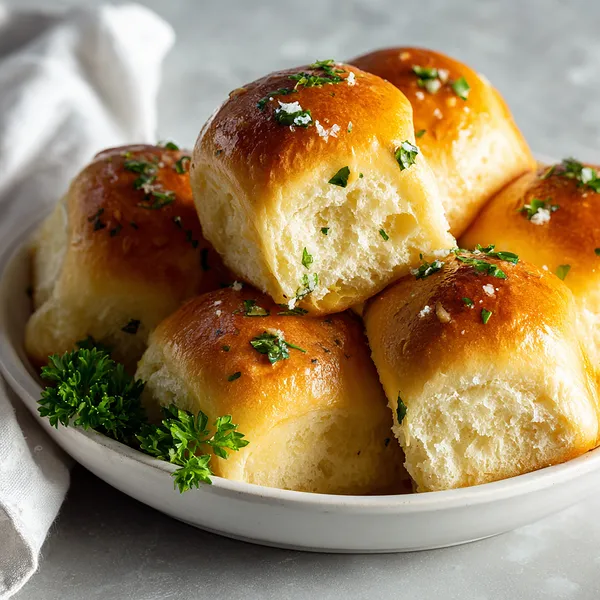
I remember walking into a small bakery in San Francisco years ago, and the smell of fresh bread and garlic butter hit me like a warm hug. The baker was pulling trays of golden dinner rolls from the oven, each one perfectly domed and glistening. I bought half a dozen and ate three before I even left the block – they were that good. That experience inspired me to recreate that magic at home, and after many batches and tweaks, these garlic butter dinner rolls were born. What makes them special is the combination of a slightly sweet, enriched dough that stays soft for days, and that generous coating of garlic herb butter that seeps into every crevice. The dough itself is forgiving and fun to work with, rising beautifully into pillowy mounds. When they bake, they develop this gorgeous golden-brown color and a slightly crispy top that gives way to the softest, fluffiest interior. The finishing touch – that final brush of melted garlic butter mixed with fresh parsley and a sprinkle of flaky sea salt – transforms them from simple dinner rolls into something truly extraordinary. They're the kind of rolls that make people pause mid-conversation to ask, "Did you really make these from scratch?" And when you proudly say yes, you'll see their eyes light up with admiration.
Why I love this recipe
There's something deeply satisfying about making bread from scratch, and these garlic butter dinner rolls capture that joy perfectly. I love how the simple act of mixing flour, yeast, and a few basic ingredients transforms into something so comforting and delicious. The process itself is therapeutic – kneading the dough, watching it rise, shaping the rolls into perfect little balls. But what really makes me love this recipe is the reaction it gets from people. There's nothing quite like seeing someone tear open a warm roll, watch the steam rise, and take that first bite. Their face lights up, they close their eyes to savor it, and invariably they reach for another. These rolls have this amazing ability to make any meal feel special, whether it's a Tuesday night dinner or Thanksgiving feast. I also love their versatility – you can customize the herbs, adjust the garlic level, or even stuff them with cheese. They freeze beautifully too, so you can always have homemade rolls ready to go. But mostly, I love that making these rolls has become a tradition in my kitchen, a recipe I can make with my eyes closed, and one that consistently brings joy to everyone who tries them.
What You Need From Your Kitchen
- All-purpose flour: Forms the base structure of the rolls, providing the perfect texture
- Active dry yeast: Creates the rise and fluffy texture, activate in warm milk first
- Warm milk: Activates the yeast and adds richness to the dough
- Unsalted butter: Used both in the dough and for the garlic butter topping, adds richness and flavor
- Fresh garlic: Mince finely and mix with melted butter for that signature garlic flavor
- Fresh parsley: Chop and mix into the garlic butter for color and fresh herb flavor
- Egg: Enriches the dough and helps create a tender crumb
Let's Make These Together
- Activate Your Yeast
- Start by warming your milk to about 110°F – it should feel like warm bathwater on your wrist. Pour it into a large bowl, add the sugar and yeast, then give it a gentle stir. Walk away for about 5-10 minutes and let the magic happen. You'll know the yeast is ready when it becomes foamy and bubbly on top, like a little cloud forming. This step is crucial because it ensures your yeast is alive and will make your rolls rise beautifully.
- Build Your Dough
- Once your yeast is foamy and active, it's time to build the dough. Pour in your melted butter (make sure it's cooled slightly so it doesn't cook the egg), crack in your egg, and add the salt. Whisk everything together until it's well combined and smooth. Now start adding your flour gradually, about a cup at a time, mixing after each addition. You can use a wooden spoon or a stand mixer with the dough hook – whatever feels comfortable. Keep adding flour until the dough pulls away from the sides of the bowl and forms a soft, slightly sticky ball.
- Knead and First Rise
- Turn your dough out onto a lightly floured counter and start kneading. Push the dough away with the heel of your hand, fold it back over itself, turn it a quarter turn, and repeat. Do this for about 8-10 minutes until the dough becomes smooth, elastic, and bounces back when you poke it. Place it in a greased bowl, cover with a clean kitchen towel, and set it somewhere warm. Let it rise for about 60-90 minutes until it doubles in size. This is when the yeast works its magic, creating all those beautiful air pockets that make the rolls so fluffy.
- Shape Those Beautiful Rolls
- Once your dough has doubled, punch it down gently to release the air – it's oddly satisfying! Turn it out onto your counter and divide it into 12 equal pieces. To shape each roll, take a piece and tuck the edges underneath, rolling it in a circular motion on the counter to create a smooth, tight ball. Place all 12 rolls into your greased baking dish, leaving a little space between each one. Cover them again and let them rise for another 30-45 minutes until they're puffy and have expanded to touch each other.
- Bake to Golden Perfection
- Preheat your oven to 375°F while the rolls are doing their second rise. When they're ready, pop them in the oven and bake for 18-22 minutes. You're looking for a gorgeous golden-brown color on top. While they're baking, mix your melted butter with minced garlic and chopped parsley. The moment those rolls come out of the oven, brush them generously with that garlic butter – don't be shy! The hot rolls will absorb all that garlicky goodness. Finish with a sprinkle of flaky sea salt and try to resist eating them all immediately!
 pin it
Switch Things Up
I'll never forget the first time I made these rolls for a family dinner. I was nervous because my grandmother was known for her legendary dinner rolls, and I wanted to impress everyone. As they baked, the house filled with the most incredible aroma of garlic and butter. When I pulled them from the oven, golden and perfect, I brushed on that final layer of garlic butter and watched it soak in. The moment I set them on the table, still warm, everyone reached for one at the same time. My grandmother took a bite, closed her eyes, and smiled – then asked for the recipe! That's when I knew I'd created something special. Now these rolls have become my signature dish at every gathering. I've made them for Thanksgiving, Christmas, Sunday dinners, and even just because. Sometimes I add extra garlic, sometimes a pinch of Italian seasoning. The beauty is they're forgiving and always turn out amazing. Pro tip: make a double batch because they disappear fast!
Perfect Pairings
These garlic butter dinner rolls are incredibly versatile and pair beautifully with so many dishes. Serve them alongside a hearty bowl of tomato soup or creamy potato soup for the ultimate comfort meal. They're perfect for soaking up the sauce from pasta dishes like spaghetti bolognese or chicken alfredo. Pair them with a crisp Caesar salad and grilled chicken for a restaurant-quality dinner at home. They also shine next to holiday classics like roasted turkey, prime rib, or glazed ham. For a lighter option, serve them with a fresh garden salad drizzled with balsamic vinaigrette. And don't overlook breakfast – these rolls make incredible breakfast sandwiches with scrambled eggs and bacon!
 pin it
Frequently Asked Questions
- → Can I make the dough ahead of time?
Absolutely! You can make the dough through the first rise, then punch it down, cover tightly, and refrigerate for up to 24 hours. When ready to use, let it come to room temperature for about 30 minutes, then shape the rolls and proceed with the second rise. This cold fermentation actually develops more flavor in the dough.
- → My rolls didn't rise properly, what went wrong?
The most common culprits are dead yeast or liquid that was too hot or too cold. Make sure your yeast is fresh (check the expiration date) and that your milk is between 105-115°F. If it's too hot, it kills the yeast; too cold, and the yeast won't activate. Also ensure you're giving the dough enough time to rise in a warm, draft-free location.
- → Can I freeze these rolls?
Yes! These rolls freeze beautifully. Let them cool completely after baking, then store in a freezer-safe bag or container for up to 3 months. To reheat, wrap them in foil and warm in a 300°F oven for about 15-20 minutes. You can brush them with fresh garlic butter after reheating for that just-baked taste.
- → Can I use instant yeast instead of active dry yeast?
Yes, you can substitute instant yeast in the same amount. The difference is that instant yeast can be mixed directly into the dry ingredients without activating it first in warm milk. However, I still recommend the activation step as it helps ensure your yeast is fresh and gives you that visual confirmation it's working.
- → How do I store leftover rolls?
Store cooled rolls in an airtight container or zip-top bag at room temperature for up to 4 days. They'll stay soft and delicious. To refresh them, warm in a 300°F oven for 5-7 minutes or microwave for 10-15 seconds. Avoid storing in the refrigerator as this can make them go stale faster.
- → Can I make these rolls without a stand mixer?
Definitely! These rolls can absolutely be made by hand. You'll just need to knead the dough for about 10 minutes on a floured surface instead of 5 minutes in the mixer. It's a bit more work, but the results are just as good, and some people find hand-kneading therapeutic.
Conclusion
These garlic butter dinner rolls are the ultimate comfort food that elevates any meal from ordinary to extraordinary. The combination of soft, pillowy texture with that irresistible garlic butter coating makes them absolutely addictive. Whether you're serving them alongside a holiday feast, a casual weeknight dinner, or just want to treat yourself to some fresh-baked goodness, these rolls deliver every single time. The best part? They're easier to make than you might think, and the homemade touch shows you really care. Once you master this recipe, you'll never want store-bought rolls again!