
 pin it
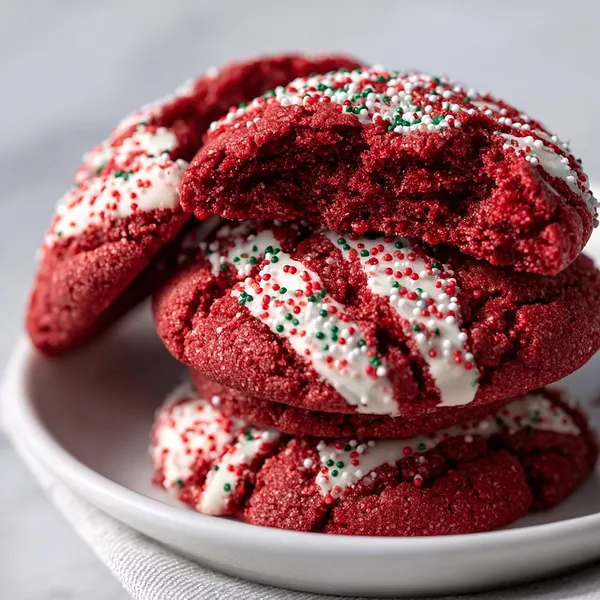
I'll never forget my first encounter with Red Velvet Cookies at a holiday market in Chicago. A small bakery had them displayed in the window, and the contrast of deep red cookies against white chocolate was mesmerizing. I bought a dozen and savored every bite during the train ride home. That experience inspired me to recreate them in my own kitchen. What I love about this recipe is how it captures the essence of red velvet cake but in a more casual, shareable form. The cookies have that distinctive cocoa flavor that's subtle but present, and the buttermilk keeps them incredibly moist. The white chocolate coating isn't just for show – it adds a creamy sweetness that balances the slight tang from the buttermilk. When I make these now, I always think back to that snowy evening and the joy of discovering something new and delicious.
Why I love this recipe
This recipe holds a special place in my baking repertoire for so many reasons. First, these cookies are practically foolproof – the dough comes together easily, and they bake up consistently perfect every time. I love how they look festive without requiring advanced decorating skills; the natural red color and simple white chocolate dip create stunning results. The texture is what really wins me over though – they're soft and chewy, never dry or crumbly. They also freeze beautifully, which means I can make them ahead during busy holiday seasons. But beyond the practical aspects, there's something magical about seeing people's faces light up when they spot these cookies on a dessert table. They photograph beautifully, taste incredible, and always spark conversations. It's the kind of recipe that makes you feel like a baking superstar.
What You Need From Your Kitchen
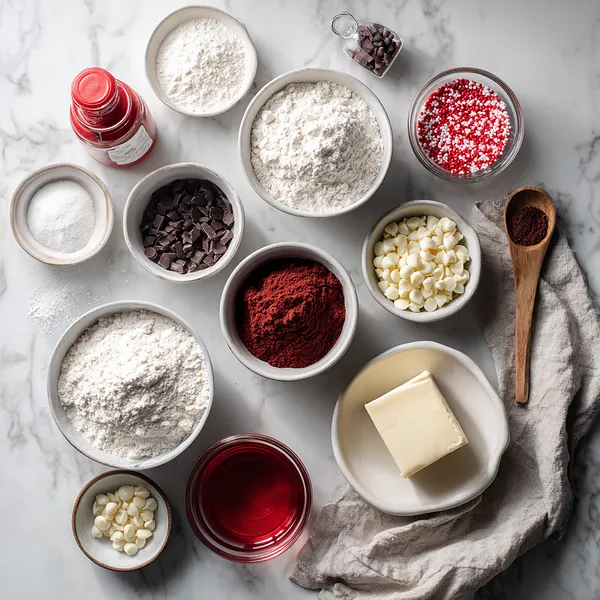
- All-purpose flour: Provides structure to the cookies and creates that perfect chewy texture
- Cocoa powder: Gives the cookies that classic red velvet flavor with subtle chocolate notes
- Unsalted butter: Softened to room temperature and creamed with sugar for rich flavor and tender texture
- Granulated sugar: Sweetens the cookies and helps create a slightly crispy exterior
- Eggs: Bind the ingredients together and add richness to the cookie dough
- Buttermilk: Adds tanginess and moisture while reacting with baking soda for perfect rise
- Red food coloring: Creates that signature vibrant red velvet color that makes these cookies so festive
- White chocolate chips: Melted for dipping to create a beautiful contrast and add creamy sweetness
- Festive sprinkles: Add holiday cheer and decorative flair to the finished cookies
Let's Make These Together
- Mix your dry ingredients
- Start by combining all your dry ingredients in a bowl – the flour, cocoa powder, baking soda, and salt. Whisk them together thoroughly so the cocoa powder is evenly distributed throughout. This ensures every cookie will have that beautiful red velvet flavor.
- Cream the butter and sugar
- This is where the magic begins! Beat your softened butter and sugar together until the mixture becomes light, fluffy, and pale in color. This process incorporates air into the dough, which helps create a tender cookie texture. Take your time with this step – it should take about 3-4 minutes.
- Add wet ingredients for color
- Now comes the fun part – adding that gorgeous red color! Mix in your eggs, vanilla, food coloring, and vinegar. Watch as the batter transforms into that signature red velvet hue. The vinegar might seem unusual, but it's essential for achieving the classic red velvet chemistry and flavor.
- Combine everything gently
- Alternate adding your dry ingredients and buttermilk to the butter mixture, starting and ending with the dry ingredients. Mix on low speed and be careful not to overmix – you want to mix just until everything is combined. Overmixing can lead to tough cookies instead of soft, tender ones.
- Bake to perfection
- Scoop your dough onto prepared baking sheets and bake until the edges are set but the centers are still soft. They'll continue to firm up as they cool. The key is to not overbake – you want these cookies soft and chewy, not crispy.
- Decorate with style
- Once your cookies are completely cool, it's time for the finishing touch. Dip each cookie halfway into melted white chocolate and immediately add your festive sprinkles. This creates that stunning contrast between the red cookie and white chocolate that makes these so visually appealing. Let the chocolate set completely before serving or storing.
 pin it
Switch Things Up
I first made these cookies during a chaotic December when I needed something impressive but didn't have time for elaborate cake decorating. As I mixed the vibrant red batter, I felt that familiar excitement of holiday baking. The kitchen smelled amazing with hints of cocoa and vanilla swirling together. When I pulled the first batch from the oven, I couldn't believe how perfectly they held their shape and that gorgeous red color. Dipping them in white chocolate was oddly therapeutic – watching each cookie get its glossy coating felt like wrapping tiny edible presents. My family devoured them within hours, and I realized I'd stumbled onto my new holiday tradition. Now I can't imagine the season without making at least three batches.
Perfect Pairings
These Red Velvet Cookies pair beautifully with a variety of beverages and accompaniments. Serve them with cold milk for a classic combination, or elevate your presentation with hot cocoa topped with marshmallows. For adult gatherings, pair them with Irish cream coffee or a creamy white hot chocolate. They're also wonderful alongside vanilla ice cream for an indulgent dessert. Consider serving them with cream cheese frosting on the side for dipping if you want to lean into that classic red velvet flavor profile. Fresh berries like strawberries or raspberries add a nice tart contrast to the sweet cookies.
 pin it
Frequently Asked Questions
- → Can I make these cookies without buttermilk?
Yes! If you don't have buttermilk, you can make a substitute by adding 1 tablespoon of white vinegar or lemon juice to 1 cup of regular milk. Let it sit for 5 minutes before using. The acid in the vinegar or lemon juice will curdle the milk slightly, creating a similar tang to buttermilk.
- → Why are my cookies spreading too much in the oven?
If your cookies are spreading excessively, your butter might have been too soft or melted. Make sure your butter is softened but still holds its shape. Also, ensure your dough isn't too warm – you can refrigerate it for 15-20 minutes before baking if needed. Finally, check that your baking soda is fresh, as old leavening agents can affect cookie spread.
- → Can I use milk chocolate instead of white chocolate?
Absolutely! While white chocolate creates a beautiful contrast with the red cookies, milk chocolate or dark chocolate would be delicious alternatives. Semi-sweet chocolate also works wonderfully and adds a nice balance to the sweetness of the cookie.
- → How do I store these cookies and how long do they last?
Store the decorated cookies in an airtight container at room temperature for up to 5 days. Place parchment paper between layers to prevent the white chocolate from sticking. If you want to freeze them, freeze undecorated cookies for up to 3 months, then thaw and decorate when ready to serve.
- → Can I make the dough ahead of time?
Yes! You can prepare the cookie dough and refrigerate it for up to 2 days before baking. You can also scoop the dough into balls, freeze them on a baking sheet, then transfer to a freezer bag for up to 3 months. Bake from frozen, adding 1-2 extra minutes to the baking time.
- → What's the best way to get an even white chocolate coating?
Make sure your white chocolate is melted smoothly with no lumps. Dip each cookie at a slight angle and gently tap off the excess chocolate on the side of the bowl. Working quickly while the chocolate is still fluid will give you the smoothest finish. If the chocolate starts to thicken, reheat it briefly in the microwave.
- → Is it necessary to use gel food coloring or can I use liquid?
While you can use liquid food coloring, gel or paste food coloring is highly recommended for the most vibrant red color without adding excess liquid to your dough. Liquid coloring requires more volume to achieve the same color intensity, which can affect the cookie texture by making the dough too wet.
Conclusion
These Red Velvet Cookies bring all the magic of red velvet cake into a convenient, handheld treat that's perfect for any holiday celebration. The combination of the soft, cocoa-kissed cookie with the sweet white chocolate coating creates a flavor experience that's both nostalgic and exciting. Whether you're baking for a cookie exchange, holiday party, or simply treating yourself, these cookies deliver on both presentation and taste. The festive sprinkles add that extra touch of celebration, making each cookie feel special. They also make wonderful gifts when packaged in clear cellophane bags with ribbon.