
 pin it
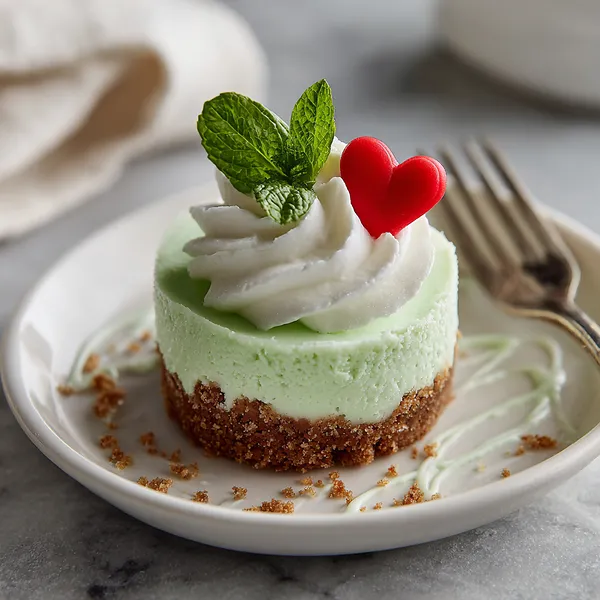
I stumbled upon the idea of Grinch-themed desserts during a late-night Pinterest scroll three years ago when I was desperately searching for something festive yet easy to make for my office holiday party. The moment I saw those vibrant green mini cheesecakes topped with red hearts, I knew I had found my project. What I love about this recipe is how it transforms simple, everyday ingredients into something that feels truly magical and special. The base starts with crushed graham crackers mixed with melted butter – pressed firmly into mini cheesecake pans or muffin tins to create that perfect crunchy foundation. Then comes the star: a silky cream cheese mixture sweetened with powdered sugar, flavored with vanilla, and tinted with that signature Grinch green. I remember the first time I folded the green food coloring into the mixture and watched it transform from plain white to that festive mint shade – it felt like Christmas magic in a bowl. The filling gets spooned over the crusts and chilled until perfectly set, then topped with freshly whipped cream piped into elegant swirls. Those little red fondant hearts perched on top are the finishing touch that takes these from pretty to absolutely adorable. Every time I make these, I'm reminded that the best holiday recipes are the ones that make people smile before they even take a bite.
Why I love this recipe
This recipe holds a special place in my heart because it proves that impressive-looking desserts don't have to be complicated or time-consuming. I love that it requires zero baking, which means I can make these even on the busiest days of the holiday season when my oven is already occupied with dinner preparations. The no-bake aspect also makes it perfect for introducing kids to baking – my seven-year-old can help crush the graham crackers, mix the filling, and carefully place those heart decorations, creating wonderful kitchen memories together. What really wins me over is the versatility of this recipe; you can easily adjust the food coloring intensity, swap the vanilla for peppermint extract for a minty twist, or even experiment with different crust flavors. The make-ahead friendly nature means I can prepare them the night before any gathering, leaving me stress-free and ready to enjoy the celebration. Beyond the practical benefits, these mini cheesecakes genuinely taste incredible – that perfect balance of creamy, sweet, and slightly tangy from the cream cheese, with the graham cracker crust providing just enough textural contrast. They're portion-controlled, adorable, festive, and absolutely delicious, making them the complete package for any holiday dessert lover.
What You Need From Your Kitchen
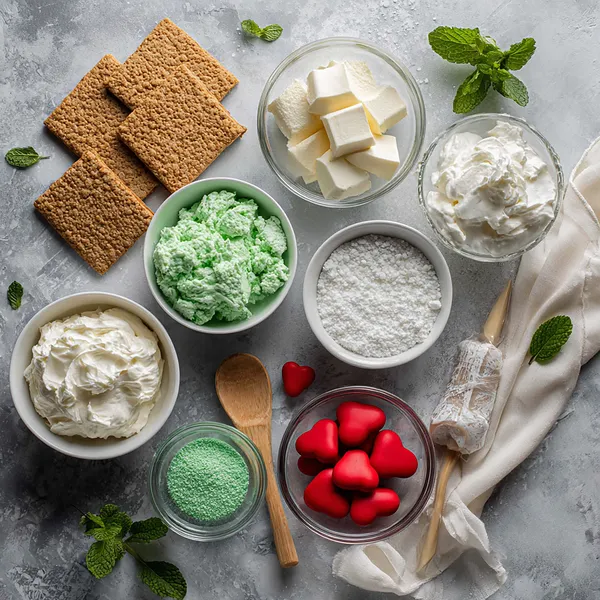
- Graham crackers: Crush into fine crumbs using a food processor or place in a sealed bag and crush with a rolling pin
- Cream cheese: Leave at room temperature for 30-60 minutes to soften for easy mixing
- Heavy whipping cream: Keep chilled until ready to whip for best volume and stiffness
- Green food coloring: Add gradually to control the intensity of the Grinch-green shade
- Red fondant: Roll out and cut into small heart shapes using a mini cookie cutter or purchase pre-made fondant decorations
- Powdered sugar: Sift if lumpy to ensure smooth incorporation into both filling and whipped cream
Let's Make These Together
- Create the Perfect Crust Foundation
- Start by lining your muffin tin with festive cupcake liners to make removal easier later. Mix those graham cracker crumbs with melted butter until the mixture holds together when pressed – this creates that essential crunchy base that contrasts beautifully with the creamy filling. Press the mixture firmly into each liner using the back of a measuring spoon or your fingers, ensuring an even, compact layer. Pop the tin into the fridge to set while you work on the filling, which helps the crust hold its shape and adds structural integrity to your mini cheesecakes.
- Whip Up That Dreamy Green Filling
- Beat your room-temperature cream cheese until it's silky smooth and completely lump-free – this is crucial for that professional, velvety texture. Gradually add powdered sugar and vanilla, mixing until the filling becomes light and fluffy. Now comes the fun part: adding the green food coloring! Start with just a few drops and mix thoroughly, adding more until you achieve that perfect Grinch-inspired mint green. Remember, gel colors are more concentrated than liquid, so adjust accordingly. The filling should be sweet, creamy, and beautifully colored.
- Assemble and Set Your Cheesecakes
- Retrieve your chilled crust-filled tin from the refrigerator. Carefully spoon or pipe the vibrant green filling over each crust, filling the liners about three-quarters full to leave room for your whipped cream topping. Smooth the tops gently with a spatula or the back of a spoon for a clean, professional appearance. Return the entire tin to the refrigerator for at least 3 hours – patience here is key as the filling needs time to firm up completely before you can add the decorative toppings.
- Crown with Whipped Cream Glory
- When your mini cheesecakes are perfectly set, it's time for the show-stopping finale. Whip cold heavy cream with a touch of powdered sugar until stiff peaks form – this ensures your piped decorations will hold their beautiful shape. Transfer the whipped cream to a piping bag fitted with a star tip and create generous, elegant swirls on top of each cheesecake. Press a red fondant heart gently into the center of each cream rosette, and admire your festive masterpieces before serving them to delighted guests!
 pin it
Switch Things Up
I first made these mini cheesecakes for my daughter's Grinch-themed birthday party last December, and they were an instant hit with kids and adults alike. The original plan was to make regular-sized cheesecakes, but I'm so glad I went with the mini version – they're perfectly portioned and so much more fun to serve. I experimented with different shades of green food coloring until I found that perfect Grinch color, and adding just a touch of peppermint extract to the cream cheese mixture gave them a subtle minty freshness without overwhelming the classic cheesecake flavor. One year I tried making them with an Oreo crust instead of graham crackers, and while delicious, the traditional graham cracker base lets the vibrant green filling shine more beautifully. Now these have become a December tradition in our house, and my kids actually request them over regular Christmas cookies!
Perfect Pairings
These Grinch Mini Cheesecakes pair wonderfully with a cup of hot cocoa topped with marshmallows or a glass of cold eggnog for the full holiday experience. For a dessert platter, serve them alongside peppermint bark, sugar cookies decorated with royal icing, and chocolate truffles to create a festive spread. If you're hosting a holiday brunch, these mini cheesecakes complement fresh fruit salad and warm cinnamon rolls beautifully. For an adult gathering, pair them with a glass of sweet dessert wine or Irish cream liqueur. The mint-green color and creamy texture also work wonderfully when served with hot peppermint tea or a vanilla latte for an afternoon treat.
 pin it
Frequently Asked Questions
- → Can I make these mini cheesecakes ahead of time?
Absolutely! These mini cheesecakes are perfect for advance preparation. You can make them up to 2 days ahead, but wait to add the whipped cream topping and heart decorations until just before serving to ensure they look fresh and beautiful. Store the assembled cheesecakes (without toppings) covered in the refrigerator.
- → Can I use a different crust instead of graham crackers?
Yes, you can easily customize the crust to your preference! Oreo cookies (crushed with filling removed), vanilla wafers, or even gingersnap cookies work wonderfully. Just maintain the same ratio of crumbs to melted butter for proper binding and texture.
- → How do I prevent my cheesecakes from sticking to the liners?
Using quality cupcake liners helps significantly. Parchment paper liners work best as they peel away more easily than standard paper liners. Alternatively, you can lightly spray the liners with cooking spray before adding the crust. Letting the cheesecakes sit at room temperature for 5 minutes before removing also helps them release more cleanly.
- → Can I freeze these mini cheesecakes for longer storage?
Yes, these freeze beautifully! Freeze them without the whipped cream topping – wrap each cheesecake individually in plastic wrap, then place in a freezer-safe container for up to 2 months. Thaw in the refrigerator overnight before adding the whipped cream and hearts. Do not freeze the whipped cream topping as it will become watery when thawed.
- → What if I don't have fondant for the heart decorations?
No problem! You can use fresh strawberries cut into heart shapes, maraschino cherries, red chocolate chips, or even make simple hearts from red fruit leather or cut red Starbursts into shapes. You could also use red sprinkles, fresh raspberries, or skip the red decoration entirely and add crushed candy canes or chocolate shavings for a different festive look.
- → How can I make the green color more vibrant?
Gel food coloring produces more vibrant, intense colors than liquid food coloring. Start with small amounts and add gradually until you reach your desired shade. AmeriColor or Wilton gel colors work exceptionally well. Remember that the color may darken slightly as the cheesecakes chill, so aim for a shade slightly lighter than your target color.
- → Can I add peppermint flavor to these cheesecakes?
Absolutely! Add ½ to 1 teaspoon of peppermint extract to the cream cheese filling for a refreshing minty twist that's perfect for the holidays. You can also fold in mini chocolate chips or crushed candy canes for extra festive flavor and texture. Just be careful not to add too much peppermint extract as it can be overpowering.
Conclusion
These Grinch Mini Cheesecakes are the perfect addition to any holiday dessert table, combining festive colors with irresistible creamy texture. They're surprisingly simple to make, require no baking, and can be prepared ahead of time, making them ideal for busy holiday schedules. The charming presentation with whipped cream swirls and heart toppers makes each mini cheesecake feel special and gift-worthy. Whether you're hosting a Christmas party, attending a potluck, or simply want to bring some holiday cheer to your family, these adorable treats deliver both on looks and flavor. Make a batch today and watch them disappear faster than presents on Christmas morning!