
 pin it
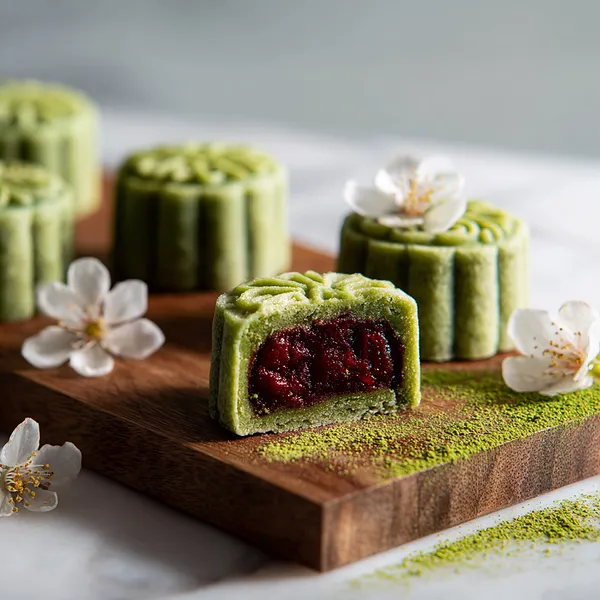
I first encountered snow skin mooncakes at a small Cantonese bakery tucked into a busy street market, and I was completely unprepared for what I was about to taste. Unlike the dense, baked mooncakes I had tried before, these were cool, soft, and almost cloud-like in texture. The matcha version caught my eye immediately — that deep jade green pressed with an intricate chrysanthemum pattern looked almost too beautiful to eat. But I bit in anyway, and the combination of that gently bitter, grassy matcha skin with the silky, sweet red bean paste inside was a revelation. From that moment, I was obsessed. I knew I had to figure out how to make these at home. After a lot of testing and a few crumbly failures, I finally nailed the dough ratio that gives that signature pillowy softness. Now these mooncakes are my go-to for any occasion that calls for something special, unique, and genuinely impressive.
Why I love this recipe
What I love most about this recipe is how it manages to feel both ancient and modern at the same time. Snow skin mooncakes have roots in traditional Chinese festival culture, but their no-bake nature and delicate texture feel completely contemporary. The matcha dough is such a satisfying thing to work with — it comes together quickly, takes the mold beautifully, and the color is just breathtaking. I also love that you can customize the filling endlessly — red bean is classic, but taro, mung bean, or even a dark chocolate ganache work wonderfully. These mooncakes also refrigerate well, which means I can make a big batch ahead of time. And honestly? Every single time I unmold one and that perfect flower pattern appears on the skin, I feel genuinely proud. That's a feeling no other recipe gives me quite like this one.
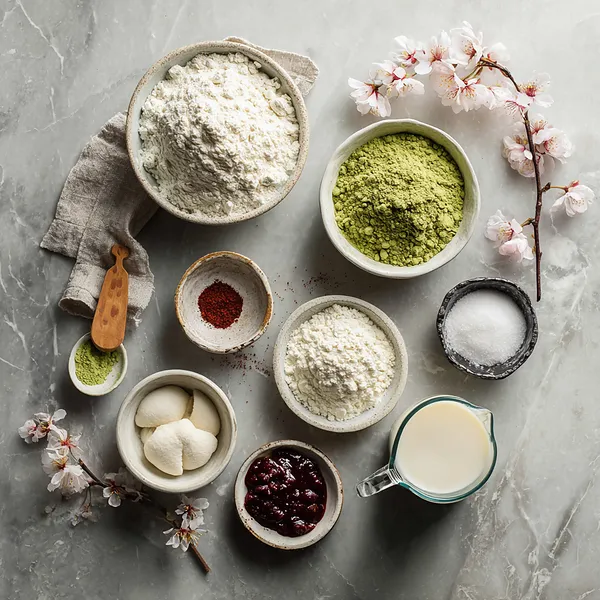
What You Need From Your Kitchen
- Glutinous Rice Flour: The base of the snow skin dough — provides that signature chewy, mochi-like texture. Do not substitute with regular rice flour alone.
- Matcha Powder: Sifted into the dough to create the vibrant jade-green color and distinctive earthy flavor. Use culinary grade for best results.
- Wheat Starch: Added to give the dough a slightly translucent, delicate appearance after steaming.
- Red Bean Paste: The classic filling — smooth, sweet, and deeply satisfying. Store-bought works perfectly; homemade gives richer flavor.
- Whole Milk: Hydrates the dough and adds a subtle creaminess. Use plant-based milk for a vegan version.
- Vegetable Oil: Keeps the dough soft and pliable, preventing it from drying out after refrigeration.
- Icing Sugar: Finely milled sugar that dissolves seamlessly into the dough, ensuring a smooth and even texture.
Let's Make These Together
- Mix the Snow Skin Batter
- Sift all the dry ingredients — glutinous rice flour, rice flour, wheat starch, icing sugar, and matcha powder — into a large bowl. Pour in the milk and vegetable oil, then whisk everything together until you have a completely smooth, thin, green batter with no lumps. Let it sit for 10 minutes so the starches hydrate fully before steaming.
- Steam Until Set
- Pour your batter into a lightly oiled heatproof dish and place it in a steamer over medium-high heat. Steam for 20–25 minutes until the dough is fully set — it should look matte, feel firm to the touch, and pull slightly from the edges. Remove from the steamer and let cool until safe to handle.
- Knead to Silky Smoothness
- Turn the cooled dough onto a surface dusted with cooked glutinous rice flour. Knead it for 3–5 minutes, working out any rough patches until the dough is perfectly smooth, soft, and pliable. It should feel similar to mochi — soft but not sticky. Divide into 10 equal portions.
- Prepare Your Filling Balls
- Weigh out your red bean paste and roll it into 10 smooth, compact balls of about 25–30g each. The filling should be slightly smaller than your dough portion to ensure an even skin thickness all the way around. Keep them covered while you work to prevent drying.
- Wrap and Seal Each Mooncake
- Flatten one dough portion into a disc in your palm. Place a filling ball in the center and carefully wrap the dough up around it, pressing and pinching the seam closed. Roll between your palms until perfectly round and smooth with no cracks visible on the surface.
- Press and Unmold
- Dust your mooncake mold with a little cooked glutinous rice flour and shake out the excess. Drop your filled ball into the cavity, then press the plunger down firmly and steadily. Hover over your tray and release — a beautifully patterned mooncake will drop out. Repeat for all portions.
- Chill Before Serving
- Arrange all mooncakes on a lined tray and refrigerate uncovered for at least 30 minutes. This step firms up the skin slightly, makes them easier to slice, and helps all the flavors meld together. Serve cold or at room temperature with a pot of green tea for the full experience.
 pin it
Switch Things Up
I started experimenting with snow skin mooncakes when I wanted something lighter and more refreshing than the traditional baked version. Adding matcha to the dough was a total game changer — the color alone is worth it. Sometimes I swap the red bean paste for a taro or lotus seed filling, and both work beautifully. If you want a more intense matcha flavor, just bump up the powder by half a teaspoon. I've also tried mixing a tiny pinch of pandan extract into the dough for a tropical twist — absolutely delicious. The molds make all the difference for presentation, so invest in a good mooncake mold if you plan to make these regularly!
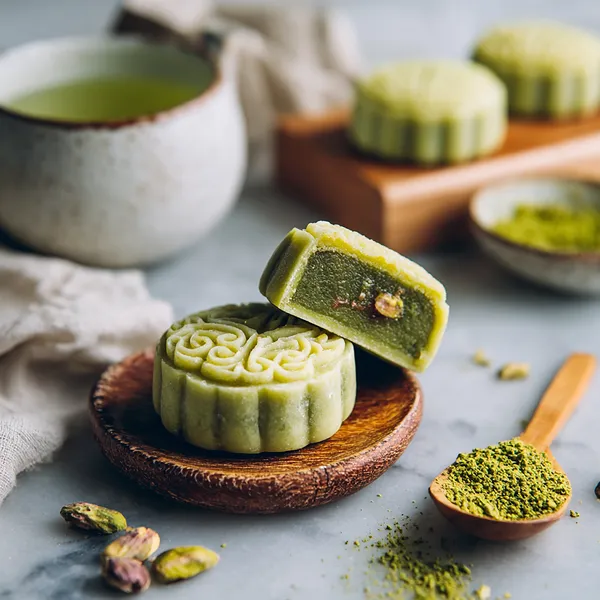
Perfect Pairings
Matcha snow skin mooncakes pair beautifully with a warm pot of jasmine green tea or a frothy matcha latte — the shared earthiness is a match made in heaven. For a more contrasting experience, try them alongside a lightly sweetened oolong or chrysanthemum tea to cut through the richness of the red bean filling. If you're serving these at a gathering, pair with fresh lychee, sliced mango, or a small bowl of candied lotus seeds for an elegant spread that feels both festive and refined.
 pin it
Frequently Asked Questions
- → Can I make snow skin mooncakes without a mold?
Yes! You can shape them by hand into smooth round balls or flatten them into small discs. They won't have the decorative pattern, but they'll taste just as delicious. A small round cookie cutter can also be used to give them a cleaner shape.
- → Can I use a different filling instead of red bean paste?
Absolutely — snow skin mooncakes are wonderfully versatile. Try smooth taro paste, mung bean filling, lotus seed paste, or even a rich dark chocolate ganache. The matcha skin pairs beautifully with all of these options.
- → How long do snow skin mooncakes last?
Stored in an airtight container in the refrigerator, they will stay fresh and delicious for up to 3 days. The skin tends to firm up slightly the longer they're chilled, which some people actually prefer. They are not suitable for freezing as the texture changes significantly.
- → Why is my dough too sticky to work with?
This usually happens if the dough was slightly under-steamed or if your kitchen is warm and humid. Dust your hands and work surface generously with cooked glutinous rice flour and add a little more a teaspoon at a time to the dough until it becomes manageable. Do not add raw flour.
- → Can I make this recipe vegan?
Yes! Simply substitute the whole milk with an unsweetened plant-based milk such as oat milk, almond milk, or coconut milk. The texture may be very slightly different but still delicious. Ensure your red bean paste is also vegan-friendly (most store-bought versions are).
- → What type of matcha powder should I use?
Use culinary-grade matcha rather than ceremonial grade. Culinary matcha has a stronger, more robust flavor that comes through after steaming, while ceremonial matcha is too delicate and expensive to use in baking. Look for a vibrant green color — dull brownish powder indicates old or low-quality matcha.
Conclusion
These matcha snow skin mooncakes are a love letter to East Asian dessert tradition — delicate, elegant, and surprisingly easy to make at home. Whether you're celebrating Mid-Autumn Festival or simply want a showstopping treat for tea time, this recipe delivers on every level. The vibrant green skin, the yielding softness, and that deeply satisfying red bean center make every bite memorable. Make a batch, gift a few, and keep the rest for yourself — you deserve every single one.