
 pin it
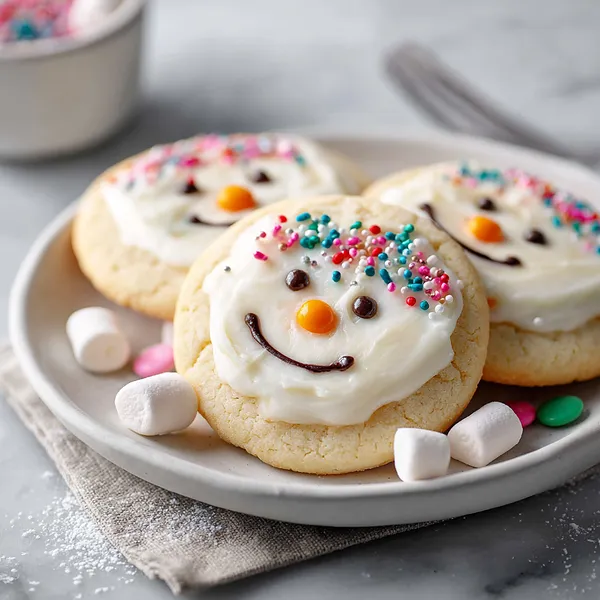
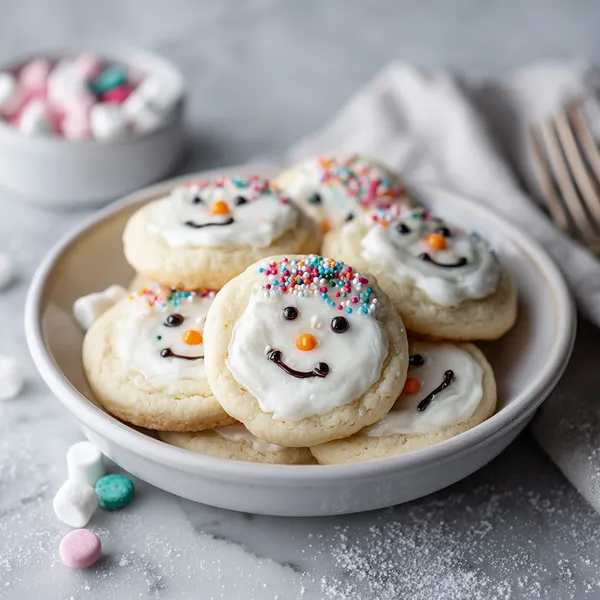
I describe these Melted Snowman Sugar Cookies as pure whimsy captured in edible form. The base is a classic sugar cookie – tender, buttery, with just the right amount of sweetness and that melt-in-your-mouth texture that makes sugar cookies so beloved. What transforms them into something magical is the decoration process. Each cookie gets a generous layer of smooth white frosting that serves as the snowman's puddle, then a whole marshmallow placed on top becomes the head – it genuinely looks like the little snowman is sinking into a melted pool. The colorful candy buttons arranged down the center bring personality and vibrancy, while the hand-drawn faces using black frosting gel give each snowman its own unique character. I first encountered these cookies at a holiday bake sale years ago and was immediately charmed by their creativity. The baker told me they were inspired by her son's comment about a melting snowman in their yard, and she wanted to capture that bittersweet moment in cookie form. I went home that day determined to recreate them, and after a few attempts perfecting the frosting consistency and marshmallow placement, I had it down. Now they're requested every single winter by friends and family.
Why I love this recipe
I love this recipe because it perfectly balances simplicity with impressive results – it looks like you spent hours on intricate cookie artistry, but in reality, it's quite straightforward and forgiving. There's something deeply satisfying about the creative process of decorating each snowman, giving them different expressions and candy button arrangements so no two are exactly alike. The cookies themselves are reliably delicious every single time, with that perfect sugar cookie texture that's crisp on the edges and soft in the center. But beyond the taste and technique, these cookies bring so much joy to people. I've watched faces light up when they see them, heard genuine laughter at the clever melted concept, and seen kids' eyes widen with delight. They spark conversation and create memories in a way that ordinary cookies simply don't. They're also wonderfully versatile – you can make them with kids and embrace the imperfect, wonky decorations, or take your time creating picture-perfect versions for a fancy holiday party. Either way, they're guaranteed to be the star of any dessert table and the first cookies to disappear.
What You Need From Your Kitchen
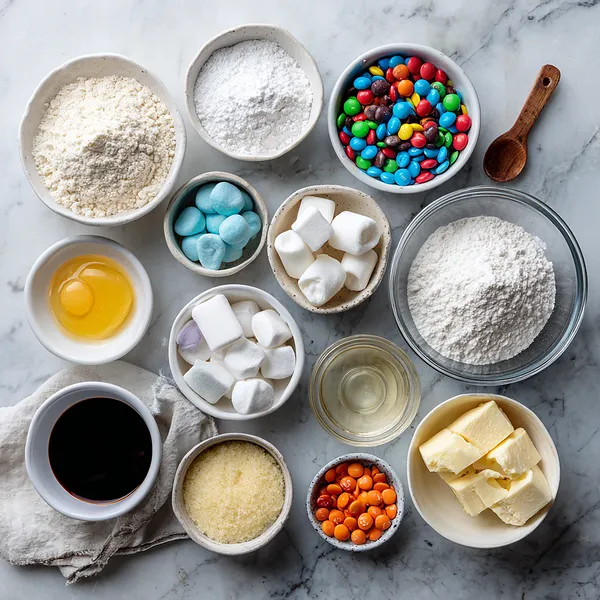
- All-purpose flour: Forms the base structure of the sugar cookies and provides the perfect texture.
- Unsalted butter: Adds richness and creates that tender, melt-in-your-mouth cookie texture when creamed with sugar.
- White granulated sugar: Sweetens the cookies and helps create the classic sugar cookie flavor and crisp edges.
- Egg: Binds the ingredients together and adds moisture to the cookie dough.
- White frosting: Creates the melted snow puddle effect and serves as the adhesive for all decorations.
- Marshmallows: Form the adorable snowman heads sitting atop each cookie.
- Colorful candy-coated chocolates: Become the vibrant buttons that give each snowman personality and charm.
Let's Make These Together
- Prepare your cookie dough
- Start by mixing your dry ingredients in one bowl and creaming your butter and sugar in another until light and fluffy. This takes about 3-4 minutes and is crucial for creating cookies with the perfect texture. Add your egg and vanilla, then gradually incorporate the flour mixture until just combined. The dough should be soft and slightly sticky but manageable.
- Shape and bake
- Form your dough into uniform balls or use a cookie cutter for perfect circles. Space them properly on your parchment-lined baking sheets because they will spread slightly during baking. Bake until the edges just start to turn golden but the centers still look a bit underdone – they'll continue cooking as they cool and this ensures soft centers.
- Create the melted effect
- Once your cookies are completely cooled (this is important so the frosting doesn't melt), spread a generous layer of white frosting over each cookie. Think of it as creating a little pool of melted snow. Make sure the frosting reaches nearly to the edges and is thick enough to support your marshmallow.
- Add personality with decorations
- Press a marshmallow onto the upper portion of each frosted cookie for the head. Then arrange your colorful candies vertically down the center for buttons. Using black decorating gel, draw simple dot eyes and a curved smile on each marshmallow face. Add a small orange candy or frosting triangle for the carrot nose. Finally, pipe small twig arms extending from the sides. Let them set for about 30 minutes and enjoy your adorable creation!
 pin it
Switch Things Up
I first made these cookies on a snowy Saturday afternoon when my nieces were visiting. We'd planned to build a real snowman outside, but the weather was too bitterly cold, so we decided to bring the snowman fun inside instead. The kitchen became our winter wonderland, with flour dusting the counters like fresh powder and colorful candies scattered everywhere like confetti. Watching the girls carefully place each marshmallow head and giggle at how the snowmen looked like they were melting was absolutely priceless. We ended up making three dozen cookies, and by the time we finished decorating, we had more frosting on ourselves than on the cookies. But that's the beauty of these – they're meant to be fun and a little messy. Now, every winter, making melted snowman cookies has become our tradition, and I can't imagine the season without them.
Perfect Pairings
These Melted Snowman Sugar Cookies pair beautifully with a steaming mug of hot chocolate topped with extra mini marshmallows for the ultimate winter treat experience. They're also wonderful alongside a cup of warm spiced apple cider or a creamy vanilla latte. For a more substantial pairing, serve them at the end of a winter brunch alongside fresh fruit and yogurt parfaits. They make an excellent addition to a holiday cookie platter alongside gingerbread men, peppermint bark, and snickerdoodles. If you're hosting a winter movie night, these cookies are perfect with popcorn and candy canes for a festive snack spread.
 pin it
Frequently Asked Questions
- → Can I use homemade frosting instead of store-bought?
Absolutely! A simple buttercream or royal icing works beautifully. Just make sure it's thick enough to hold the marshmallow in place but spreadable enough to create a smooth surface. Royal icing gives a firmer finish, while buttercream stays softer.
- → How do I prevent the cookies from spreading too much during baking?
Make sure your butter is softened but not melted, and consider chilling your dough balls for 15 minutes before baking. Also, ensure your baking sheets aren't too warm when you place the dough on them – let them cool between batches.
- → Can I make these cookies gluten-free?
Yes! Substitute the all-purpose flour with a 1:1 gluten-free baking flour blend. The texture may be slightly different, but they'll still be delicious. Make sure your other ingredients, especially the frosting and candies, are certified gluten-free.
- → What if I don't have large marshmallows?
You can use regular-sized marshmallows, though the proportion will be slightly different. You could also stack two mini marshmallows or use marshmallow cream piped into a mound shape, though the visual effect won't be quite as dramatic.
- → How long do these decorated cookies stay fresh?
Store them in an airtight container at room temperature for up to 5 days. Keep them in a single layer separated by parchment paper to prevent the decorations from sticking together. The cookies themselves can be baked and frozen unfrosted for up to 3 months.
- → Can kids help make these cookies?
Absolutely! These are perfect for kids to help with, especially the decorating part. They can help place the marshmallows, arrange the candy buttons, and even try their hand at drawing faces. It's a wonderfully messy, creative activity that results in adorable (if imperfect) treats.
Conclusion
These Melted Snowman Sugar Cookies bring pure joy to any winter gathering or holiday celebration. They're surprisingly simple to make, yet the results look incredibly impressive and creative. The combination of buttery sugar cookies, sweet frosting, and playful decorations creates a treat that's as delightful to look at as it is to eat. Kids and adults alike will love both making and enjoying these whimsical cookies. They're perfect for cookie exchanges, winter parties, or simply brightening a cold day with something sweet and smile-inducing.