
 pin it
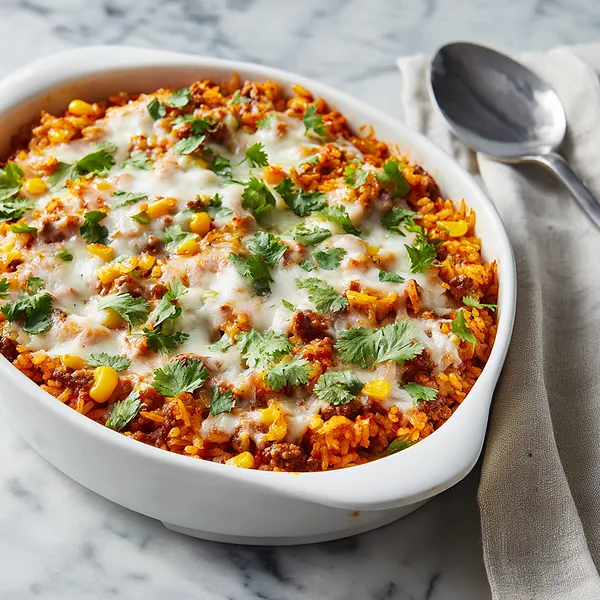
I discovered this recipe during my college years when I was desperately searching for something more exciting than ramen noodles that wouldn't break my tiny budget. A friend's Mexican grandmother shared her family's version with me, and I've been hooked ever since. What makes this casserole truly special is how it transforms simple, affordable ingredients into something that tastes like you spent hours in the kitchen. The magic happens when the rice absorbs all those wonderful flavors from the beef broth, spices, and tomatoes, creating layers of taste in every forkful. I love how the black beans add earthiness while the corn brings little bursts of sweetness that balance the savory elements. The bell peppers not only contribute gorgeous color but also provide a slight crunch that keeps the texture interesting. When that cheese melts on top and gets those beautiful golden spots, it creates a delicious crust that everyone fights over. Over the years, I've adapted it countless times, but the core concept remains the same: one dish, bold flavors, and pure comfort food satisfaction.
Why I love this recipe
This recipe holds a special place in my heart because it represents everything I value in cooking: simplicity, flavor, and the ability to bring people together. I love that it's incredibly forgiving – forgot to add the garlic at the right time? No problem. Want to use brown rice instead? Just adjust the cooking time. It's one of those recipes that welcomes improvisation and personal touches. What really gets me is the versatility; it works equally well for a quiet family dinner, a potluck contribution, or even as meal prep for the entire week. The fact that it all happens in one dish means less cleanup, which any busy cook appreciates. I'm also obsessed with how the textures play together – the fluffy rice, tender beef, creamy beans, and that gloriously gooey cheese create a symphony in your mouth. Every time I make it, someone asks for the recipe, and I love sharing it because I know it'll become a staple in their kitchen too. It's comfort food that doesn't require comfort food effort, and that's exactly why it's earned its permanent spot in my weekly rotation.
What You Need From Your Kitchen
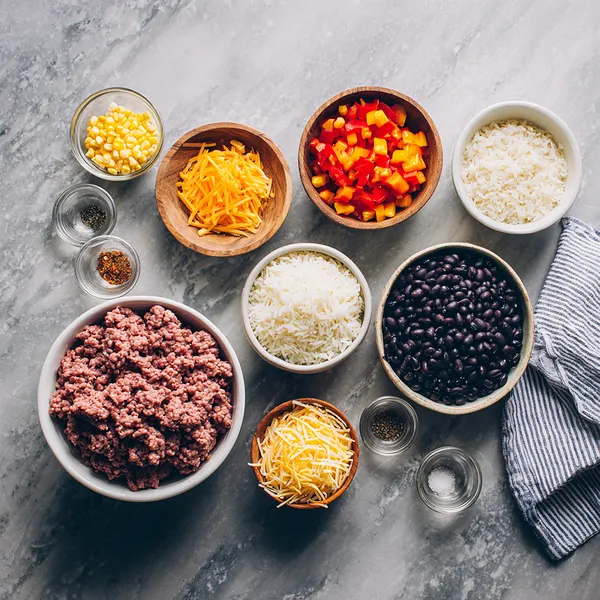
- Ground Beef: Use 85/15 or 90/10 lean ground beef for the best balance of flavor and minimal excess fat
- Long-Grain White Rice: Rinse briefly under cold water to remove excess starch for fluffier results
- Black Beans: Drain and rinse thoroughly to remove excess sodium and prevent a murky appearance
- Bell Peppers: Choose firm, brightly colored peppers and dice into uniform pieces for even cooking
- Mexican Cheese Blend: Use a good-quality blend containing cheddar, Monterey Jack, and queso quesadilla for optimal melting
- Beef Broth: Choose low-sodium broth so you can control the salt level in your finished dish
- Diced Tomatoes: Fire-roasted tomatoes add an extra layer of smoky flavor if you want to elevate the dish
Let's Make These Together
- Brown the Protein Base
- Start by heating your large oven-safe skillet over medium-high heat and adding the ground beef. As it cooks, use your spatula to break it into small, even crumbles – this ensures every bite has perfectly seasoned meat. Once it's nicely browned with no pink remaining, drain most of the fat but leave a tablespoon behind for flavor. The beef should have a beautiful caramelized color that adds depth to your casserole.
- Build the Vegetable Foundation
- To your browned beef, add the chopped onions and diced bell peppers. These aromatics form the flavor backbone of your dish, so let them sauté for a few minutes until the onions turn translucent and the peppers begin to soften. The kitchen will start smelling amazing at this point. Toss in your minced garlic during the last minute – garlic burns easily, so this timing ensures it releases its flavor without becoming bitter.
- Layer in Spices and Rice
- This is where the magic happens. Sprinkle your uncooked rice directly into the pan with the beef and vegetables, stirring it around so every grain gets coated. Add your cumin, chili powder, and paprika, mixing thoroughly to distribute the spices evenly. This technique, called blooming the spices, intensifies their flavors and ensures your casserole won't have bland spots. Season with salt and pepper at this stage.
- Incorporate Liquids and Legumes
- Pour in your beef broth and canned tomatoes, which will create the cooking liquid for your rice. Stir in the black beans and corn kernels, distributing them throughout the mixture so every serving gets an equal share of these delicious additions. Bring everything to a gentle boil, then let it simmer briefly. The mixture should look slightly soupy at this stage – don't worry, the rice will absorb all that flavorful liquid as it bakes.
- Bake to Perfection
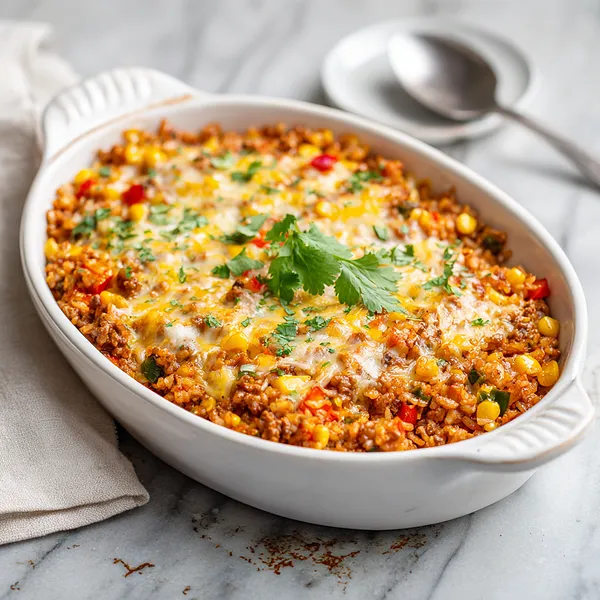
- Cover your pan tightly with aluminum foil – this traps steam and ensures your rice cooks evenly without drying out. Slide it into your preheated 375°F oven and let it bake for about 25-30 minutes. The rice should be tender and have absorbed most of the liquid. Remove the foil, blanket the top with your shredded cheese, and return it to the oven uncovered. Those final 5-7 minutes will melt the cheese into a gorgeous, bubbly golden topping that everyone will want to dig into immediately.
 pin it
Switch Things Up
I'll never forget the first time I made this casserole on a busy Tuesday evening when I had zero energy for complicated cooking. I threw everything into my trusty casserole dish, popped it in the oven, and honestly forgot about it while helping with homework. When the timer went off and I pulled out this bubbling masterpiece, I couldn't believe something so delicious required so little effort. My kids, who are notoriously picky about "mixed" foods, devoured their portions and asked for seconds. Now it's become our go-to comfort meal, especially during those hectic weeks when everyone needs something hearty and satisfying. I've experimented with different cheese blends, added jalapeños for extra heat, and even tried it with ground turkey when I'm feeling lighter. Every variation has been a hit, but nothing beats that classic combination of beef, rice, and melted cheese that started it all.
Perfect Pairings
This casserole pairs beautifully with a crisp side salad dressed in lime vinaigrette to cut through the richness of the cheese. A bowl of cool, creamy guacamole and some tortilla chips on the side add that perfect textural contrast and authentic Mexican flair. For beverages, consider serving it with ice-cold Mexican beer, a tangy margarita, or for a family-friendly option, fresh agua fresca or horchata. If you want to round out the meal, warm flour tortillas or cornbread make excellent additions for soaking up all those delicious juices. A simple pico de gallo or fresh salsa verde on the side allows everyone to customize their heat level.
 pin it
Frequently Asked Questions
- → Can I make this casserole ahead of time?
Absolutely! You can prepare the entire casserole through step 3, cover it tightly with plastic wrap and then foil, and refrigerate for up to 24 hours. When ready to bake, remove it from the fridge while your oven preheats to take the chill off (about 15-20 minutes), then bake as directed, adding an extra 5-10 minutes to the covered baking time since it's starting cold.
- → What can I substitute for ground beef?
Ground turkey, chicken, or pork all work wonderfully in this recipe. For a vegetarian version, try crumbled firm tofu, textured vegetable protein (TVP), or additional beans. If using leaner meats, add a tablespoon of olive oil to the pan to prevent sticking. Plant-based ground meat substitutes also work great and follow the same cooking method as beef.
- → Why is my rice still crunchy after baking?
This usually means there wasn't enough liquid or the oven temperature was too low. Make sure you're using the full 2 cups of beef broth and that your oven is properly preheated to 375°F. Also ensure the foil is sealed tightly to trap steam. If you notice the rice is still undercooked when you add the cheese, simply add 1/4 cup of hot water or broth, re-cover with foil, and bake for an additional 10 minutes before adding the cheese.
- → How do I prevent the casserole from being too watery?
After the covered baking time, if there's excess liquid visible, remove the foil and let it bake uncovered for 3-5 minutes before adding the cheese. This allows extra moisture to evaporate. Also, make sure you're draining and rinsing your canned beans and corn well, as they can release additional liquid. Using long-grain rice (not instant or minute rice) also helps maintain the proper texture.
- → Can I freeze individual portions of this casserole?
Yes! This casserole is perfect for meal prep. Let it cool completely after baking, then portion it into individual airtight containers or freezer bags. Freeze for up to 3 months. To reheat, thaw overnight in the refrigerator, then microwave individual portions for 2-3 minutes, stirring halfway through. You can also reheat frozen portions directly in the microwave, though it will take 4-5 minutes and require stirring multiple times for even heating.
- → What's the best way to reheat leftovers?
For individual servings, the microwave works great – place a portion in a microwave-safe bowl, cover with a damp paper towel, and heat for 2-3 minutes at 70% power, stirring once. For reheating the whole casserole, cover it with foil and warm in a 350°F oven for 20-25 minutes until heated through. Add a splash of broth or water before reheating if it seems dry. The cheese may separate slightly upon reheating, but the flavor remains delicious.
Conclusion
This Mexican Ground Beef Casserole with Rice is the ultimate weeknight winner that brings restaurant-quality flavors to your family table. It's one of those magical recipes where everything cooks together, allowing the flavors to meld beautifully while you tackle other tasks. The combination of protein-packed beef, fiber-rich beans, and wholesome rice makes it a complete meal that satisfies both nutrition and taste requirements. Leftovers reheat beautifully, making it perfect for meal prep or next-day lunches. Whether you're feeding a hungry family or hosting a casual dinner party, this casserole never disappoints.