
 pin it
I first discovered this No-Bake Peanut Butter Pie at my neighbor's potluck dinner about five years ago, and it was honestly love at first bite. I remember thinking there was no way something so elegant and delicious could be easy to make, but boy was I wrong. The pie has this incredible creamy texture that just melts on your tongue – it's like eating a cloud made of peanut butter dreams. What makes this recipe so special is how it balances flavors and textures perfectly. The graham cracker crust adds just the right amount of crunch and a subtle honey-like sweetness that complements the filling without overpowering it. The peanut butter layer is where the magic really happens – it's rich and creamy but not too heavy, thanks to the whipped cream folded in. Then there's that gorgeous topping of fresh whipped cream that's barely sweetened, letting the peanut butter shine through. The crushed peanuts on top aren't just for looks; they add little bursts of nutty crunch that make every bite interesting. I've tweaked the original recipe slightly over the years, adding a touch more vanilla and using a higher quality peanut butter, but the essence remains the same. It's comfort food at its finest – familiar, satisfying, and guaranteed to make people happy. Every time I make it, I'm transported back to that first slice at my neighbor's house, and I still get excited to share it with others.
Why I love this recipe
What I absolutely love about this No-Bake Peanut Butter Pie is how it manages to be both incredibly impressive and ridiculously easy at the same time. In a world where we're all busy and stressed, having a go-to dessert that requires zero baking but looks like it came from a professional pastry chef is pure gold. I love that I can make this when it's too hot to bake, when my oven is broken, or when I'm just feeling lazy but still want something spectacular. The make-ahead nature is another huge plus – I can prepare it the night before a gathering and have one less thing to worry about on the day of the event. But beyond the convenience, I genuinely love how this pie tastes. The peanut butter flavor is bold and authentic without being overwhelming or artificial. It reminds me of eating peanut butter straight from the jar as a kid, but elevated into something sophisticated. I also appreciate how customizable it is – sometimes I add a layer of chocolate ganache, other times I mix in some mini chocolate chips, and occasionally I'll use honey-roasted peanuts for the topping. My family requests this pie constantly, and it's become our unofficial celebration dessert. Whether someone aces a test, gets a promotion, or we're just celebrating making it through a tough week, this pie shows up. It's more than just a recipe to me; it's become a way I show love and create happy memories with the people I care about.
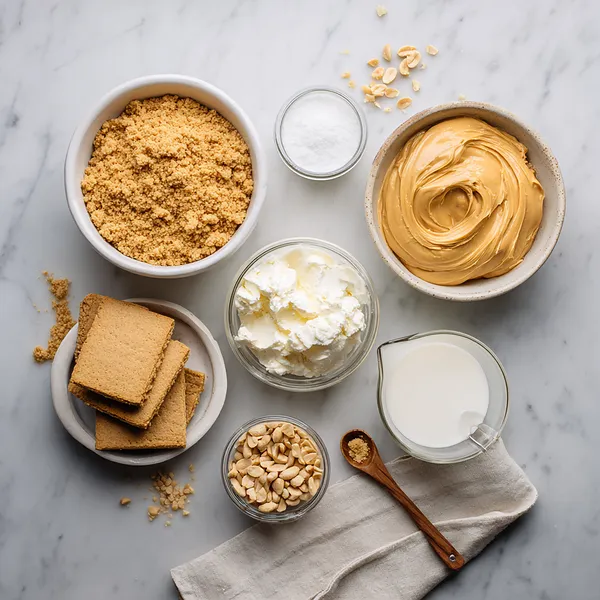
What You Need From Your Kitchen
- Graham cracker crumbs: The foundation for the crust, providing a sweet and slightly honeyed base that complements the peanut butter
- Cream cheese: Adds richness and tanginess to balance the sweetness while creating a smooth, creamy texture
- Creamy peanut butter: The star ingredient that delivers bold, nutty flavor throughout the filling
- Heavy whipping cream: Whipped to create both a light, airy filling and a fluffy topping that adds elegance
- Powdered sugar: Sweetens the filling while dissolving smoothly without any graininess
- Unsalted butter: Binds the graham cracker crust together and adds richness
- Chopped peanuts: Provides a crunchy garnish that reinforces the peanut flavor and adds visual appeal
Let's Make These Together
- Create the Perfect Crust
- Start by combining your graham cracker crumbs with sugar and melted butter, mixing until everything is evenly moistened. The mixture should hold together when you squeeze it in your hand. Press this firmly into your pie pan, making sure to get it up the sides for that classic pie look. Pop it in the fridge to set while you work on the filling – this helps it hold its shape beautifully.
- Whip Up the Creamy Filling
- Beat your room-temperature cream cheese until it's super smooth and fluffy – no lumps allowed! Add in that gorgeous peanut butter and watch as it transforms into the creamiest mixture you've ever seen. The powdered sugar and vanilla come next, and as you beat everything together, you'll start to smell that irresistible peanut butter aroma filling your kitchen.
- Fold in the Clouds
- Here's where the magic happens – whip your cream until it forms stiff, glossy peaks, then gently fold half of it into your peanut butter mixture. Use a light hand and sweeping motions to keep all that air you just whipped in. This is what makes the filling so incredibly light and mousse-like instead of dense and heavy.
- Let It Set to Perfection
- Pour your gorgeous filling into that chilled crust and smooth the top with a spatula. Cover it up and let it chill in the fridge for several hours or overnight. I know waiting is hard, but this step is crucial – it's what transforms the filling from a soft mousse into a perfectly sliceable pie that holds its shape when you cut into it.
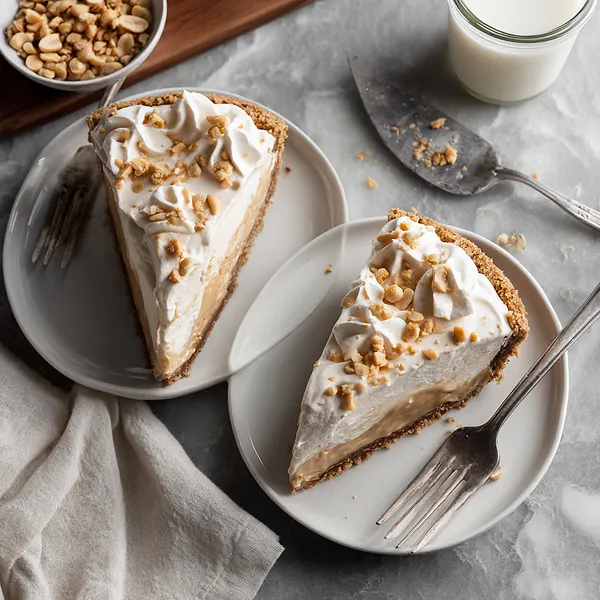
- Crown Your Creation
- When you're ready to serve, whip up the remaining cream and spread or pipe it over the top of your pie. Shower it with those chopped peanuts for crunch and visual drama. Now step back and admire your work before slicing into that creamy, dreamy masterpiece!
 pin it
Switch Things Up
I'll never forget the first time I made this pie for a summer cookout. It was one of those scorching hot days where the thought of turning on the oven was absolutely unbearable, but I'd promised to bring dessert. I frantically searched for no-bake options and stumbled upon this gem. With just my refrigerator doing all the work, I whipped up this beauty in less than 30 minutes. When I pulled it out at the party, covered in those gorgeous whipped cream swirls and glistening peanuts, everyone thought I'd spent hours on it. The first bite had everyone going silent – you know, that good kind of silence when food is so good people forget to talk. My friend Sarah actually asked if I'd secretly bought it from a fancy bakery! Now it's my secret weapon dessert. I've made it for birthdays, brought it to office parties, and even served it at Thanksgiving. Last month, I made three in one weekend for different events. The best part? My kids can help make it since there's no hot oven involved, and they love crushing the graham crackers and mixing the filling. It's become our special weekend project, and watching their faces light up when they taste the finished product never gets old.
Perfect Pairings
This No-Bake Peanut Butter Pie pairs beautifully with a variety of accompaniments. Serve it alongside a hot cup of freshly brewed coffee or espresso – the slight bitterness cuts through the sweetness perfectly. For a more indulgent experience, drizzle warm chocolate or caramel sauce over each slice just before serving. Fresh berries like strawberries or raspberries add a lovely tart contrast that balances the rich peanut butter flavor. If you're feeling extra fancy, a scoop of vanilla ice cream on the side creates an incredible hot-and-cold combination. For beverages, try pairing it with cold milk (obviously!), a creamy vanilla milkshake, or even a glass of dessert wine like a late-harvest Riesling. The pie also works wonderfully as part of a dessert spread alongside brownies or chocolate chip cookies for variety.
 pin it
Frequently Asked Questions
- → Can I use natural peanut butter for this recipe?
It's not recommended to use natural peanut butter for this recipe. Natural peanut butter contains more oil and tends to separate, which can make the filling grainy and cause it not to set properly. Stick with regular creamy peanut butter (like Jif or Skippy) for the best texture and results.
- → How long does this pie need to chill before serving?
The pie needs to chill for at least 3-4 hours to set properly, but overnight is ideal for the best texture. The filling needs this time to firm up so it will slice cleanly. If you're in a rush, you can try freezing it for 2 hours, but refrigeration gives you the best creamy consistency.
- → Can I freeze this No-Bake Peanut Butter Pie?
Yes, this pie freezes beautifully! Wrap it tightly in plastic wrap and then aluminum foil, and it will keep in the freezer for up to 2 months. Let it thaw in the refrigerator for several hours before serving. Add the whipped cream topping fresh after thawing for the best presentation.
- → What can I substitute for the graham cracker crust?
You can use crushed vanilla wafers, Oreo cookies (with or without the filling), or even pretzel crumbs for a sweet and salty twist. You could also use a store-bought graham cracker crust if you want to save time, though homemade always tastes better!
- → My filling seems too soft. What went wrong?
The most common causes are: not chilling it long enough, using natural peanut butter instead of regular, or the cream cheese wasn't beaten enough before adding other ingredients. Make sure to chill the pie for at least 4 hours, and if it's still soft, pop it in the freezer for 30-60 minutes to help it set up.
- → Can I make this pie dairy-free?
Yes! You can substitute the cream cheese with dairy-free cream cheese, use coconut cream instead of heavy whipping cream, and replace the butter with vegan butter or coconut oil. The texture might be slightly different, but it will still be delicious.
- → How do I get clean slices when cutting the pie?
The key is to use a sharp knife dipped in hot water and wiped dry between each cut. The warm knife glides through the filling more easily. Make sure the pie is well-chilled before slicing, as a cold pie will hold its shape much better than one at room temperature.
Conclusion
This No-Bake Peanut Butter Pie is the ultimate dessert for peanut butter lovers and anyone who appreciates a show-stopping treat without spending hours in the kitchen. The combination of textures – from the crunchy crust to the silky filling and airy whipped cream – creates a dessert experience that's truly unforgettable. It's perfect for potlucks, holiday gatherings, or any time you want to impress without stress. Make it ahead, let it chill, and watch it disappear in minutes. This recipe proves that sometimes the simplest desserts are the most spectacular!