
 pin it
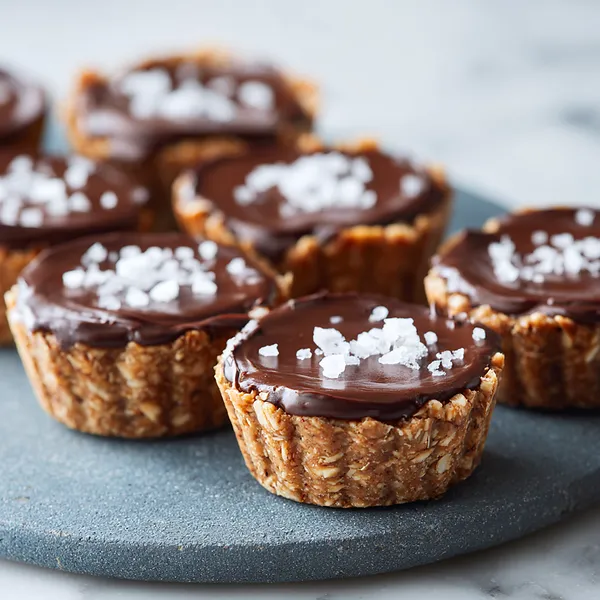
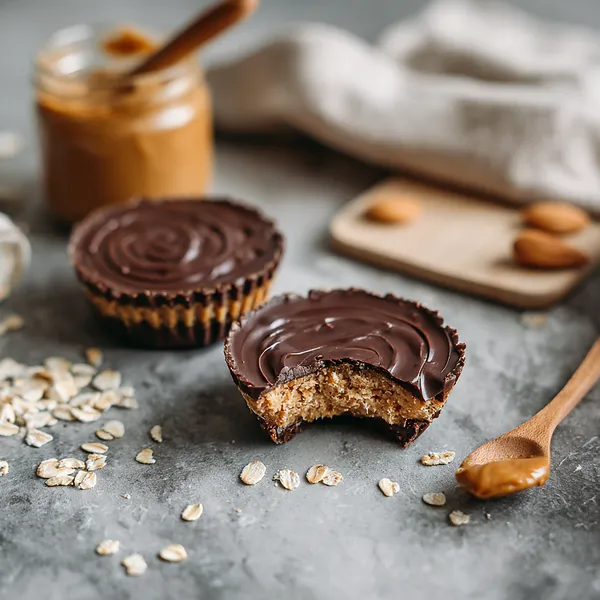
I first came across a version of these at a friend's potluck, sitting on a parchment-lined tray like little edible jewels — each one gleaming with dark chocolate and dusted with sea salt. I picked one up expecting something dry and healthy-tasting, and instead got hit with this incredible combination of chewy, honey-sweet oats and deeply rich chocolate ganache. I stood there for a moment genuinely surprised. The texture was unlike anything I expected — sturdy enough to hold their shape but soft enough to give immediately when you bite in. I asked for the recipe on the spot. Since then, I've made these more times than I can count. They've become my go-to when I need something impressive that doesn't require turning on the oven. The flaky sea salt on top is non-negotiable for me — it elevates the whole thing from a simple snack to something that feels genuinely gourmet.
Why I love this recipe
There are so many reasons this recipe has earned a permanent spot in my rotation. First, the simplicity — five core ingredients, no baking, no special equipment. Second, the flavor combination. Peanut butter and chocolate is a classic for a reason, but adding the oat base gives it this hearty, satisfying quality that sets it apart from any candy bar. The flaky sea salt on top is what really makes it sing — it creates this perfect contrast that keeps you reaching for another one. I also love how adaptable it is: different nut butters, different chocolates, different sweeteners. It's a recipe that rewards creativity without punishing mistakes. And honestly, there's something deeply satisfying about setting a tray of these in the fridge and knowing that in a couple of hours, you're going to have one of the best little bites of your day waiting for you.
What You Need From Your Kitchen
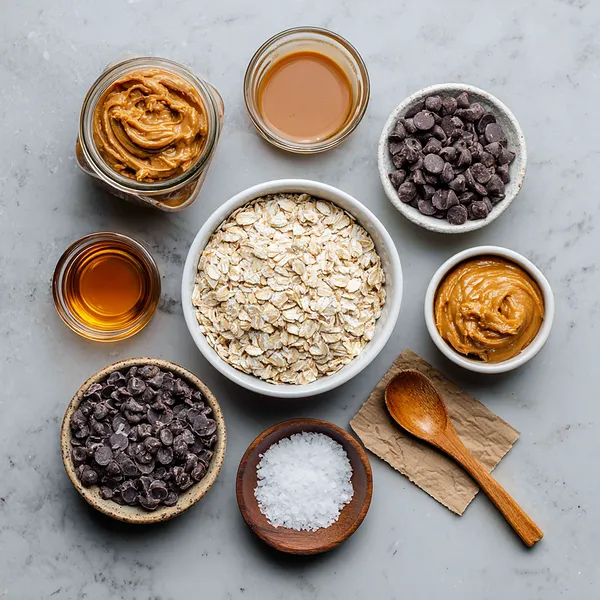
- Rolled Oats: Form the chewy, hearty base of each cup — use old-fashioned rolled oats for best texture, not instant.
- Peanut Butter: Binds the oat base and adds rich, nutty flavor — natural peanut butter works best.
- Honey: Sweetens the oat base naturally and helps hold everything together as it chills.
- Coconut Oil: Adds richness to the base and helps the cups firm up perfectly in the fridge.
- Dark Chocolate Chips: Melt into a glossy, smooth ganache that fills each oat cup beautifully.
- Heavy Cream or Coconut Cream: Creates the silky ganache consistency — coconut cream keeps it dairy-free.
- Flaky Sea Salt: The finishing touch that elevates the chocolate and balances the sweetness perfectly.
Let's Make These Together
- Melt and Mix the Base
- Warm your peanut butter, honey, and coconut oil together in a saucepan over low heat until smooth and combined. Stir in vanilla and salt, then fold in all the rolled oats until every single oat is glossy and coated. The mixture should feel sticky and hold together when pressed.
- Shape the Oat Cups
- Line your muffin tin and scoop about 2 tablespoons of oat mixture into each cup. Press firmly with your fingers or a spoon to push the oats up the sides, forming a little cup shape. The tighter you pack them, the better they'll hold their shape after chilling.
- Freeze to Set the Shape
- Pop the muffin tin into the freezer for 15 minutes. This firms the oat cups so they won't crumble or lose their shape when you pour in the warm ganache. Don't skip this step — it makes all the difference.
- Make the Chocolate Ganache
- Melt your dark chocolate chips with the cream over very low heat, stirring constantly until you have a smooth, glossy ganache. Remove from heat and let it cool just slightly — you want it pourable but not piping hot.
- Fill and Finish
- Spoon the ganache into each chilled oat cup, filling it close to the top. Immediately scatter a pinch of flaky sea salt over each one, then refrigerate for at least 30 minutes until fully set. Peel off the liners and enjoy!
 pin it
Switch Things Up
I once swapped the dark chocolate for white chocolate chips and stirred in a little espresso powder — honestly one of the best decisions I've ever made in the kitchen. Another time I pressed the oat base thinner so each cup held more ganache, and everyone at the table went completely silent after the first bite. That's the best kind of feedback. You can also try almond butter instead of peanut butter for a slightly more delicate flavor, or drizzle a little salted caramel over the chocolate before it sets. Every version has been a hit.
Perfect Pairings
These oat cups pair beautifully with a cold glass of oat milk or almond milk — the creaminess complements the rich chocolate perfectly. For a dessert spread, serve them alongside fresh strawberries or sliced bananas to cut through the richness. A hot cup of black coffee or an espresso shot is the ultimate pairing if you're enjoying them as an afternoon treat.
 pin it
Frequently Asked Questions
- → Can I use almond butter instead of peanut butter?
Absolutely! Almond butter works beautifully in this recipe and gives the cups a slightly lighter, more delicate flavor. Cashew butter is another fantastic option. Just make sure whichever nut butter you use is smooth and natural with no added oils or sugars for the best result.
- → Do I need to refrigerate these cups?
Yes — these cups are meant to be stored in the refrigerator. The oat base and chocolate ganache are both held together by chilled fats (coconut oil, peanut butter, chocolate), so they will soften and lose shape at room temperature. Keep them in an airtight container in the fridge for up to 5 days.
- → Can I make these vegan?
Yes, very easily. Simply substitute the heavy cream with full-fat coconut cream when making the ganache, and swap honey for maple syrup in the oat base. Use dairy-free dark chocolate chips and you have a fully vegan treat that tastes just as incredible.
- → Why are my oat cups crumbling when I remove them?
This usually means they weren't pressed firmly enough into the muffin tin, or they didn't chill long enough before being removed. Make sure to pack the oat mixture tightly against the sides and freeze for at least 15 minutes before adding the ganache, and another 30 minutes after filling before unmolding.
- → Can I freeze these for later?
Yes! These cups freeze wonderfully. Place them in a single layer in a freezer-safe container and freeze for up to one month. When you're ready to eat, let them thaw in the refrigerator for about 30 minutes. They taste just as good as freshly made.
- → What type of oats should I use?
Old-fashioned rolled oats are ideal for this recipe — they give the cups the best chewy texture and hold their structure well. Quick oats can be used in a pinch but will create a softer, less textured base. Avoid steel-cut oats entirely as they won't bind properly.
Conclusion
These No-Bake Chocolate Peanut Butter Oat Cups are proof that the best desserts don't require an oven — just good ingredients and a little patience while they set. Whether you're making them for a weeknight treat, a party platter, or just because you deserve something delicious, they never disappoint. Store them in the fridge and enjoy one (or three) whenever the craving hits.