
 pin it
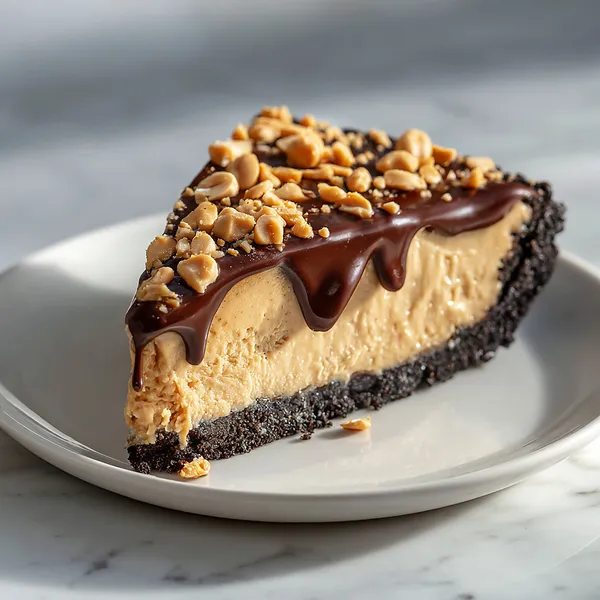
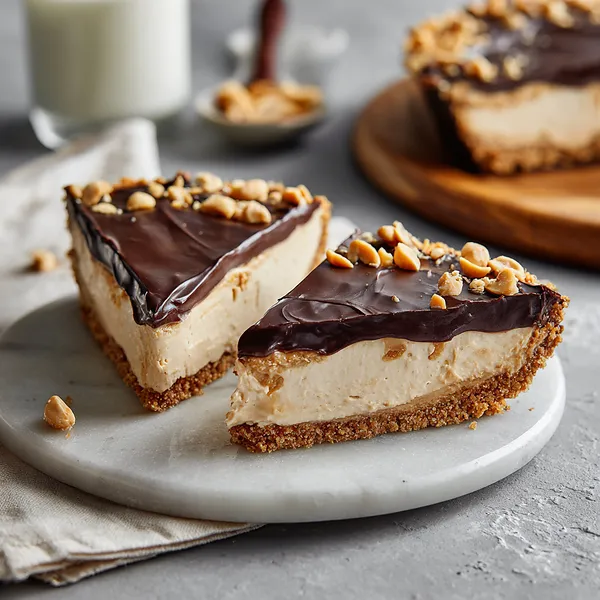
The first time I encountered a no-bake peanut butter pie was at a potluck dinner at a neighbor's house. She brought it in a plain pie dish with no fanfare, and I almost walked past it. Then someone nearby took a bite and let out this involuntary little gasp of delight, and I immediately grabbed a slice. I was not prepared. The crust was this deep, chocolatey crunch of Oreo crumbs bound together with buttery richness. Then the filling — light and mousse-like on the outside, denser and more fudge-like in the center — just dissolving on the tongue with waves of roasted peanut flavor. And the ganache on top brought everything together with a glossy, almost bittersweet finish that stopped it from being too sweet. I asked for the recipe before I even finished my slice. Since then I've made it at least a dozen times, tweaking the ratios until I found the version that I think is absolutely perfect. It's deceptively simple, endlessly impressive, and genuinely one of the best desserts I've ever put in my mouth.
Why I love this recipe
I love this recipe because it gives you maximum payoff for minimum effort. There's no baking, no tempering chocolate, no water baths — none of the anxiety that comes with more technical desserts. You crush some cookies, you whip some cream, you stir together a few ingredients, and then the fridge does all the work for you. But the result looks and tastes like something from a high-end bakery. I also love how forgiving it is. Overmixed the filling a little? Still incredible. Ganache came out slightly thicker than expected? Gorgeous rustic drizzle. The peanut butter flavor is bold and satisfying without being overwhelming, and the chocolate ganache brings this sophisticated edge that makes it feel grown-up and indulgent. It's also deeply nostalgic — peanut butter and chocolate together is the kind of flavor combination that just feels like home. Every time I make this pie, there are zero leftovers, and that tells me everything I need to know.
What You Need From Your Kitchen
- Oreo Cookies: Crushed into fine crumbs to form the base of the crust — use the full cookie including the filling for the best buttery texture.
- Cream Cheese: Softened to room temperature and beaten until fluffy before combining with peanut butter — this is the backbone of the creamy filling.
- Creamy Peanut Butter: Use a commercial creamy peanut butter (like Jif or Skippy) for the smoothest, most stable filling — natural peanut butter can make the filling too oily.
- Heavy Whipping Cream: Whipped to stiff peaks and folded into the base to create the mousse-like, airy texture of the filling.
- Dark Chocolate Chips: Melted with warm heavy cream to create the glossy ganache topping that balances the sweetness of the peanut butter filling.
- Roasted Peanuts: Roughly chopped and scattered over the warm ganache as a finishing garnish — adds crunch, texture, and a salty contrast.
Let's Make These Together
- Crush and build the Oreo crust
- Pulse your Oreo cookies in a food processor until they become fine, even crumbs. Mix in the melted butter until the crumbs hold together when pressed. Transfer to your pie dish and use the bottom of a flat glass to press the mixture firmly and evenly across the base and up the sides. Pop it in the freezer for 15 minutes while you move on to the filling.
- Whip your cream to stiff peaks
- Pour your cold heavy whipping cream into a chilled mixing bowl. Beat with an electric mixer starting on medium then increasing to high speed until you have beautifully stiff, cloud-like peaks. This is what gives the filling its light, mousse-like structure. Set it aside in the fridge.
- Beat together the peanut butter base
- In a large bowl, beat your softened cream cheese until there are absolutely no lumps. Add the peanut butter, powdered sugar, and vanilla and beat again until the mixture is silky, smooth, and cohesive. Taste it — it should be rich, nutty, and perfectly sweet.
- Fold in the whipped cream
- Add your whipped cream to the peanut butter mixture in two stages, folding gently with a rubber spatula each time. Use a slow, sweeping motion from the bottom of the bowl upward to keep the air in. The final mixture should be light, creamy, and fluffy.
- Fill and chill the pie
- Spoon the peanut butter filling into your chilled Oreo crust and spread it into an even, smooth layer with an offset spatula. Cover loosely with plastic wrap and refrigerate for at least 2 hours, or ideally overnight, until the filling is fully set and sliceable.
- Make and pour the ganache
- Heat heavy cream in a saucepan until it just simmers — don't let it boil. Pour it over your dark chocolate chips in a heatproof bowl and let it sit for 2 minutes untouched. Then stir slowly from the center outward until you have a perfectly smooth, glossy ganache. Pour it over your set pie and spread gently. Top immediately with chopped roasted peanuts and refrigerate 15 more minutes to set.
 pin it
Switch Things Up
I first made this pie on a whim when I needed a dessert but didn't want to turn on the oven in the middle of summer. I had Oreos, peanut butter, and cream cheese sitting in the fridge and just thought — why not? The moment I poured that warm ganache over the set filling and watched it drip down the sides, I knew I had stumbled onto something special. My family devoured it in one sitting. Since then, I've tried drizzling salted caramel on top, swapping the dark chocolate for white chocolate ganache, and even adding a layer of sliced bananas under the filling. Every version has been a winner. The base recipe is so forgiving and easy that it's become my go-to emergency dessert.
Perfect Pairings
This peanut butter pie pairs beautifully with a tall glass of cold whole milk, which balances the richness of the filling perfectly. For a more grown-up pairing, try it alongside a hot espresso or a cup of dark roast coffee — the bitterness cuts right through the sweetness. If you're building a dessert spread, serve it next to fresh strawberries or raspberries to add a bright, fruity contrast to the deep chocolate and nutty flavors. A scoop of vanilla bean ice cream on the side never hurts either.
 pin it
Frequently Asked Questions
- → Can I use natural peanut butter for this recipe?
It is not recommended. Natural peanut butter tends to separate and can make the filling oily and unstable. For the best texture and structure, use a commercial creamy peanut butter like Jif or Skippy.
- → How far in advance can I make this pie?
You can make the pie up to 2 days ahead and store it covered in the refrigerator. For the best presentation, add the ganache topping and chopped peanuts the day you plan to serve it.
- → Can I freeze the peanut butter pie?
Yes! This pie freezes beautifully. Wrap it tightly in plastic wrap and foil and freeze for up to one month. Thaw overnight in the refrigerator before serving. Add the ganache after thawing for best results.
- → Can I use a store-bought Oreo pie crust?
Absolutely. A pre-made Oreo crust works perfectly and saves time. Just be aware the crust will be slightly thinner than a homemade one, so you may have a small amount of filling left over.
- → What if my ganache is too thick to pour?
If your ganache thickens too quickly, gently microwave it in 10-second intervals, stirring between each, until it returns to a pourable consistency. Adding a tiny splash of warm cream can also help loosen it.
- → Can I make this recipe dairy-free?
Yes, with substitutions. Use dairy-free cream cheese, full-fat coconut cream in place of heavy whipping cream, and dairy-free chocolate chips for the ganache. The texture may be slightly different but still delicious.
Conclusion
This no-bake peanut butter pie is the ultimate crowd-pleaser that comes together with minimal effort and maximum flavor. The combination of a crunchy Oreo crust, airy peanut butter filling, and rich chocolate ganache creates a dessert that feels truly indulgent. Whether you're hosting a dinner party or satisfying a late-night craving, this pie delivers every single time. Store leftovers covered in the fridge for up to 4 days — if it lasts that long!