
 pin it
I first encountered this magical peppermint swirl fudge at a holiday cookie exchange about five years ago. A friend brought a tin full of these glossy, marbled squares, and I was immediately captivated by how professional they looked. One bite and I was hooked – the rich chocolate melted on my tongue, followed by the cool refreshment of peppermint and the satisfying crunch of candy cane pieces. I begged for the recipe and was shocked at how simple it was. The genius lies in the technique: you create two separate chocolate mixtures, pour them into the same pan, and create art with a simple swirl of a knife. The dark chocolate base provides depth and richness, while the white chocolate adds creaminess and visual contrast. The peppermint extract brings that quintessential holiday flavor without being overwhelming. What I love most is how versatile this recipe is – you can adjust the swirl pattern to your liking, add more or less peppermint, or even skip the candy cane topping for a cleaner look. It's become my signature holiday treat, the one everyone expects me to bring to gatherings. The recipe is forgiving, requires no candy thermometer, and sets beautifully in the refrigerator. Every time I make it, I'm reminded of that first bite at the cookie exchange and how sometimes the simplest recipes create the most lasting memories.
Why I love this recipe
This Peppermint Swirl Fudge holds a special place in my heart for so many reasons. First, it's absolutely foolproof – even if you've never made fudge before, you'll succeed with this recipe. There's no temperature monitoring, no worry about crystallization, just straightforward melting and swirling. I love how it transforms simple ingredients into something that looks like it came from a fancy chocolate shop. The visual impact is stunning, yet it requires minimal skill. Every batch turns out slightly different depending on how you swirl, which means each one is unique and personal. The flavor combination is perfection – the bittersweet chocolate balances the sweet white chocolate, and the peppermint adds that holiday magic without being cloying. I adore how this recipe has become part of my family's holiday tradition. My kids get excited to help crush the candy canes, and we've created so many memories in the kitchen making batch after batch. It's also incredibly practical for gift-giving – I make several batches, cut them into squares, package them in pretty tins, and suddenly I have thoughtful, homemade gifts for teachers, neighbors, and friends. The fact that it stays fresh for weeks when properly stored is a huge bonus during the busy holiday season. Most of all, I love the joy it brings to people. The combination of nostalgia from the peppermint and the indulgence of the chocolate creates smiles every single time. It's my way of sharing holiday cheer, one delicious square at a time.
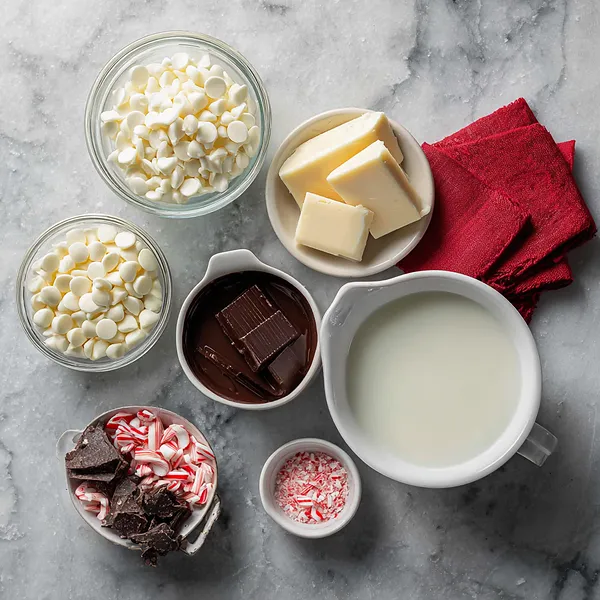
What You Need From Your Kitchen
- Dark chocolate chips: The base of the fudge, providing rich chocolate flavor and smooth texture when melted with condensed milk.
- White chocolate chips: Creates the beautiful swirl effect and adds creamy sweetness to contrast the dark chocolate.
- Sweetened condensed milk: Binds the chocolate together and provides the creamy, fudgy texture without the need for a candy thermometer.
- Peppermint extract: Infuses the fudge with refreshing mint flavor that complements the chocolate perfectly.
- Candy canes: Provides festive decoration, crunch, and an extra burst of peppermint flavor on top.
- Butter: Adds richness and helps create a glossy, smooth finish to the melted chocolate.
Let's Make These Together
- Prepare Your Workspace
- Start by lining your baking pan with parchment paper and setting up your two saucepans. Having everything ready before you begin melting the chocolate ensures a smooth process, as the chocolate can set quickly once removed from heat. This preparation step is crucial for achieving those beautiful swirls.
- Create the Dark Chocolate Base
- Melt the dark chocolate chips with most of the condensed milk and butter over low heat, stirring constantly. The key here is patience and low heat – rushing this step can cause the chocolate to seize or burn. Once smooth and glossy, remove from heat and add half the peppermint extract. The aroma at this stage is absolutely heavenly!
- Make the White Chocolate Layer
- Using a separate pan, repeat the melting process with white chocolate, remaining condensed milk, and butter. White chocolate is more delicate than dark chocolate, so keep the heat low and stir continuously. Once melted and smooth, add the remaining peppermint extract and mix thoroughly.
- Swirl to Perfection
- Pour the dark chocolate into your prepared pan, then immediately dollop the white chocolate on top in random spots. Using a knife or skewer, create your swirl pattern with gentle, deliberate movements. Think of it as creating art – each swirl is unique! Don't overwork it; 8-10 swirls are usually perfect for that professional marbled look.
- Finish and Set
- Sprinkle your crushed candy canes over the top while the chocolate is still wet, gently pressing them into the surface. This ensures they'll stay put when you cut the fudge later. Then comes the hardest part – waiting! Refrigerate for at least 2 hours until completely firm before cutting into perfect squares.
 pin it
Switch Things Up
I remember making this fudge for the first time during a particularly hectic holiday season. I was looking for something festive but foolproof, and this recipe became my saving grace. The first batch turned out so beautifully that I ended up making three more batches that week! I love experimenting with the swirl patterns – sometimes I go for dramatic swoops, other times delicate marbles. One year, I made a batch without the peppermint for a friend who wasn't a fan, and simply increased the vanilla extract instead. It was equally delicious! I've also tried using different types of chocolate – semi-sweet, milk chocolate, even ruby chocolate for a pink swirl. The key is to work quickly when swirling so the chocolate doesn't set too fast. I've found that gently heating my knife before cutting gives me those clean, professional-looking edges. My favorite part is crushing the candy canes – it's surprisingly therapeutic, and the kids love helping with that step!
Perfect Pairings
This Peppermint Swirl Fudge pairs beautifully with a rich cup of hot chocolate or a strong espresso to balance the sweetness. For a dessert platter, serve it alongside gingerbread cookies, shortbread, or chocolate-dipped pretzels. The minty freshness complements creamy desserts like cheesecake or vanilla ice cream wonderfully. If you're hosting a holiday party, arrange the fudge on a platter with other chocolate treats, nuts, and dried fruits for an elegant dessert board. For beverage pairings, try it with peppermint hot chocolate, Irish coffee, or a glass of cold milk. The fudge also works surprisingly well with a small glass of dessert wine or port for adult gatherings.
 pin it
Frequently Asked Questions
- → Can I make this fudge ahead of time?
Absolutely! This fudge actually improves after a day or two as the flavors meld together. You can make it up to 2 weeks in advance and store it in an airtight container in the refrigerator. For longer storage, freeze the fudge for up to 3 months – just thaw it in the refrigerator overnight before serving.
- → Why is my fudge grainy instead of smooth?
Graininess usually occurs when chocolate is overheated or if moisture gets into the mixture. Always melt chocolate over low heat and stir constantly. Make sure all utensils are completely dry before use. Using high-quality chocolate chips also helps prevent this issue, as they contain stabilizers that help maintain smooth texture.
- → Can I use different types of chocolate?
Yes! You can experiment with milk chocolate, semi-sweet chocolate, or even ruby chocolate for unique variations. Just keep in mind that different chocolates have different melting points and sweetness levels, so you may need to adjust the amount of peppermint extract to balance the flavors.
- → How do I get clean cuts when slicing the fudge?
The secret is using a sharp knife heated under hot running water, then dried completely before each cut. The warm blade slices through the chocolate cleanly without dragging or crumbling. Wipe the knife clean between cuts and reheat as needed. This technique gives you those professional-looking edges.
- → Can I make this without peppermint?
Definitely! Simply omit the peppermint extract and crushed candy canes. You can substitute with vanilla extract for a classic chocolate fudge, or try other extracts like almond, orange, or coffee for different flavor profiles. You could also top with chopped nuts, sprinkles, or sea salt instead of candy canes.
- → My fudge won't set – what went wrong?
If your fudge is too soft after 2-3 hours in the refrigerator, it likely wasn't cooked long enough to evaporate some of the liquid, or too much condensed milk was used. Try placing it in the freezer for 30 minutes to help it set. For future batches, make sure the chocolate mixture is fully melted and smooth before removing from heat.
Conclusion
This Peppermint Swirl Fudge is the perfect holiday treat that combines simplicity with stunning presentation. The rich chocolate base paired with creamy white chocolate swirls and refreshing peppermint creates a flavor combination that's both nostalgic and elegant. Whether you're making it for gift-giving, holiday parties, or simply to enjoy with family, this fudge delivers every time. The beautiful marbled effect looks impressive but requires minimal effort, making it ideal for busy holiday schedules. Store it in an airtight container in the refrigerator, and it'll stay fresh for up to two weeks – though I doubt it'll last that long!