
 pin it
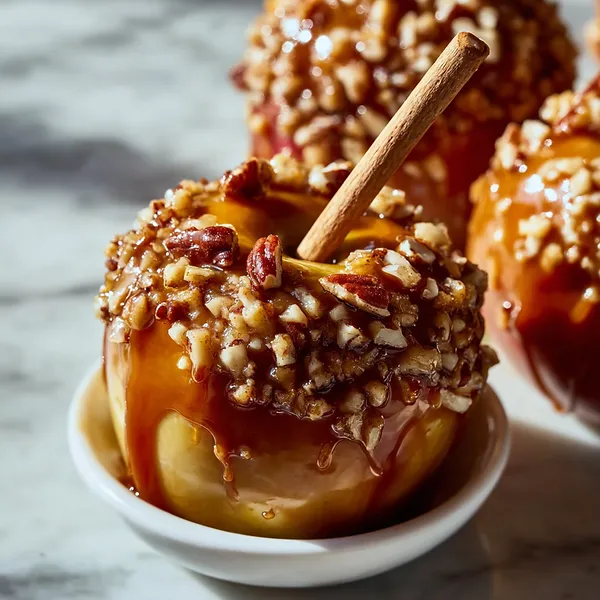
I first encountered caramel apples at a county fair when I was eight years old, and I've been obsessed ever since. This recipe brings back all those nostalgic fall memories but makes the process so much easier. The apples get a glossy caramel coating that's smooth and buttery, with just the right amount of sweetness. What I love most is how the sheet pan catches any excess caramel, which you can then scrape up and drizzle over the finished apples for extra decadence. The toppings – crunchy pecans and sweet toffee bits – add incredible texture that contrasts beautifully with the soft caramel and crisp apple. Each bite is a perfect balance of sweet, tart, and crunchy. The wooden sticks make them fun to eat and easy to share. And honestly, they look so professional that people always assume I bought them from a fancy candy shop. Little do they know it took me less than an hour from start to finish!
Why I love this recipe
This recipe has become my go-to for fall entertaining because it checks every box: easy, impressive, delicious, and crowd-pleasing. I love that it removes all the intimidation from making caramel apples at home. The sheet pan method means no more hovering over a hot pot of caramel or worrying about it seizing up. Everything happens in the oven at a controlled temperature, giving you consistent results every single time. I also appreciate how customizable these are – you can use any toppings you want, from crushed cookies to coconut flakes to mini M&Ms. The apples themselves stay perfectly crisp under that caramel coating, giving you that satisfying crunch with every bite. And let's talk about presentation – these look absolutely stunning on a dessert table. They're like edible decorations that also happen to taste amazing. Plus, making these with kids is actually fun rather than stressful, which is rare for candy-making recipes.
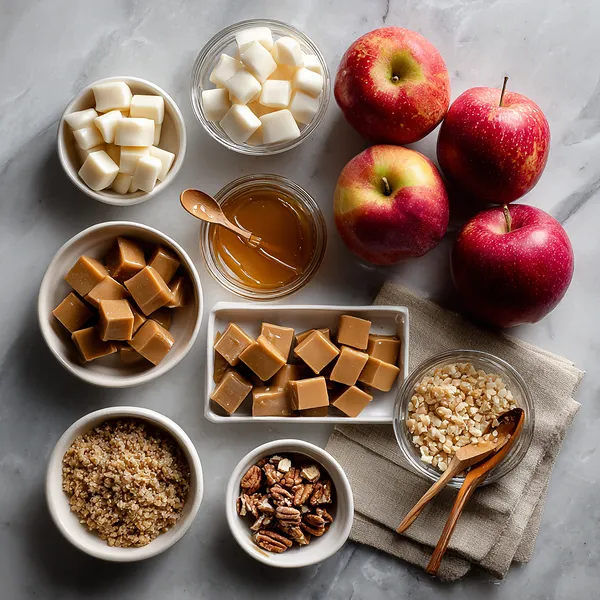
What You Need From Your Kitchen
- Granny Smith Apples: Wash thoroughly, dry completely, and insert wooden sticks before coating
- Caramel Candies: Unwrap all candies and melt with heavy cream until smooth and pourable
- Heavy Cream: Mix with caramel candies to create a smoother, more spreadable consistency
- Chopped Pecans: Combine with toffee bits for rolling and coating the caramel-covered apples
- Toffee Bits: Mix with pecans to add sweet crunch and texture to the coating
- Wooden Sticks: Insert firmly into the stem end of each apple for easy handling and eating
Let's Make These Together
- Prepare Your Workspace
- Start by setting up your workspace with everything you need within reach. Line your sheet pan with parchment paper and arrange your apples, sticks, and toppings nearby. This preparation makes the coating process much smoother since you'll need to work quickly once the caramel is melted. Having everything organized means you can focus on creating beautiful caramel apples without scrambling for supplies mid-process.
- Get Those Apples Ready
- Wash your apples under cool running water and scrub them gently to remove any waxy coating that could prevent the caramel from sticking. Dry them completely with a clean kitchen towel – this step is crucial! Any moisture will cause the caramel to slide right off. Once dry, firmly insert a wooden stick into the stem end of each apple, pushing it about halfway through to ensure it stays secure when you're coating and eating.
- Melt the Caramel
- Unwrap all your caramel candies and place them in a microwave-safe bowl with the heavy cream. The cream helps create a smoother, more pourable consistency that coats the apples beautifully. Microwave in 30-second bursts, stirring well between each interval. Usually this takes about 2-3 minutes total. The caramel should be completely melted and smooth, with no lumps remaining. Be patient during this step – rushing can cause uneven melting.
- Coat with Love
- This is where the magic happens! Hold each apple by its stick and use a spoon to drizzle the warm caramel over it, rotating as you go to ensure even coverage. Let the excess drip back onto the sheet pan – don't worry about perfection here. The rustic, homemade look is part of the charm! Work at a steady pace since the caramel will start to set as it cools. If it becomes too thick, pop it back in the microwave for a few seconds.
- Add the Crunch
- While your caramel coating is still sticky and soft, it's time to add those delicious toppings. Mix your chopped pecans and toffee bits together in a shallow bowl, then roll each caramel-coated apple through the mixture. Press gently with your hands to help the toppings stick. You can be generous here – the more toppings, the better! If rolling doesn't work well, simply hold the apple over the bowl and sprinkle the toppings over it, pressing them in with your fingers.
- Set and Chill
- Place your beautifully coated apples back on the sheet pan and pop them in the warm oven for just 5 minutes. This helps the caramel start to set without melting off. Then transfer the whole sheet pan to your refrigerator for at least 30 minutes. This chilling time is essential – it transforms the soft, sticky caramel into that perfect firm coating that snaps when you bite into it. Once they're fully chilled, they're ready to devour or gift to lucky friends!
 pin it
Switch Things Up
I'll never forget the first time I tried making caramel apples the traditional way – what a sticky disaster! Caramel everywhere except where it was supposed to be, burns on my fingers, and apples that looked like they'd been through a war zone. Then I discovered this sheet pan method and it completely changed the game. Now I make these every October without fail, and my kitchen stays clean! Last week, I experimented with adding mini chocolate chips to the topping mix, and wow – total game changer. My neighbor couldn't stop raving about them. The best part? I can make eight apples at once without breaking a sweat, which means more time enjoying them and less time stressing in the kitchen.
Perfect Pairings
These caramel apples pair beautifully with a mug of hot apple cider or spiced chai tea for the ultimate fall experience. If you're serving them at a party, consider setting up a toppings bar with extra crushed pretzels, mini marshmallows, and chocolate chips so guests can customize their own. They also make an excellent dessert alongside warm apple crisp or pumpkin pie. For a more indulgent pairing, serve with vanilla ice cream and an extra drizzle of caramel sauce. And don't forget a glass of cold milk – it's the classic companion that cuts through the sweetness perfectly.
 pin it
Frequently Asked Questions
- → Why won't my caramel stick to the apples?
The most common reason is moisture on the apple's surface. Make sure to wash and completely dry your apples, rubbing them with a clean towel to remove any waxy coating. Some apples come with a food-grade wax that needs to be removed for the caramel to adhere properly. You can also try dipping the apples briefly in boiling water, then drying them thoroughly before coating.
- → Can I use homemade caramel instead of store-bought candies?
Absolutely! Homemade caramel can work wonderfully for this recipe. Just make sure your caramel is at the right temperature – around 200-210°F is ideal. If it's too hot, it will slide right off the apples; too cool, and it won't coat smoothly. Homemade caramel often gives you a richer, more complex flavor than candy caramels.
- → How long do these caramel apples stay fresh?
When stored properly in the refrigerator, wrapped individually in wax paper or plastic wrap, these caramel apples will stay fresh for up to 5 days. However, they're best enjoyed within 2-3 days for optimal texture. The apples may start to release moisture over time, which can make the caramel coating softer. Always keep them refrigerated until ready to serve.
- → What other toppings can I use besides pecans and toffee?
The topping possibilities are endless! Try crushed pretzels for a sweet-salty combo, mini chocolate chips, crushed Oreos, shredded coconut, crushed graham crackers, mini marshmallows, or even colorful sprinkles. You can also drizzle melted chocolate over the finished apples for an extra layer of indulgence. Mix and match to create your own signature caramel apple!
- → My caramel became too thick while I was working with it. What should I do?
No problem! Simply microwave the caramel for 10-15 seconds to re-warm it and restore its pourable consistency. Stir well after heating. If it's still too thick, add a teaspoon of heavy cream and stir until smooth. Caramel naturally thickens as it cools, so don't hesitate to reheat it as needed throughout the coating process.
- → Can I make these ahead of time for a party?
Yes! These are actually perfect make-ahead treats. Prepare them 1-2 days before your event and store them in the refrigerator, wrapped individually to prevent them from sticking together. Remove them from the fridge about 15-20 minutes before serving to take the chill off – they taste best at cool room temperature rather than straight from the fridge. This also makes the caramel easier to bite through.
Conclusion
These Sheet Pan Caramel Apples are the perfect fall treat that combines nostalgia with modern convenience. The sheet pan method eliminates the stress of traditional caramel apple making, giving you perfectly coated apples every time. Whether you're making these for a fall party, Halloween celebration, or just because you're craving something sweet and crunchy, this recipe delivers on flavor and fun. The combination of smooth caramel, crisp apple, and crunchy toppings creates a textural experience that's absolutely addictive. Make a batch this weekend and watch them disappear!