
 pin it
I remember the first time I encountered breakfast enchiladas at a small café in Austin, Texas. I was skeptical at first – enchiladas for breakfast? But one bite changed everything. The way the eggs stayed creamy inside the tortilla, how the cheese melted into every crevice, and that perfect bacon crunch on top was a revelation. When I got home, I knew I had to recreate that magic in my own kitchen. This recipe is my love letter to that experience. What makes it special is how it transforms simple breakfast ingredients into something that feels celebratory and indulgent. The process of rolling each enchilada feels almost therapeutic, and there's something deeply satisfying about arranging them in the skillet, knowing they're about to become this gorgeous, golden, cheesy masterpiece. Every time I make this dish, it reminds me that breakfast doesn't have to be boring or rushed. It can be an event, something worth waking up early for and lingering over with people you love.
Why I love this recipe
This recipe holds a special place in my heart because it brings people together. There's something about pulling a cast iron skillet full of these loaded enchiladas out of the oven that makes everyone gather around the kitchen. I love how versatile it is – you can prep everything the night before and just bake it in the morning, which makes it perfect for those mornings when you want something impressive but don't want to be stuck cooking while everyone else is chatting. The layers of flavor are what really get me – the savory bacon, the creamy eggs, the sharp cheddar, all wrapped up in soft tortillas and topped with fresh, bright ingredients. It's comfort food that doesn't feel heavy, and it's fancy enough for guests but easy enough for a regular weekend. Plus, leftovers reheat beautifully, so you can enjoy this deliciousness for days. Every time I make it, I discover something new to love about it, whether it's trying a different cheese blend or experimenting with the toppings.
What You Need From Your Kitchen
- Flour Tortillas: Use large burrito-size tortillas that are soft and pliable for easy rolling
- Bacon: Cook until crispy, then crumble into pieces, reserving some grease for scrambling eggs
- Eggs: Whisk well and scramble until just set but still creamy for the best texture
- Cheddar Cheese: Shred fresh cheese for best melting results, divided between filling and topping
- Tomatoes: Dice fresh tomatoes and add as a bright, fresh topping after baking
- Bell Peppers: Dice and add to the filling for sweetness and color
- Fresh Parsley: Chop finely and sprinkle over the top as a fresh garnish
- Sour Cream: Add dollops on top before serving for creamy richness
Let's Make These Together
- Prep the Bacon
- Start by cooking your bacon in a large skillet over medium heat until it reaches that perfect crispy texture. This usually takes about 6-8 minutes, and you'll want to flip the strips occasionally for even cooking. Once done, transfer the bacon to paper towels to drain excess grease, but don't discard all that flavorful bacon fat! Keep about 2 tablespoons in the skillet – this will add incredible flavor to your scrambled eggs. Once the bacon has cooled slightly, crumble it into bite-sized pieces and set aside.
- Scramble the Eggs
- In a mixing bowl, crack your eggs and whisk them together with a pinch of salt and pepper until well combined. Using the same skillet with the reserved bacon grease, pour in your whisked eggs over medium-low heat. Gently stir and fold the eggs as they cook, ensuring they remain soft and creamy rather than dry and overcooked. The goal is to have them just set but still slightly glossy, which should take about 3-4 minutes. Remove from heat immediately and set aside.
- Assemble Your Enchiladas
- Now comes the fun part! Lightly grease your cast iron skillet or baking dish with cooking spray or butter. Lay out your flour tortillas on a clean work surface. Down the center of each tortilla, add a generous scoop of the scrambled eggs, followed by some diced bell peppers, a sprinkle of crumbled bacon (saving some for topping), and about 2 tablespoons of shredded cheese. Roll each tortilla tightly, tucking in the sides as you go, and place them seam-side down in your prepared skillet. Arrange them snugly next to each other so they hold their shape during baking.
- Add Cheese and Bake
- Once all your enchiladas are nestled in the skillet, it's time to create that irresistible cheesy top. Sprinkle the remaining shredded cheddar cheese generously and evenly over all the enchiladas. Cover the entire skillet with aluminum foil to trap the heat and moisture. Place the skillet in your preheated 375°F oven and bake for 20 minutes. After 20 minutes, remove the foil and bake for an additional 5 minutes to allow the cheese to become golden and bubbly. The aroma filling your kitchen will be absolutely divine!
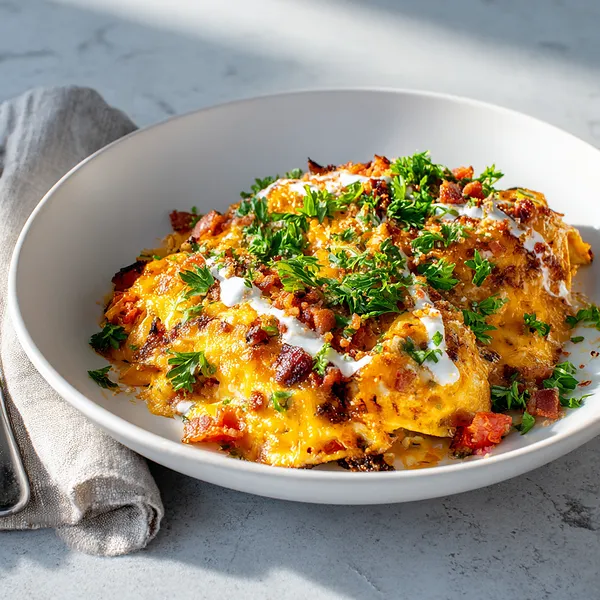
- Garnish and Serve
- The moment you've been waiting for! Carefully remove the hot skillet from the oven using oven mitts. Immediately sprinkle the remaining crumbled bacon over the top while everything is still piping hot. Add your diced fresh tomatoes for a burst of color and freshness, followed by a generous sprinkle of chopped parsley. Finally, add dollops of sour cream across the top. Serve directly from the skillet for that rustic, homey presentation that everyone will love. These enchiladas are best enjoyed hot, with each bite delivering layers of creamy, cheesy, bacon-y goodness!
 pin it
Switch Things Up
I first made these enchiladas on a lazy Sunday morning when I had leftover tortillas and a craving for something more exciting than regular scrambled eggs. I threw together what I had in the fridge, and honestly, it turned out so much better than I expected. The key moment was when I pulled that skillet out of the oven and saw all that cheese bubbling and golden. Now I make this every time we have family visiting for breakfast. My sister always requests it specifically. The great thing is you can customize it however you want – sometimes I add jalapeños for heat, other times I throw in sautéed mushrooms or spinach. Last month I made it with chorizo instead of bacon and it was incredible. The best part is that even though it looks fancy and impressive, it comes together in less than an hour, and most of that time is just letting it bake while you sip your coffee.
Perfect Pairings
These breakfast enchiladas pair beautifully with a variety of sides and beverages. Serve them alongside crispy hash browns or seasoned breakfast potatoes for extra heartiness. A fresh fruit salad with melon, berries, and citrus provides a refreshing contrast to the rich, cheesy enchiladas. For drinks, pair with freshly squeezed orange juice, a robust coffee, or for a special occasion, mimosas or bloody marys. You can also set out bowls of salsa, guacamole, and additional sour cream so everyone can customize their plates. A simple green salad with lime vinaigrette makes an excellent lighter accompaniment if you want to balance the richness of the dish.
 pin it
Frequently Asked Questions
- → Can I make these enchiladas ahead of time?
Absolutely! You can assemble the enchiladas completely through step 4, cover the skillet tightly with plastic wrap or aluminum foil, and refrigerate overnight. In the morning, simply remove from the refrigerator, let sit at room temperature for 10 minutes, then bake as directed. You may need to add an extra 5 minutes to the covered baking time since they're starting cold.
- → Can I use corn tortillas instead of flour?
While flour tortillas work best for this recipe because they're more pliable and hold together better when rolled, you can use corn tortillas if you prefer. Just be sure to warm them first by wrapping in a damp paper towel and microwaving for 30 seconds, or heating them briefly in a dry skillet. This will make them more flexible and less likely to crack when rolling.
- → What other fillings can I add?
This recipe is incredibly versatile! Popular additions include sautéed onions, diced jalapeños for heat, black beans for extra protein, spinach or kale for greens, mushrooms, or even diced ham or sausage instead of bacon. Just be careful not to overfill the tortillas or they'll be difficult to roll and may burst during baking.
- → How do I prevent the enchiladas from getting soggy?
The key is to not add too much wet filling and to make sure your scrambled eggs aren't too runny. Cook the eggs until they're just set, and avoid adding sauces or salsa to the filling itself. If you want to add sauce, drizzle it lightly over the top after baking rather than soaking the tortillas before baking.
- → How should I store and reheat leftovers?
Store leftover enchiladas in an airtight container in the refrigerator for up to 3 days. To reheat, you can either microwave individual portions for 1-2 minutes, or reheat in a covered oven-safe dish at 350°F for about 15 minutes until warmed through. The oven method will help maintain the texture better than the microwave.
- → Can I freeze these enchiladas?
Yes! These freeze wonderfully. Assemble the enchiladas completely but don't bake them. Wrap the skillet tightly in plastic wrap and then aluminum foil, or transfer to a freezer-safe container. Freeze for up to 2 months. When ready to eat, thaw overnight in the refrigerator, then bake as directed, adding a few extra minutes to the cooking time if needed.
- → What's the best cheese to use?
Sharp cheddar cheese is the classic choice and provides great flavor, but you can use any melting cheese you prefer. Mexican cheese blend, Monterey Jack, Colby Jack, or even pepper jack for a spicy kick all work wonderfully. For the best results, always shred cheese fresh from a block rather than using pre-shredded cheese, as it melts much better.
Conclusion
This Loaded Bacon Breakfast Enchilada Skillet is the ultimate comfort food for any morning. It combines all your breakfast favorites into one incredible dish that's perfect for feeding a crowd or meal prepping for the week. The combination of crispy bacon, fluffy eggs, melted cheese, and fresh toppings creates layers of flavor and texture that will have everyone coming back for seconds. Whether you're hosting a brunch party or just want to treat yourself to something special, this recipe delivers restaurant-quality results with minimal effort.