
 pin it
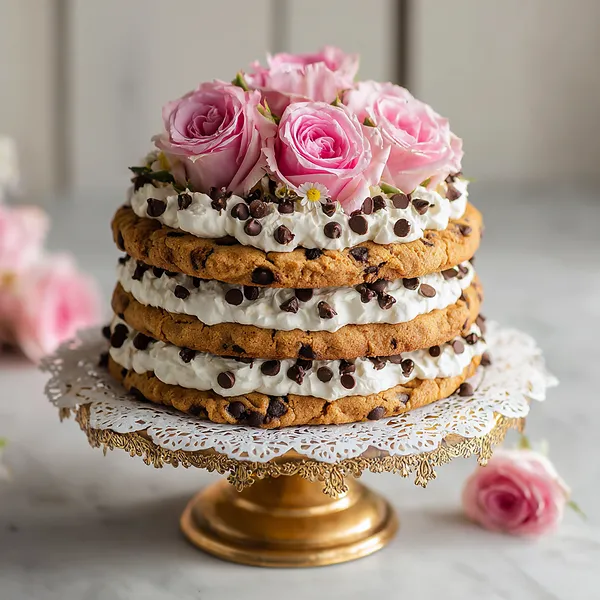
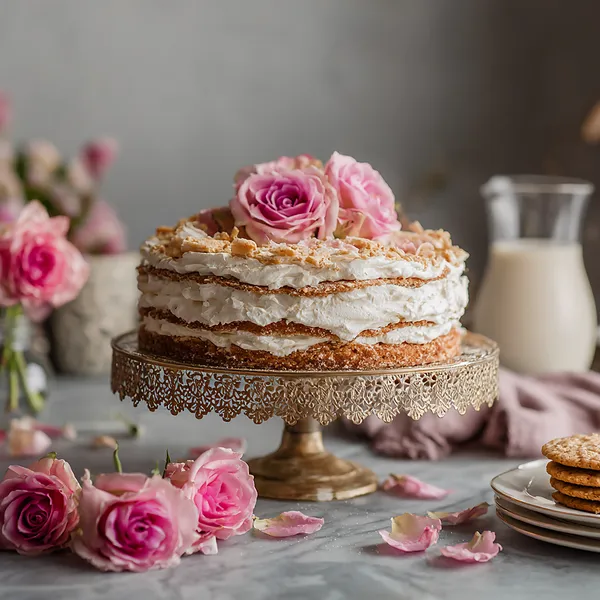
I first encountered this style of cake at a small artisan bakery tucked in a side street, where the display case had one towering cookie cake sitting on a pedestal like a crown jewel. I could not believe what I was seeing — actual cookie layers, stacked like a proper celebration cake, with cream spilling softly between each one and roses perched on top like something from a dream. I ordered a slice immediately and the moment I tasted it I knew I had to learn to make it myself. The Magnificent Cookie Rose Cake is built from thick, golden chocolate chip cookie rounds baked in round cake pans so they hold their shape perfectly for stacking. The whipped cream filling is kept simple — just heavy cream, a touch of powdered sugar, and vanilla — so it does not overpower the deep buttery flavor of the cookies. Mini chocolate chips are scattered generously on top, and the fresh blush roses crown the whole thing with a romantic elegance that makes it feel both rustic and refined at the same time. It is the kind of dessert that photographs like a painting and tastes even better than it looks.
Why I love this recipe
What I love most about this Cookie Rose Cake is that it sits beautifully at the intersection of comfort food and fine pastry. It has all the warmth and nostalgia of a homemade chocolate chip cookie — that golden buttery edge, the melty chocolate chips, the soft chewy center — but it is presented in a way that feels genuinely stunning and celebratory. There is something deeply satisfying about building it layer by layer, spreading the cream, watching the tower rise, and then adding those roses at the very end like placing a crown. I also love that it is endlessly customizable — you can swap the whipped cream for mascarpone, add a caramel drizzle between layers, or change the flowers with the season. Every time I make it, it feels slightly different and entirely special. And the reaction it gets from people who see it for the first time is absolutely priceless every single time.
What You Need From Your Kitchen
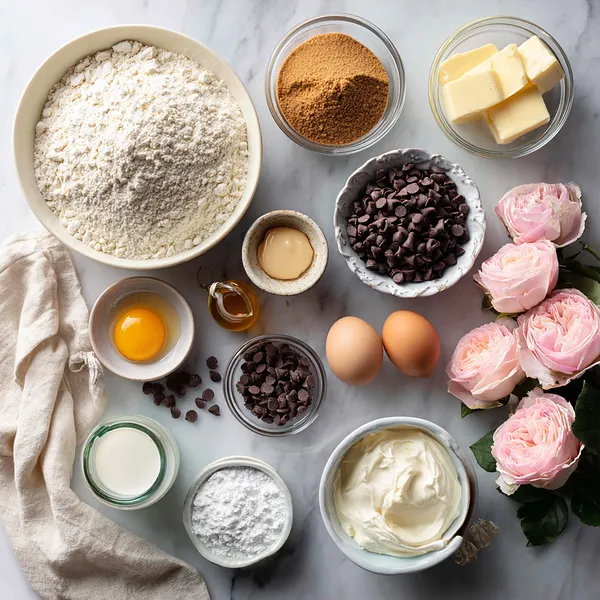
- Unsalted Butter: Creamed with both sugars to form the rich, golden cookie base that makes each layer perfectly chewy
- Semi-Sweet Chocolate Chips: Folded into the dough to create pockets of melted chocolate throughout every cookie layer
- Heavy Whipping Cream: Whipped to stiff peaks with vanilla and powdered sugar to create the billowing cream filling between each layer
- All-Purpose Flour: Combined with baking soda and salt to give the cookie layers structure and the perfect thickness for stacking
- Brown Sugar: Added alongside granulated sugar to give the cookie layers a deep caramel flavor and chewy texture
- Mini Chocolate Chips: Scattered generously across the top of the cake for decoration and a delicate crunch with every bite
- Fresh Blush Pink Roses: Arranged on top of the cake as a stunning floral crown that makes the entire dessert look breathtaking
Let's Make These Together
- Cream Butter and Sugars Together
- Beat the softened butter with both sugars until the mixture is pale, light, and fluffy. This step builds the foundation of flavor and texture for all six cookie layers — do not rush it, give it a full 3-4 minutes of mixing.
- Build the Cookie Dough
- Add the eggs and vanilla to the butter mixture, then fold in the flour mixture and chocolate chips until you have a thick, glossy dough. Divide it into six equal portions ready for the pans.
- Bake Each Cookie Layer
- Press each portion of dough into a lined round cake pan and bake at 350°F for 12-14 minutes until the edges are golden. Let every layer cool completely before you even think about stacking — patience here is everything.
- Whip the Cream to Stiff Peaks
- Using a chilled bowl, whip the heavy cream with powdered sugar and vanilla until it holds beautiful stiff peaks. Keep it refrigerated until the very moment you need it so it stays perfectly firm during assembly.
- Stack, Fill, and Crown the Cake
- Layer each cookie round with a generous swirl of cream, stacking them carefully into a glorious tower. Top with mini chocolate chips and finish with fresh blush roses and greenery for a crown that will take everyone's breath away.
 pin it
Switch Things Up
The first time I attempted this cake I made the cookie layers too thin and they crumbled when I tried to stack them. So I went back, made them thicker — almost like a skillet cookie in each pan — and the difference was night and day. I also discovered that chilling the whipped cream layers for 20 minutes between stacking helps everything hold together beautifully without sliding. Now I sometimes add a thin layer of Nutella between two of the cookie layers for an extra surprise, and it takes the whole cake to a completely different level.
Perfect Pairings
This Cookie Rose Cake pairs beautifully with a hot cup of freshly brewed espresso or a creamy cappuccino — the bitterness of the coffee is the perfect counterpoint to the sweet cookie layers. For a non-coffee option, a tall glass of cold whole milk is the classic companion that never fails. For a special occasion spread, serve alongside a bowl of fresh strawberries or raspberries to add a touch of tartness that cuts through the richness of the cream. A light sparkling rosé also pairs surprisingly well for an adult celebration setting.
 pin it
Frequently Asked Questions
- → Can I make the cookie layers ahead of time?
Absolutely! The baked cookie layers can be wrapped individually in plastic wrap and stored at room temperature for up to 2 days before assembling. You can also freeze them for up to one month — just thaw at room temperature for a couple of hours before building the cake.
- → What can I use instead of whipped cream?
Mascarpone cream is a wonderful alternative — it is slightly richer and more stable than whipped cream, making it easier to stack. A vanilla buttercream also works beautifully if you prefer a sweeter, firmer filling between the layers.
- → How do I prevent the cake from sliding when I stack it?
Make sure the cookie layers are completely cool before stacking, and chill each layer of cream for 15-20 minutes in the refrigerator before adding the next cookie. You can also insert 2-3 long wooden skewers through the center of the assembled cake for extra stability.
- → Can I use store-bought cookie dough to save time?
Yes, you can! A good quality store-bought chocolate chip cookie dough works in a pinch. Press it into round pans and bake as directed. The homemade version has a richer flavor, but store-bought gives you a wonderful result with much less effort.
- → Are the roses safe to eat on a cake?
Fresh roses used for decoration should be food-safe — meaning they have not been treated with pesticides or chemicals. Roses from a florist are typically treated, so it is safest to purchase organic edible roses or use roses grown without chemicals. Always rinse them well and remove the stems before placing them on the cake.
- → How long does the assembled cake keep in the refrigerator?
The assembled Cookie Rose Cake keeps beautifully in the refrigerator for up to 2 days covered loosely with plastic wrap or a cake dome. The cookie layers will soften slightly as they absorb moisture from the cream, which many people find makes the cake even more delicious the next day.
Conclusion
The Magnificent Cookie Rose Cake is the kind of dessert that creates memories. Every layer tells a story — chewy golden cookie, pillowy cream, and a crown of roses that makes the whole thing unforgettable. It is impressive enough for weddings and birthdays yet approachable enough to make on a weekend just because you deserve something extraordinary. Store loosely covered in the refrigerator for up to 2 days for the best texture.