
 pin it
I first discovered the magic of pickle-brined chicken at a local restaurant that specialized in Southern comfort food. The waitress recommended their "pickle fried chicken" and I was skeptical at first – pickles on chicken? But one bite changed everything. The meat was incredibly tender and juicy, with this subtle tangy flavor that just elevated everything. I became obsessed with recreating it at home, experimenting with different breading techniques until I landed on this parmesan-panko combination. The key is marinating the chicken in pickle juice for at least an hour, which not only adds flavor but also uses the acidity to tenderize the meat beautifully. When you coat it in that mixture of panko, parmesan, and finely chopped pickles, you get this incredible textural contrast – super crispy on the outside, impossibly tender inside. The creamy dill sauce was inspired by the tartar sauce they served alongside, but I wanted something that would complement rather than compete with the pickle flavor. Fresh dill makes all the difference here, bringing a bright, herbal note that ties everything together. This recipe has become my signature dish, the one everyone requests at gatherings.
Why I love this recipe
What I love most about this recipe is how it takes a simple ingredient – chicken breast – and transforms it into something truly special. The pickle juice marinade is such a clever trick; it's like getting restaurant-quality results at home with minimal effort. I appreciate that it uses everyday ingredients you probably already have in your pantry and fridge. The versatility is another huge plus – you can adjust the pickle intensity by varying the marinating time, make it spicier with some cayenne, or even use it as a base for sandwiches and wraps. It's one of those recipes that looks impressive enough for company but is easy enough for a Tuesday night. My family genuinely gets excited when I announce we're having this for dinner. The leftovers (when there are any) are fantastic cold the next day, which rarely happens in my house. Plus, there's something deeply satisfying about achieving that perfect golden-brown crust and hearing that crunch when you cut into it. It's comfort food at its finest – familiar flavors presented in a way that feels new and exciting.
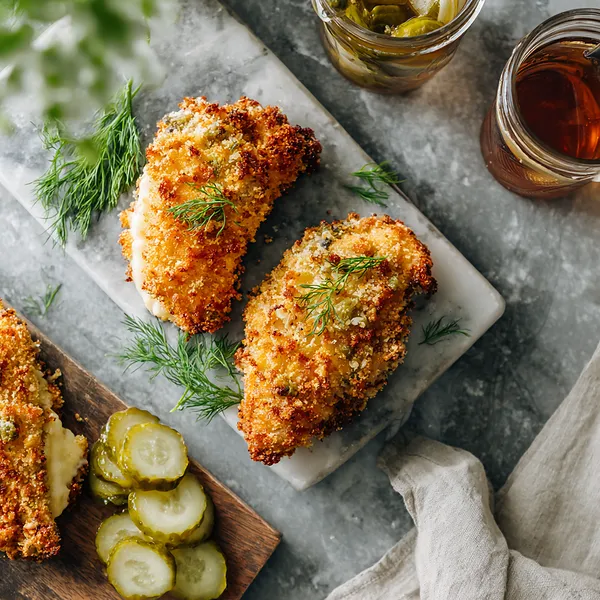
What You Need From Your Kitchen
- Chicken breasts: Marinate in pickle juice for at least 1 hour to tenderize and infuse with flavor
- Dill pickle juice: Use as marinade for the chicken, reserving pickles for chopping into the breading
- Panko breadcrumbs: Combine with Parmesan cheese and chopped pickles for the crispy coating
- Parmesan cheese: Grate fresh and mix into the breadcrumb mixture for extra flavor and crunch
- Fresh dill: Chop finely and mix into sour cream and mayonnaise for the creamy sauce
- Dill pickles: Chop finely and incorporate into the panko coating mixture
- Eggs: Beat well for the middle coating layer in the breading process
Let's Make These Together
- Marinate for Tenderness
- Start by placing your chicken breasts in the pickle juice marinade. This magical step does two things: the acidity tenderizes the meat while infusing every bite with that signature tangy flavor. Let it sit for at least an hour, but if you have time, go for the full four hours. Your patience will be rewarded with the most tender, flavorful chicken you've ever made. While the chicken marinates, you can prep your other ingredients and get your breading station ready.
- Create the Perfect Coating
- The secret to that restaurant-quality crunch is all in the breading technique. Set up your three-dish station like a pro: flour for the base layer, beaten eggs for adhesion, and that incredible panko-parmesan-pickle mixture for the final coat. When you press the breadcrumbs onto the chicken, really make sure they stick – this creates those beautiful golden edges you see in the photos. The chopped pickles in the coating add little bursts of tangy flavor throughout.
- Master the Fry
- Temperature control is everything when pan-frying. You want that oil hot enough to create an immediate sizzle when the chicken hits the pan, but not so hot that it burns the coating before the inside cooks through. Use a thermometer if you have one – 350°F is your sweet spot. Don't crowd the pan; give each piece room to breathe and develop that gorgeous golden crust. When you flip them and see that perfect color, you'll know you nailed it.
- Finish with Creamy Perfection
- While your chicken rests and stays crispy on that wire rack, whisk together the simplest yet most delicious sauce. The combination of sour cream, mayo, and fresh dill creates this cooling, creamy complement to the crispy, savory chicken. That dollop of sauce on top isn't just for looks – it's the perfect finishing touch that brings the whole dish together. Garnish with extra fresh dill and watch everyone's eyes light up when you bring it to the table.
 pin it
Switch Things Up
I'll never forget the first time I made this recipe for a casual Friday dinner. My kids are obsessed with anything pickle-flavored, so I thought, why not combine their love for pickles with crispy chicken? The kitchen smelled absolutely incredible as these beauties cooked up golden and crispy. When I brought them to the table, the crunch was so loud you could hear it across the room. My youngest took one bite and literally did a happy dance. Now it's become our special Friday night tradition. I love how the pickle juice tenderizes the chicken while adding that signature tangy flavor throughout. The creamy dill sauce was a last-minute addition that turned out to be genius – it adds the perfect cooling contrast to the crispy, savory coating. Sometimes I'll make extra just so we have leftovers for sandwiches the next day, though they rarely last that long!
Perfect Pairings
This Crispy Dill Pickle Parmesan Chicken pairs beautifully with a variety of sides. Try serving it alongside creamy mashed potatoes or garlic butter rice to soak up that delicious dill sauce. A fresh coleslaw or crisp garden salad provides a nice contrast to the rich, crispy chicken. For a true comfort food feast, pair it with mac and cheese or roasted vegetables. If you're feeling extra indulgent, serve it with sweet potato fries or onion rings. Don't forget a cold glass of iced tea or lemonade to complement the tangy pickle flavors!
 pin it
Frequently Asked Questions
- → Can I use chicken thighs instead of breasts?
Absolutely! Chicken thighs work wonderfully with this recipe. They're naturally more flavorful and juicy, though they may need a slightly longer cooking time. Just make sure the internal temperature reaches 165°F. Bone-in thighs will require additional cooking time compared to boneless.
- → What if I don't have pickle juice?
If you don't have pickle juice, you can make a quick brine with 1 cup water, 2 tablespoons white vinegar, 1 tablespoon salt, and 1 teaspoon dill. While it won't be exactly the same, it will still tenderize the chicken. Alternatively, you can use buttermilk as a marinade, though you'll lose some of that signature pickle flavor.
- → Can I make this ahead of time?
You can prep the components ahead! Marinate the chicken up to 4 hours in advance, and prepare the dill sauce up to 3 days ahead. You can even bread the chicken a few hours before cooking and refrigerate it. However, for the best texture, fry the chicken just before serving. If you must reheat, use the oven rather than the microwave to maintain crispiness.
- → How do I keep the coating from falling off?
The key is making sure each layer adheres properly. Pat the chicken completely dry after removing it from the marinade. Make sure you press the breadcrumb mixture firmly onto the chicken and let it rest for 5 minutes before frying. Also, don't flip the chicken too early – let it develop a crust before turning. Using one hand for wet ingredients and one for dry helps prevent clumping too.
- → Can I bake this instead of frying?
Yes! Place the breaded chicken on a greased baking sheet or wire rack set over a baking sheet. Lightly spray the tops with cooking spray. Bake at 425°F for 20-25 minutes, flipping halfway through, until golden brown and the internal temperature reaches 165°F. The texture will be slightly different from fried, but still delicious and much lighter.
- → What sides go best with this dish?
This chicken pairs beautifully with classic comfort sides like mashed potatoes, coleslaw, mac and cheese, or roasted vegetables. For a lighter option, try it with a fresh garden salad or steamed green beans. Sweet potato fries or regular fries make it feel like a restaurant meal. The creamy dill sauce also works great as a dip for the sides!
- → How do I store and reheat leftovers?
Store leftover chicken in an airtight container in the refrigerator for up to 3 days. To reheat while maintaining crispiness, place it on a wire rack set over a baking sheet and reheat in a 375°F oven for 10-15 minutes until warmed through and crispy again. Avoid the microwave as it will make the coating soggy. The dill sauce should be stored separately.
Conclusion
This Crispy Dill Pickle Parmesan Chicken is a game-changer for weeknight dinners and special occasions alike. The combination of tangy pickle brine marinade and crispy parmesan coating creates layers of flavor that'll have everyone coming back for more. Whether you're feeding picky eaters or impressing dinner guests, this recipe delivers on both taste and presentation. Serve it alongside your favorite sides and watch it disappear from the table in minutes!