
 pin it
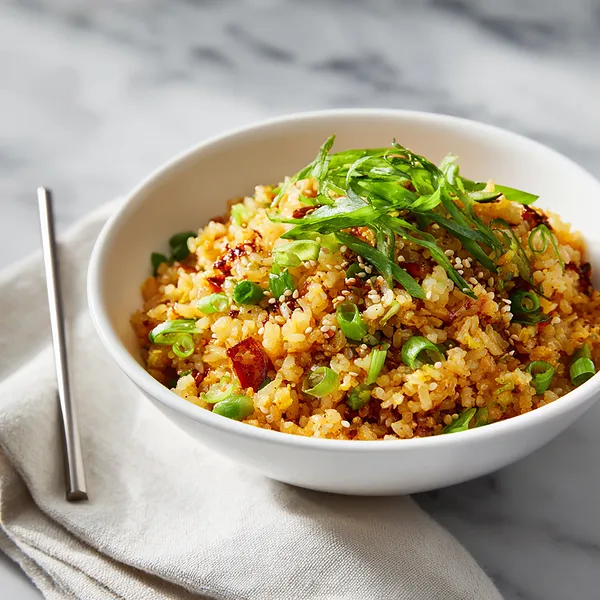
I first stumbled upon the concept of baked fried rice during a late-night recipe browsing session, and I was immediately skeptical. Fried rice in the oven? It seemed to go against everything I knew about making fried rice. But the promise of hands-off cooking was too tempting to ignore, especially after countless nights of standing over a hot wok, constantly stirring and tossing. When I finally tried it, I was absolutely blown away. The rice comes out perfectly fluffy with individual grains that don't clump together, and the vegetables retain their vibrant colors and slight crunch. What really sold me was discovering those golden, slightly crispy bits on top and around the edges – they add such an amazing textural contrast. The beauty of this method is that the rice cooks evenly in the oven's gentle heat, absorbing all those savory flavors from the soy sauce and sesame oil without any risk of burning or sticking. It's become my secret weapon for entertaining because I can assemble it ahead of time and just pop it in the oven when guests arrive. The colorful presentation never fails to impress, and people are always surprised when I tell them how ridiculously easy it is to make.
Why I love this recipe
This recipe has genuinely changed my relationship with weeknight cooking. I love that it takes all the stress and technique out of making fried rice while delivering results that are just as good – if not better – than the traditional method. There's something incredibly satisfying about dumping everything into one dish and walking away, knowing that dinner is taking care of itself. I also love how customizable it is; I can throw in whatever vegetables I have on hand, and it always turns out delicious. The fact that it's baked means I can use that stovetop time to prepare other dishes or just sit down and actually relax for a few minutes. My family loves the vibrant colors and how each bite is packed with different vegetables and textures. It's nutritious, budget-friendly, and makes fantastic leftovers that taste even better the next day. But what I truly love most is that this recipe proves that easy doesn't mean boring or compromising on flavor. It's become our family's comfort food – the dish we turn to when we want something familiar, delicious, and totally stress-free.
What You Need From Your Kitchen
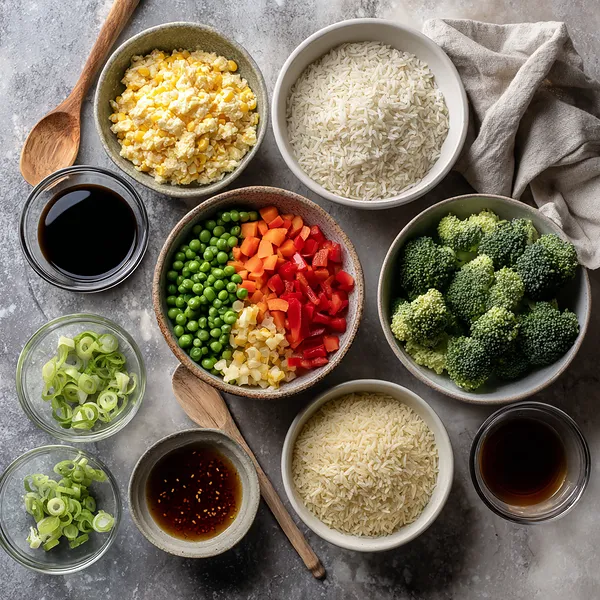
- Long-grain white rice: Rinse briefly and use uncooked for best texture
- Vegetable broth: Use low-sodium if watching salt intake
- Frozen mixed vegetables: No need to thaw, use straight from freezer
- Broccoli florets: Chop into small, bite-sized pieces
- Red bell pepper: Dice into small cubes for even cooking
- Eggs: Beat thoroughly before adding to ensure even distribution
Let's Make These Together
- Prep your workspace
- Start by gathering all your ingredients and preheating the oven to 375°F. Grease your baking dish well to ensure nothing sticks. Take a moment to dice your red pepper and chop your broccoli into small, uniform pieces so everything cooks evenly.
- Create the base mixture
- In your prepared baking dish, combine the uncooked rice with the vegetable broth, creating a flavorful cooking liquid. Add all your colorful vegetables – the frozen mixed veggies, broccoli, and red pepper – along with the minced garlic. Drizzle in the soy sauce and sesame oil, then stir everything together until the rice is evenly distributed and all ingredients are well combined.
- Bake until tender
- Cover the dish tightly with aluminum foil to trap steam and moisture, which will cook the rice perfectly. Slide it into your preheated oven and let it bake undisturbed for 30 minutes. During this time, the rice will absorb all that delicious broth and the vegetables will become tender.
- Add the egg mixture
- Carefully remove the hot dish from the oven and take off the foil. Pour your beaten eggs evenly over the top of the rice mixture. Use a fork to gently fold the eggs throughout, creating beautiful ribbons of cooked egg that add protein and richness to every bite.
- Final bake and garnish
- Return the uncovered dish to the oven for just 5 more minutes to set the eggs and create those irresistible crispy bits on top. Once done, fluff the rice with a fork to separate the grains and distribute everything evenly. Finish with a generous sprinkle of fresh sliced green onions for a pop of color and fresh flavor.
 pin it
Switch Things Up
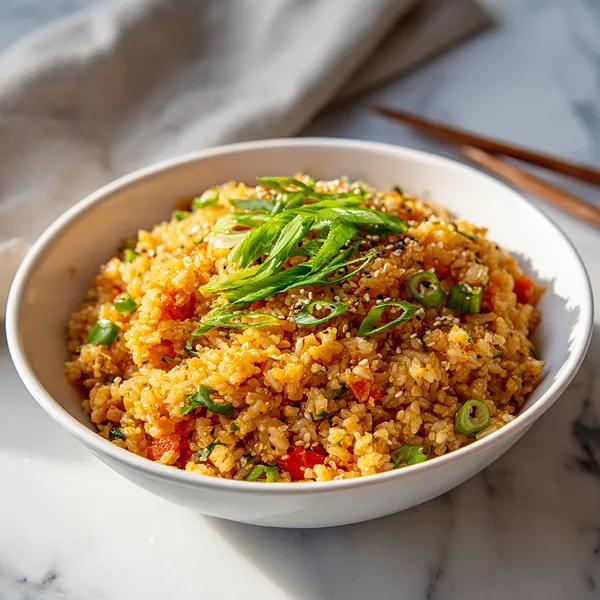
I discovered this recipe on a particularly chaotic Tuesday evening when I had promised my kids homemade fried rice but realized I had zero energy to stand over the stove. In a moment of desperation-fueled creativity, I threw everything into my trusty baking dish, crossed my fingers, and hoped for the best. When I pulled it out of the oven 35 minutes later, I couldn't believe how perfect it turned out – maybe even better than my stovetop version! The rice was fluffy, the vegetables were tender-crisp, and those slightly caramelized edges on top added an unexpected crunch that had everyone asking for seconds. Now it's become our go-to Tuesday tradition, and I've started experimenting with different vegetable combinations depending on what's in the freezer. Last week I added edamame and snap peas, and it was absolutely incredible. My eldest now requests it specifically because she loves picking out all the colorful vegetables.
Perfect Pairings
This Dump-and-Bake Fried Rice is wonderfully versatile and pairs beautifully with so many dishes. Serve it alongside teriyaki chicken or honey garlic shrimp for a complete Asian-inspired meal. It's also fantastic with crispy spring rolls or vegetable dumplings as appetizers. For a lighter pairing, try it with a simple cucumber salad dressed with rice vinegar and a sprinkle of sesame seeds. If you want to keep things vegetarian, add some crispy tofu on top or serve it with vegetable tempura. It even works great as a base for a fried rice bowl – just top with a fried egg, sriracha mayo, and some pickled vegetables for an incredible lunch.
 pin it
Frequently Asked Questions
- → Can I use brown rice instead of white rice?
Yes, but you'll need to adjust the cooking time and liquid. Brown rice typically needs about 45-50 minutes covered baking time and an additional 1/2 cup of broth. Check for tenderness before adding the eggs.
- → Can I make this recipe ahead of time?
Absolutely! You can assemble everything in the baking dish up to 24 hours in advance, cover it tightly, and refrigerate. When ready to cook, let it sit at room temperature for 15 minutes, then bake as directed, adding 5-10 minutes to the covered baking time.
- → What other vegetables work well in this recipe?
This recipe is very versatile! Try snap peas, edamame, zucchini, mushrooms, baby corn, or water chestnuts. Just keep the total vegetable quantity around 3 cups and chop everything into similar-sized pieces for even cooking.
- → How do I prevent the rice from being too dry or mushy?
The key is the liquid-to-rice ratio. Use exactly 3 cups of broth for 2 cups of rice, and make sure to cover the dish tightly with foil during the first baking stage. If your rice tends to come out dry, add an extra 1/4 cup of broth next time.
- → Can I make this recipe vegan?
Yes! Simply omit the eggs or replace them with scrambled tofu. Season the tofu with a bit of turmeric for color and mix it in during the last 5 minutes of baking for a delicious vegan version.
- → What's the best way to reheat leftovers?
Reheat in the microwave with a damp paper towel over the top to add moisture, or in a skillet over medium heat with a splash of water or broth. Stir frequently until heated through. You can also add a drizzle of sesame oil to refresh the flavors.
Conclusion
This Dump-and-Bake Fried Rice proves that incredible flavor doesn't require complicated techniques or hours in the kitchen. It's the perfect solution for busy weeknights when you want something satisfying, nutritious, and absolutely delicious without all the fuss. The oven does all the heavy lifting while you relax, and you end up with restaurant-quality fried rice that's packed with colorful vegetables and perfectly seasoned. Whether you're feeding a family or meal-prepping for the week ahead, this recipe delivers every single time.