
 pin it
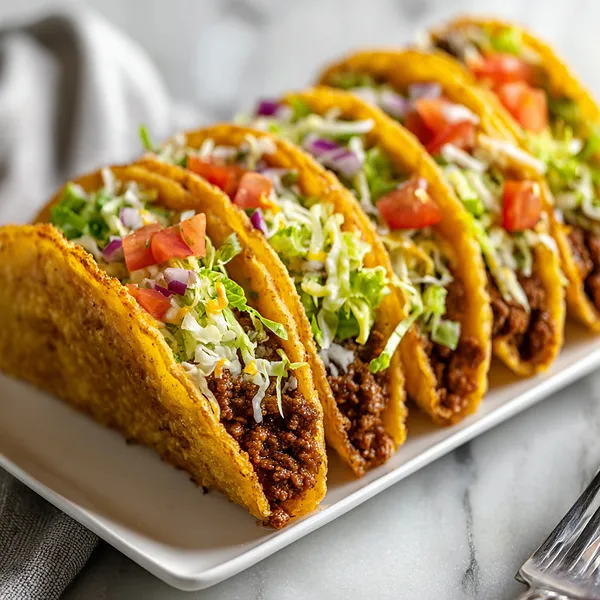
I stumbled upon the idea of oven baked tacos quite by accident during one particularly chaotic dinner rush. Standing at the stove, flipping tacos one by one while they got soggy waiting for their turn, I thought there had to be a better way. That's when inspiration struck – why not bake them all at once? The concept seemed almost too simple to work, but I grabbed a baking dish, arranged the taco shells in a neat row, and started filling them with seasoned ground beef that I'd cooked with my favorite blend of spices. I topped each one with a generous amount of shredded cheddar cheese and slid the whole thing into a preheated oven. Twenty-five minutes later, I pulled out what can only be described as taco perfection. The shells had turned golden and incredibly crispy – even crispier than traditional frying methods. The cheese had melted into every crevice, creating these beautiful stretchy pulls with each taco. The beef stayed moist and flavorful, protected by that blanket of melted cheese. When I topped them with cool, crisp lettuce, juicy tomatoes, and tangy red onions, the contrast of temperatures and textures was absolutely perfect. What started as a time-saving hack has become my preferred method for making tacos. There's something incredibly satisfying about pulling a whole tray of perfectly cooked tacos from the oven, knowing that everyone can eat together while the food is hot. No more assembly line cooking, no more soggy shells, just pure taco bliss in every crispy, cheesy bite.
Why I love this recipe
This recipe has earned a permanent spot in my weekly meal rotation for so many reasons. First and foremost, it solves the biggest problem with traditional tacos – the cook always eats last and usually alone. With oven baked tacos, I can sit down with my family and enjoy dinner together while everything is still hot and fresh. But beyond the convenience factor, these tacos are genuinely better than their stovetop counterparts. The oven's dry heat creates shells that are impossibly crispy, with none of that sogginess that can happen when you're working with a hot pan and steam. The cheese melts evenly and thoroughly, creating these gorgeous cheese pulls that make every taco Instagram-worthy. I also love how customizable this recipe is – I can easily make half with extra spice for the adults and keep the other half mild for the kids. Sometimes I'll add black beans to the beef mixture for extra protein and fiber, or swap in ground turkey for a lighter version. The fresh toppings are where you can really make this recipe your own – I've experimented with pickled jalapeños, fresh cilantro, diced avocado, and different types of cheese. Another reason I'm obsessed with this recipe is how impressive it looks when you bring the whole tray to the table. There's something about that golden row of perfectly stuffed tacos that makes even a simple weeknight dinner feel special. And let's talk about leftovers – if you somehow have any remaining tacos, they reheat beautifully in the oven, maintaining that signature crispiness. This recipe has turned taco night from a stressful cooking marathon into a relaxed, enjoyable meal that brings everyone together.
What You Need From Your Kitchen
- Ground Beef: Brown in a skillet and season with taco seasoning for the savory filling
- Taco Shells: Arrange upright in baking dish to hold the beef and cheese filling
- Cheddar Cheese: Shred and sprinkle generously over filled tacos before baking for melty goodness
- Lettuce: Shred finely and add as fresh topping after baking for crisp texture
- Tomatoes: Dice into small pieces for a juicy, fresh topping
- Red Onion: Dice finely for a tangy, crunchy element
Let's Make These Together
- Brown the Seasoned Beef
- Start by heating a large skillet over medium-high heat. Add the ground beef and break it apart with a wooden spoon as it cooks. You want to cook it until it's completely browned with no pink remaining, which should take about 7-8 minutes. Once cooked, drain off any excess fat. Add your taco seasoning packet and the specified amount of water, then let it simmer until the mixture thickens and the beef is nicely coated in that flavorful sauce.
- Prepare the Baking Setup
- While your beef is simmering, preheat your oven to 375°F and grab a 9x13 inch baking dish. Give it a light spray with cooking spray to prevent sticking. Now comes the fun part – stand your taco shells upright in the dish, arranging them close together so they support each other. They should fit snugly, almost like soldiers standing at attention. This close arrangement keeps them stable during baking.
- Fill and Cheese
- Once your taco shells are arranged, carefully spoon the seasoned beef into each shell. Don't overfill them – you want the beef to come just below the rim of each shell. After filling all the shells, it's time for the star of the show – the cheese! Sprinkle that shredded cheddar generously over all the tacos, making sure to get cheese in between the shells and on top. Don't be shy with the cheese; it's what makes these tacos extra special.
- Bake to Golden Perfection
- Slide your baking dish into the preheated oven and set a timer for 20-25 minutes. You'll know they're ready when the cheese is fully melted and bubbling, and the shells have turned a beautiful golden color and are perfectly crispy. Keep an eye on them during the last few minutes to make sure nothing burns. Your kitchen will smell absolutely amazing!
- Top and Serve
- When the tacos come out of the oven, let them cool for just 2-3 minutes – you don't want to burn your mouth! Then add all those fresh, cool toppings: the crisp shredded lettuce, juicy diced tomatoes, and tangy red onions. Set out the sour cream so everyone can add their own dollop. Serve these beauties immediately while they're hot and crispy, and watch them disappear!
 pin it
Switch Things Up
I first made these oven baked tacos on a hectic Wednesday evening when I realized I couldn't stand at the stove making tacos one by one while juggling homework help and a million other things. Out of desperation, I arranged all the shells in a baking dish, filled them with the seasoned beef, topped them with cheese, and popped them in the oven. When I pulled them out twenty minutes later, the shells were golden and crispy, the cheese was bubbling, and I had a whole tray of tacos ready at once. My kids were amazed at how crispy they were – even crispier than stovetop tacos! Now this has become our go-to method. Sometimes I'll add jalapeños to half the batch for the adults, or swap in pepper jack cheese for extra kick. I've even made them with ground turkey when I wanted something lighter. The beauty of this method is that you can customize each taco slightly differently before baking, so everyone gets exactly what they want. And cleanup? Just one baking dish instead of a greasy skillet. It's become such a staple that my family now requests these specifically over regular tacos.
Perfect Pairings
These Cheesy Oven Baked Tacos pair wonderfully with classic Mexican sides. Serve them alongside creamy refried beans or zesty Mexican rice for a complete meal. A fresh batch of guacamole and crispy tortilla chips make excellent appetizers while the tacos bake. For beverages, ice-cold Mexican beer, fresh lime margaritas, or even a simple agua fresca complement the rich, savory flavors perfectly. Don't forget the salsa bar – set out mild, medium, and hot salsas so everyone can customize their heat level. A light Mexican street corn salad (esquites) adds a sweet and tangy contrast to the cheesy richness of the tacos.
 pin it
Frequently Asked Questions
- → Can I make these tacos ahead of time?
You can prepare the seasoned beef filling up to 2 days in advance and store it in the refrigerator. However, it's best to assemble and bake the tacos just before serving to ensure maximum crispiness. If you must prepare them completely ahead, assemble without the fresh toppings, bake, and reheat in a 350°F oven for 8-10 minutes before adding the lettuce, tomatoes, and onions.
- → Why do my taco shells keep falling over in the pan?
Make sure you're arranging the shells very close together so they support each other – they should be touching. If they still won't stay upright, try crumpling small pieces of aluminum foil and wedging them between shells for extra support. You can also use a smaller baking dish if you have one, which will force the shells to stay closer together naturally.
- → Can I use soft tortillas instead of hard shells?
While this recipe is specifically designed for hard taco shells to achieve that signature crispiness, you could adapt it for soft tortillas by making enchilada-style baked tacos instead. Roll the filling in tortillas, place them seam-side down in the baking dish, top with cheese and sauce, and bake. However, this creates a completely different dish than the crispy oven baked tacos.
- → How do I prevent the shells from getting soggy?
The key to crispy shells is making sure your beef mixture isn't too wet – simmer it until most of the liquid has evaporated and the sauce just coats the meat. Also, don't add the fresh toppings until after baking, as their moisture will soften the shells. Finally, serve the tacos immediately after adding toppings for maximum crispiness.
- → What's the best way to reheat leftover baked tacos?
Avoid the microwave as it will make the shells soggy. Instead, preheat your oven to 350°F, place the tacos on a baking sheet, and heat for 8-10 minutes until warmed through and crispy again. If the tacos already have fresh toppings on them, you may want to remove the lettuce and tomatoes before reheating and add fresh ones after, as they don't reheat well.
- → Can I use ground turkey or chicken instead of beef?
Absolutely! Ground turkey or chicken work wonderfully in this recipe. Just cook them the same way you would the beef, breaking them up as they cook until no longer pink. You may want to add a tablespoon of oil to the pan first since turkey and chicken are leaner than beef. Season with the taco seasoning just as you would with beef for equally delicious results.
Conclusion
These Cheesy Oven Baked Tacos are the ultimate game-changer for busy weeknight dinners. By baking all the tacos at once, you eliminate the hassle of assembling them individually while keeping everyone fed and happy. The shells come out perfectly crispy, the cheese melts into gooey perfection, and the fresh toppings add that essential crunch and brightness. Whether you're feeding a hungry family or hosting a casual get-together, this recipe delivers big on flavor and convenience. Serve them straight from the oven and watch them disappear in minutes!