
 pin it
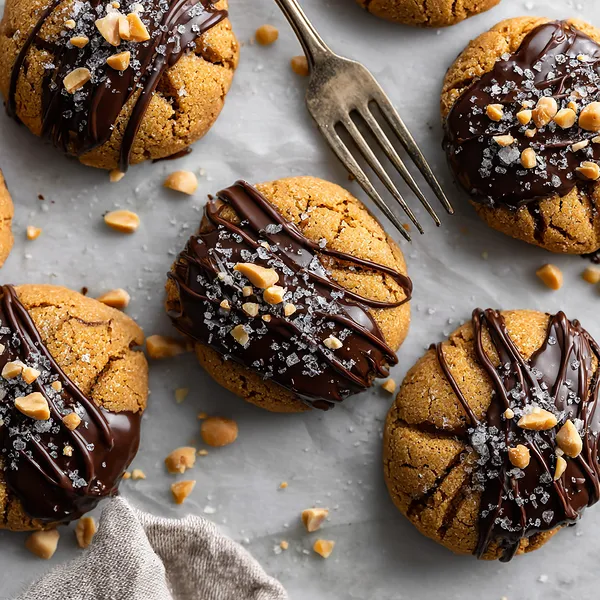
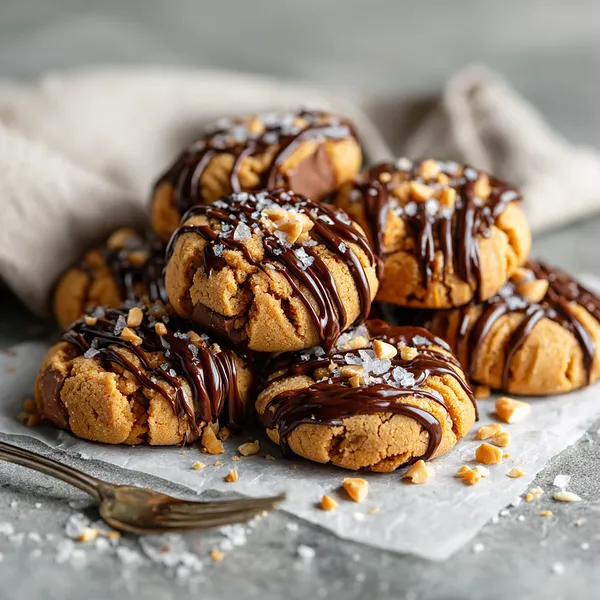
I remember the first time I encountered a cookie like this at a local bakery, and I was immediately obsessed with the combination of textures and flavors. The chewy peanut butter base, the chunks of peanut butter cups that get all melty, and that glossy chocolate drizzle – it was perfection. What really sealed the deal was the sea salt sprinkled on top, which I wasn't expecting. That little touch of saltiness transformed the entire cookie from just another sweet treat into something complex and crave-worthy. I knew I had to recreate these at home, and after several attempts, I finally nailed the recipe. The key is not overbaking them – you want to pull them from the oven when they still look slightly underdone in the center. They'll continue cooking on the baking sheet and will be perfectly chewy when cooled. The chocolate drizzle needs to be applied while the cookies are still slightly warm so it adheres properly but doesn't completely melt. And don't skip the sea salt – it's what makes these cookies truly special. Now, whenever I make them, people always ask what makes them so irresistible, and I tell them it's the perfect balance of sweet, salty, and that incredible peanut butter-chocolate combination that never gets old.
Why I love this recipe
This recipe holds a special place in my heart because it represents comfort and indulgence without being complicated. I love that I can whip these up with ingredients I usually have on hand, yet they taste like they came from an upscale bakery. The texture is what really gets me – that perfect chewiness with slightly crispy edges and those pockets of melted peanut butter cups throughout. Every bite is different, and that's exciting. I also appreciate how versatile these cookies are. I've made them for kids' birthday parties where they disappear instantly, but I've also served them at dinner parties where adults rave about the sophisticated sweet-salty balance. The recipe is forgiving, so even if you're not an expert baker, you'll succeed. What I love most is the joy these cookies bring to people. There's something about the combination of peanut butter, chocolate, and sea salt that makes everyone smile. I've given this recipe to countless friends, and it's always a hit. The fact that they stay soft for days means I can bake a batch and enjoy them throughout the week, which is perfect for my busy schedule. These cookies remind me that sometimes the best recipes are the ones that are simple, delicious, and bring people together.
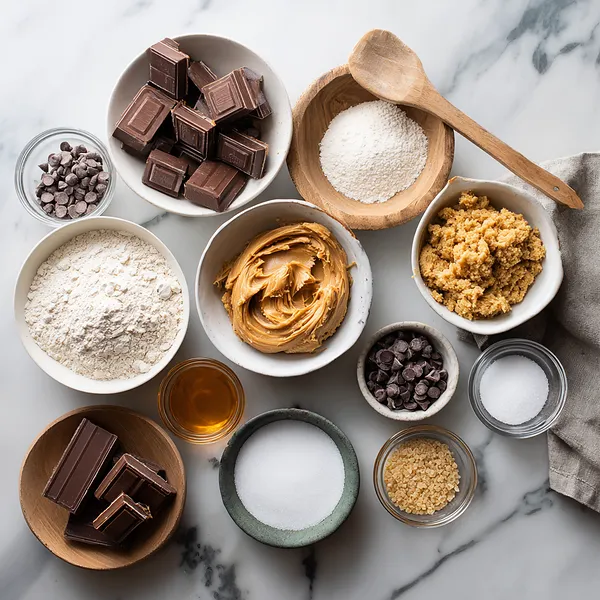
What You Need From Your Kitchen
- Peanut Butter: Use creamy peanut butter for smooth texture; natural peanut butter can make cookies too oily
- Butter: Must be softened to room temperature for proper creaming with sugars
- Brown Sugar: Provides moisture and creates chewy texture; don't substitute with all white sugar
- Eggs: Bring to room temperature for better incorporation into batter
- Peanut Butter Cups: Chop into various sizes and reserve some for pressing into cookie tops before baking
- Chocolate Chips: Melt gently in microwave at 30-second intervals for smooth drizzling consistency
- Flaky Sea Salt: Use large flake sea salt, not regular table salt, for the perfect finishing touch
Let's Make These Together
- Cream the Base
- Start by beating together the softened butter, peanut butter, and both sugars until the mixture becomes light, fluffy, and pale in color. This process incorporates air into the dough, which helps create a tender cookie texture. Make sure your butter is at room temperature – it should be soft enough to leave an indent when pressed but not melted or greasy. This step typically takes about 3-4 minutes with an electric mixer on medium speed.
- Add Eggs and Vanilla
- Beat in your eggs one at a time, allowing each to fully incorporate before adding the next. This ensures even distribution and prevents the batter from separating. Add the vanilla extract with the second egg for a beautiful aromatic base. The mixture should look smooth and uniform at this stage, with no streaks of egg visible.
- Mix Dry Ingredients
- In a separate bowl, whisk together your flour, baking soda, and salt. Whisking ensures these dry ingredients are evenly distributed, which prevents pockets of leavening or salt in your final cookies. Gradually add this mixture to your wet ingredients, mixing just until you see no more streaks of flour. Overmixing at this stage can develop the gluten too much and result in tough cookies, so stop as soon as everything comes together.
- Fold in Peanut Butter Cups
- Gently fold the chopped peanut butter cups into your dough using a spatula or wooden spoon. The key word here is gently – you want to distribute them evenly without overworking the dough. Reserve a handful of pieces to press into the tops of your cookies before baking. This not only looks beautiful but ensures every cookie has those gorgeous chocolate-peanut butter chunks visible on top.
- Bake to Perfection
- Scoop your dough onto parchment-lined baking sheets, leaving plenty of space between each cookie as they'll spread during baking. Press a few extra peanut butter cup pieces into the tops for visual appeal. Bake until the edges are golden brown but the centers still look slightly soft and underdone. This is crucial – removing them at this stage ensures they'll be perfectly chewy once cooled. Let them rest on the hot baking sheet for 5 minutes after removing from the oven to finish setting.
- Drizzle and Finish
- Once your cookies have cooled slightly but are still a bit warm, melt your chocolate chips until smooth and glossy. Drizzle the chocolate generously over each cookie in a zigzag pattern or however you prefer. While the chocolate is still wet, immediately sprinkle with flaky sea salt. The salt crystals will stick to the chocolate and provide that perfect sweet-salty contrast that makes these cookies so irresistible. Allow the chocolate to set completely before serving or storing.
 pin it
Switch Things Up
I first made these cookies on a rainy Saturday afternoon when I was craving something indulgent but didn't want to run to the store. I had all the ingredients in my pantry and decided to throw everything together. The moment I pulled them from the oven, the smell was intoxicating – rich peanut butter and melted chocolate filled every corner of my kitchen. I couldn't resist trying one while it was still warm, and the combination of gooey peanut butter cups and that slight crunch from the sea salt was a revelation. My family devoured half the batch before dinner, and I knew I'd created something special. Now, these cookies have become my signature dessert. I've experimented with dark chocolate drizzle, added crushed pretzels for extra crunch, and even made mini versions for parties. Each time, they disappear within minutes. The beauty of this recipe is how forgiving it is – you can adjust the sweetness, add more peanut butter cups, or even stuff them with extra chocolate. They've never failed me, and I've made them at least fifty times now.
Perfect Pairings
These cookies pair beautifully with a tall glass of cold milk, which helps cut through the richness and enhances the peanut butter flavor. For a more sophisticated pairing, try them with a hot cup of coffee or espresso – the bitterness of the coffee complements the sweet chocolate perfectly. If you're serving them as part of a dessert spread, they work wonderfully alongside vanilla ice cream or even a scoop of peanut butter ice cream for ultimate indulgence. For an adult gathering, pair them with a glass of dessert wine or bourbon, which brings out the caramel notes in the brown sugar. They also make an excellent companion to fresh berries, as the fruit's tartness balances the cookies' sweetness.
 pin it
Frequently Asked Questions
- → Can I use natural peanut butter instead of regular?
While you can use natural peanut butter, the results may be different. Natural peanut butter has more oil that can separate, which may make your cookies greasier and affect their texture. If you do use natural peanut butter, make sure to stir it very well first and consider reducing the butter in the recipe by 1-2 tablespoons. Regular creamy peanut butter gives the most consistent results.
- → Why do my cookies spread too much during baking?
Excessive spreading usually happens because the butter was too soft or melted, or the dough was too warm. Make sure your butter is softened but still holds its shape. If your kitchen is very warm, refrigerate the dough for 15-20 minutes before scooping and baking. Also, ensure you're measuring flour correctly – too little flour can cause spreading. Finally, make sure your baking sheets aren't hot from a previous batch when you add new dough.
- → Can I freeze the cookie dough?
Absolutely! This dough freezes beautifully. Scoop the dough into balls, place them on a baking sheet, and freeze until solid. Then transfer to a freezer bag or container for up to 3 months. You can bake them straight from frozen – just add 1-2 extra minutes to the baking time. This is perfect for having fresh-baked cookies whenever a craving hits!
- → What's the best way to melt chocolate for drizzling?
The microwave method works great – place chocolate chips in a microwave-safe bowl and heat in 30-second intervals, stirring between each, until smooth. Don't overheat or the chocolate will seize. Alternatively, you can use a double boiler for more gentle, even melting. If your chocolate is too thick for drizzling, add a teaspoon of coconut oil or vegetable oil to thin it slightly.
- → How do I keep these cookies soft and chewy?
The secret is not overbaking them and storing them properly. Remove cookies from the oven when they still look slightly underdone in the center – they'll continue cooking on the hot pan. Once completely cooled, store in an airtight container with a piece of bread, which helps maintain moisture. Stored this way, they'll stay soft for up to 5 days. You can also add them to the microwave for 10 seconds to refresh that fresh-baked texture.
- → Can I make these cookies smaller or larger?
Yes! For smaller cookies, use a smaller scoop and reduce baking time by 2-3 minutes. For larger cookies, use more dough and add 2-3 minutes to the baking time. Just watch them carefully and remove when the edges are golden but centers still look soft. Keep in mind that nutrition information and yield will change based on size.
Conclusion
These Loaded Peanut Butter Cup Cookies are the ultimate indulgence for anyone who loves the classic combination of peanut butter and chocolate. The addition of flaky sea salt elevates them from ordinary to extraordinary, creating a sophisticated flavor profile that balances sweetness with a savory edge. They're perfect for bake sales, cookie exchanges, holiday gatherings, or simply satisfying your own sweet tooth. The cookies stay soft and chewy for days when stored in an airtight container, making them an excellent make-ahead option. Whether you're an experienced baker or just starting out, these cookies are foolproof and guaranteed to impress everyone who tries them.