
 pin it
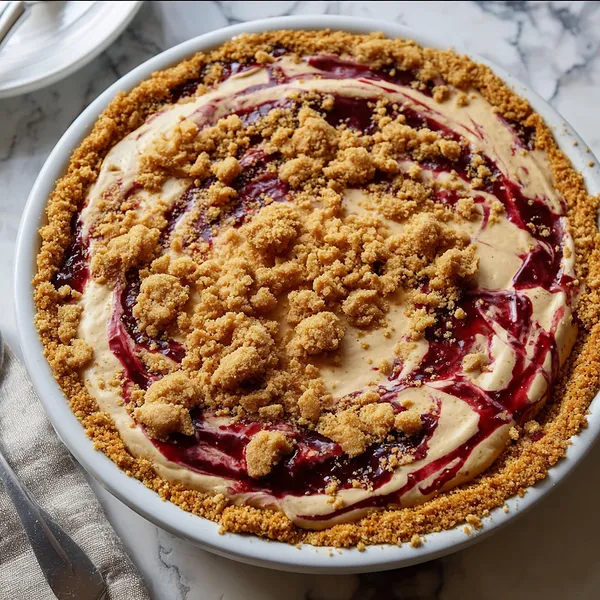
I stumbled upon the concept of a PB&J pie completely by accident while browsing through my grandmother's old recipe box. Tucked between her famous apple pie recipe and a water-stained card for lemon bars was this handwritten note that simply said "Try peanut butter in pie – the kids will flip." That cryptic message sent me down a rabbit hole of experimentation. My first attempt was honestly a disaster – I tried to bake the peanut butter filling and it separated into a grainy mess. But I kept tweaking, and when I discovered the magic of no-bake cream cheese fillings, everything clicked into place. The graham cracker crust was an obvious choice, providing that crunchy contrast we all love in a PB&J. The real breakthrough came when I decided to swirl the jelly throughout instead of layering it, creating those gorgeous ribbons of fruit that make each bite a little different. Now, this pie represents everything I love about cooking – taking something familiar and beloved, then transforming it into something unexpected and special.
Why I love this recipe
What I love most about this recipe is how it bridges generations. My kids go absolutely crazy for it because it tastes like their favorite lunch, while adults appreciate the sophisticated no-bake technique and elegant presentation. There's something deeply satisfying about creating a dessert that doesn't require any baking but still looks and tastes like you're a professional pastry chef. I also love how forgiving it is – if your jelly swirls aren't perfect, they still look gorgeous, and if you add extra peanut butter because you're a PB fanatic like me, it only gets better. The make-ahead nature is clutch for busy schedules; you can prep it the night before and let it chill while you handle everything else. But honestly, the best part is watching someone take that first bite and seeing their face light up with recognition and delight. It's comfort food that doesn't feel heavy, it's nostalgic without being childish, and it's proof that sometimes the simplest flavor combinations are the most magical.
What You Need From Your Kitchen
- Graham crackers: Crush into fine crumbs for the crust base, or use store-bought graham cracker crumbs
- Cream cheese: Soften to room temperature and beat until completely smooth before adding other ingredients
- Peanut butter: Use creamy style for best texture and fold into cream cheese mixture thoroughly
- Heavy whipping cream: Whip to stiff peaks separately, then fold gently into peanut butter mixture for light texture
- Raspberry jelly: Warm slightly until pourable, then drizzle and swirl through the filling layers
- Peanuts: Chop coarsely and sprinkle on top for crunch and decoration
Let's Make These Together
- Create the crust foundation
- Mix your graham cracker crumbs with melted butter and sugar until the mixture holds together like wet sand. Press this firmly and evenly into your pie dish, making sure to go up the sides for a nice tall crust. Pop it in the fridge while you make the filling – this helps it set properly.
- Whip up the creamy filling
- Beat that softened cream cheese until it's perfectly smooth and fluffy. Add your peanut butter, powdered sugar, and vanilla, and keep beating until everything is completely combined. In a separate bowl, whip your heavy cream until it forms stiff peaks, then gently fold it into the peanut butter mixture to keep everything light and airy.
- Create the beautiful swirls
- Spread half your filling into the chilled crust, then drizzle with warmed jelly. Use a knife to create gorgeous swirls – don't overmix, you want those pretty ribbons of color. Add the rest of your filling, smooth it out, and repeat the swirling process on top for that stunning marbled look.
- Add finishing touches and chill
- Sprinkle the top with graham cracker crumbs and chopped peanuts for extra crunch and visual appeal. Cover your masterpiece and let it chill in the refrigerator for at least 4 hours, or overnight if you can wait. This setting time is crucial for the perfect sliceable texture.
 pin it
Switch Things Up
I first made this pie for my daughter's school bake sale, thinking it would be a fun twist on a classic. I wasn't sure how it would compete with all the chocolate cakes and fancy cupcakes, but I figured the nostalgia factor might work in my favor. The morning of the sale, I carefully carried that pie into the school gym, and within the first fifteen minutes, three different parents were asking for the recipe. It sold before I even had a chance to set up my table properly! One mom told me her kids went wild when they saw it was "their favorite sandwich as a pie." Since then, it's become my go-to whenever someone asks me to bring dessert. I've experimented with different jelly flavors – strawberry is a close second to raspberry – and sometimes I'll add a drizzle of melted peanut butter on top for extra decadence.
Perfect Pairings
This pie pairs beautifully with a tall glass of cold milk, obviously channeling those after-school snack vibes. For adult gatherings, try serving it alongside vanilla ice cream or a dollop of freshly whipped cream. Coffee is another excellent companion – the slight bitterness balances the sweetness perfectly. If you're feeling adventurous, a scoop of chocolate ice cream turns this into the ultimate PB&J sundae experience. For a summer party, pair it with fresh berries on the side, or serve it with banana slices for a PB&J&B situation that works surprisingly well.
 pin it
Frequently Asked Questions
- → Can I use natural peanut butter instead of regular?
It's not recommended. Natural peanut butter tends to separate and can make the filling grainy and oily. Stick with regular creamy peanut butter for the best texture and consistency.
- → What other jelly flavors work well?
Strawberry, grape, and blackberry jelly all work beautifully. You can even try mixed berry or cherry preserves. Just make sure whatever you use is pourable when slightly warmed.
- → Can this pie be frozen?
Yes! Wrap it tightly in plastic wrap and aluminum foil, and freeze for up to 2 months. Thaw overnight in the refrigerator before serving. The texture stays remarkably creamy.
- → Do I have to use a graham cracker crust?
While graham crackers are traditional, you can use vanilla wafer cookies, Nilla wafers, or even Oreo crumbs for the crust. Just follow the same proportions of crumbs to butter and sugar.
- → How do I get clean slices?
Run a sharp knife under hot water, dry it completely, then make your cut. Wipe the knife clean and repeat for each slice. This keeps the layers distinct and prevents smearing.
- → Can I make this dairy-free?
You can substitute dairy-free cream cheese and coconut cream (the thick part from a chilled can) for the dairy ingredients. The texture will be slightly different but still delicious.
Conclusion
This Peanut Butter and Jelly Pie is pure nostalgia in dessert form. It captures everything we loved about PB&J sandwiches as kids but elevates it into an elegant, crowd-pleasing pie that's perfect for any occasion. The no-bake preparation makes it incredibly accessible, even for novice bakers, while the stunning presentation will have everyone thinking you spent hours in the kitchen. Whether you're serving it at a summer barbecue, holiday gathering, or just treating yourself on a Tuesday night, this pie delivers comfort and joy in every single bite.