
 pin it
I'll never forget the first time I encountered a red velvet lava cake. It was at a trendy dessert cafe in downtown, and I was skeptical – how could they improve on the classic red velvet? But one bite changed everything. The way the warm, cocoa-kissed red velvet cake gave way to that river of molten white chocolate was pure magic. I knew I had to recreate it at home. After several attempts and minor kitchen disasters (let's not talk about the time I overcooked them), I finally cracked the code. This recipe captures that perfect balance – the cake is tender and moist with that signature red velvet tang from the buttermilk and vinegar, while the hidden white chocolate center stays gloriously molten. The key is using ramekins and getting the baking time just right. When you unmold these cakes and see that glossy white chocolate flowing out, topped with cold ice cream that starts melting on contact, you'll understand why I fell in love with this dessert.
Why I love this recipe
There are so many reasons why this red velvet lava cake has become my go-to impressive dessert. First, it looks absolutely stunning – that vibrant red cake with the flowing white center is Instagram-worthy every single time. But beyond the aesthetics, it's the flavor combination that keeps me coming back. The red velvet base has this subtle cocoa flavor with a slight tang that's distinctly different from chocolate cake, and when you pair it with sweet, creamy white chocolate, it's heavenly. I love that it feels incredibly fancy but comes together in about 30 minutes. The contrast of textures – the tender cake, the flowing molten center, the cold ice cream, the crunchy Oreos – makes every bite interesting. And honestly? The reactions I get when I serve these make all the effort worthwhile. Watching someone cut into their cake and see that white chocolate lava flow out never fails to bring smiles. It's become my secret weapon for special occasions, date nights, or whenever I want to treat myself to something extraordinary.
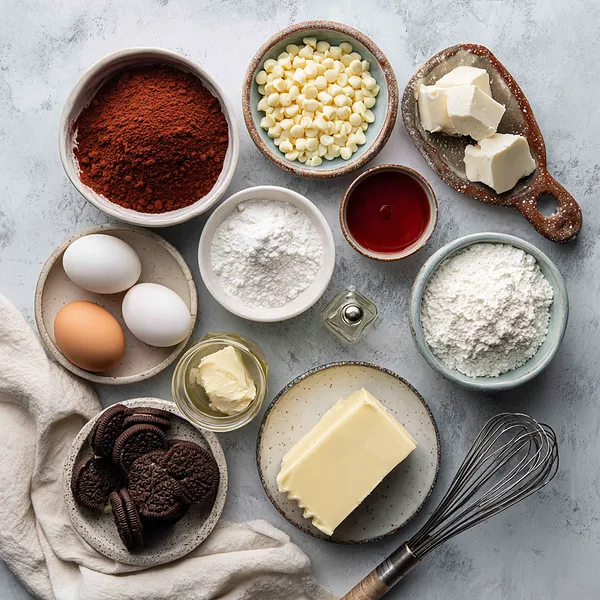
What You Need From Your Kitchen
- All-purpose flour: Provides structure to the cake; sift before measuring for lighter texture
- Cocoa powder: Gives the signature chocolate flavor to red velvet; use unsweetened Dutch-process for best results
- Buttermilk: Creates the tender crumb and slight tang that makes red velvet unique; don't substitute with regular milk
- Red food coloring: Gives the vibrant red color; gel food coloring works better than liquid for more intense color
- White chocolate chips: Melts into the molten lava center; ensure they're real white chocolate, not coating chips
- Vanilla ice cream: The cold contrast to the warm cake is essential; use premium quality for best flavor
- Oreo cookies: Crush into coarse pieces for the perfect crunchy topping that complements the smooth textures
Let's Make These Together
- Prep Your Workspace
- Begin by setting up your mise en place. Preheat your oven to 425°F and prepare your ramekins by greasing them thoroughly with butter, then dusting with cocoa powder. This step ensures your beautiful cakes will release perfectly when inverted. Gather all your ingredients and measure them out so you can work efficiently once you start mixing.
- Create the Red Velvet Batter
- In one bowl, combine all your dry ingredients – flour, cocoa powder, sugar, baking soda, and salt. In another bowl, whisk together the wet ingredients including buttermilk, oil, egg, that gorgeous red food coloring, vanilla, and vinegar. The vinegar reacts with the baking soda to create that signature red velvet texture. Gently fold the wet mixture into the dry ingredients until just combined – overmixing will make the cakes tough.
- Build the Lava Centers
- Here's where the magic happens. Divide half your batter among the four ramekins, then nestle a generous pile of white chocolate chips right in the center of each one. Cover completely with the remaining batter, making sure no chocolate peeks through. As these bake, the chocolate will melt into that gorgeous flowing center we're after.
- Bake with Precision
- Slide your baking sheet into the preheated oven and set your timer for 11 minutes. Watch them carefully – you want the edges set and firm but the center should still have a slight jiggle when you gently shake the pan. This is the sweet spot for molten perfection. Let them rest for just one minute after removing from the oven.
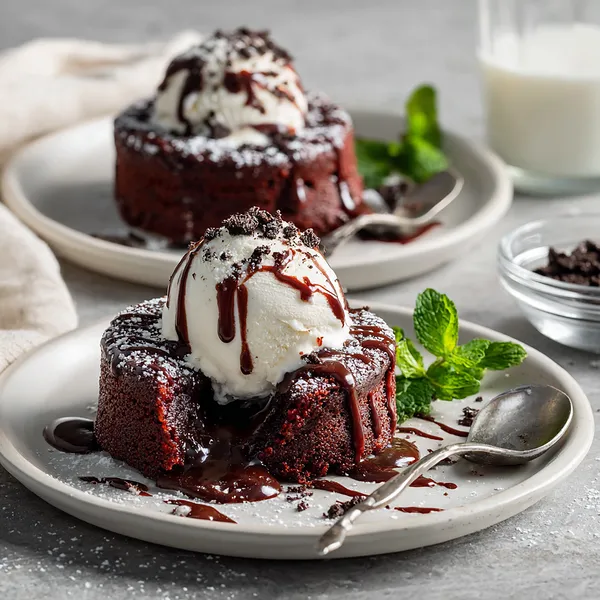
- The Grand Finale
- Now for the most satisfying part – run a knife around each ramekin edge, place your serving plate on top, and confidently flip it over. The cake should release beautifully. Immediately top with a scoop of vanilla ice cream, drizzle with both chocolate and caramel sauce in artistic swoops, then shower with crushed Oreos. Serve right away and prepare for the amazed reactions when that white chocolate center flows out!
 pin it
Switch Things Up
I first made this red velvet lava cake for Valentine's Day, and let me tell you, it was a game-changer. I'd been intimidated by lava cakes for years, thinking they required some kind of pastry chef magic. But once I realized the secret was all in the timing and hiding that white chocolate center, everything clicked. The first time I nailed it, watching that molten white chocolate pour out onto the plate, I actually did a little victory dance in my kitchen. Now I make these whenever I want to feel fancy without spending hours in the kitchen. My favorite part? That moment when you break into the cake and the center flows out – it never gets old. I've experimented with different toppings, but the combination of vanilla ice cream, both chocolate and caramel sauce, and those crushed Oreos is pure perfection.
Perfect Pairings
This decadent red velvet lava cake pairs beautifully with a variety of beverages and sides. For a classic combination, serve it with a glass of cold whole milk or a rich hot chocolate to complement the chocolate flavors. If you're feeling fancy, a dessert wine like port or a sweet moscato enhances the cake's sweetness. For coffee lovers, a strong espresso or a creamy cappuccino cuts through the richness perfectly. You can also serve it alongside fresh berries – strawberries or raspberries add a tart contrast that balances the sweetness. For an extra indulgent experience, add a dollop of whipped cream or cream cheese frosting on the side.
 pin it
Frequently Asked Questions
- → Can I make these ahead of time?
You can prepare the batter and fill the ramekins up to 2 hours ahead, then cover and refrigerate. When ready to serve, bake directly from the refrigerator, adding 1-2 extra minutes to the baking time. However, these are best baked and served immediately for the optimal molten center experience.
- → What if my lava cakes don't have a molten center?
The most common issue is overbaking. The cakes should only bake for 11-13 minutes – the edges will be firm but the center should still jiggle slightly. Every oven is different, so you may need to adjust the time slightly. Start checking at 11 minutes and remember that the cakes continue cooking slightly after you remove them from the oven.
- → Can I use a different type of chocolate for the center?
Absolutely! While white chocolate creates a beautiful contrast with the red velvet, you can use milk chocolate, dark chocolate, or even a combination. Dark chocolate will give you a more intense, less sweet center. You could also try caramel squares or Nutella for a different flavor profile.
- → My cakes stuck to the ramekins. What went wrong?
This usually happens when the ramekins aren't greased thoroughly enough. Make sure to use plenty of butter and coat every surface, including the bottom and all sides. Dusting with cocoa powder after greasing also helps. Additionally, let the cakes rest for exactly 1 minute after baking – too long and they'll stick, too soon and they may fall apart.
- → Can I make this recipe without red food coloring?
Yes, though it won't be the traditional vibrant red velvet color. The cake will be brown from the cocoa powder. You can substitute the red food coloring with beet juice or beet powder for a more natural red color, though it will be more muted. The flavor will remain delicious regardless!
- → What size ramekins should I use?
This recipe is designed for 6-ounce ramekins, which create the perfect individual portion. If you use smaller 4-ounce ramekins, reduce the baking time by 2-3 minutes. Larger 8-ounce ramekins will need an extra 2-3 minutes of baking. The key is watching for that slight jiggle in the center.
- → Can I make one large lava cake instead of individual ones?
While possible, individual cakes are better for this recipe because they bake more evenly and are easier to achieve the perfect molten center. A large cake would need significantly longer baking time and might not have the same dramatic lava effect. Plus, individual servings look more impressive!
Conclusion
This Red Velvet Lava Cake is the ultimate indulgent dessert that combines the classic elegance of red velvet with the dramatic flair of a molten lava cake. The contrast between the warm, tender red velvet exterior and the flowing white chocolate center creates an unforgettable taste experience. Topped with cold vanilla ice cream and finished with chocolate, caramel, and Oreo crumbles, every bite is a perfect balance of textures and flavors. Whether you're celebrating a special occasion or just treating yourself, this dessert is guaranteed to impress.