
 pin it
I first encountered real Chinese Lemon Chicken at a small family-run restaurant in Chinatown, and it was a revelation compared to the overly sweet versions I'd had before. The balance was perfect – crispy chicken that stayed crunchy, with a sauce that was tangy first, then sweet, with just enough savory depth to keep you coming back for more. I became a bit obsessed with recreating it. This recipe captures that perfect balance I've been chasing. The chicken gets coated twice – first in egg, then in cornstarch – which creates an incredibly crispy shell that doesn't get soggy. The sauce is where the magic happens: fresh lemon juice (never bottled!), honey for sweetness, soy sauce for umami, and a touch of ginger and garlic for complexity. When you toss the hot, crispy chicken in that warm sauce, the coating absorbs just enough to be flavorful while maintaining its crunch. The sesame seeds add nuttiness and the green onions bring freshness. It's a dish that hits every note perfectly – crispy, tender, tangy, sweet, and completely addictive. Every time I make this, I'm transported back to that little restaurant, but now I can enjoy it anytime in my own kitchen.
Why I love this recipe
What I love most about this Chinese Lemon Chicken is how it delivers that restaurant experience at home without any mysterious ingredients or complicated techniques. It's honest, straightforward cooking that produces spectacular results. The crispy coating is incredibly satisfying – you get that perfect crunch with every bite, and the fact that it holds up even after being sauced is just brilliant. The lemon sauce is bright and complex, not one-dimensional like some versions that are just sweet syrup. You taste the tartness of fresh lemon, the warmth of ginger, the depth of soy sauce, all working together beautifully. I also love that this recipe is endlessly adaptable – sometimes I add a pinch of red pepper flakes for heat, or extra garlic when I'm in the mood. It's a dish that makes weeknight dinners feel special, and it's impressive enough for guests. Plus, it's actually healthier than takeout since you control the oil and ingredients. The whole family loves it, and it's become our Friday night tradition. Nothing beats the smell of this chicken frying and that tangy sauce simmering – it's pure comfort and joy in a bowl.
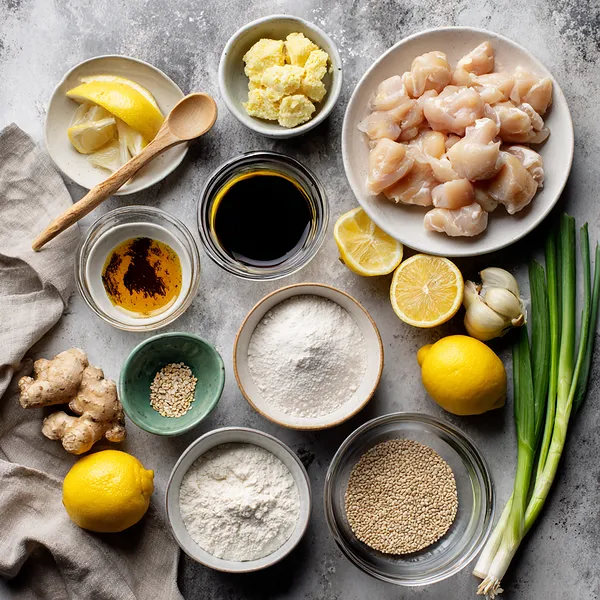
What You Need From Your Kitchen
- Chicken breast: Cut into uniform bite-sized pieces for even cooking, and pat completely dry before coating
- Fresh lemon juice: Squeeze from fresh lemons just before using for maximum brightness and flavor
- Cornstarch: Creates the ultra-crispy coating and also thickens the sauce to glossy perfection
- Honey: Provides natural sweetness and helps create that beautiful glaze on the sauce
- Fresh ginger: Peel and grate finely to release aromatic oils that add depth to the sauce
- Garlic cloves: Mince finely so it distributes evenly throughout the tangy lemon sauce
- Sesame seeds: Toast lightly in a dry pan before sprinkling for enhanced nutty flavor
Let's Make These Together
- Prep Your Chicken Right
- The secret to crispy chicken starts with dry chicken pieces. Pat them thoroughly with paper towels to remove all surface moisture. Season with salt and white pepper. Moisture is the enemy of crispiness, so don't skip this step. Cut your chicken into uniform bite-sized pieces so they cook evenly. Having all pieces roughly the same size ensures nothing is overcooked or undercooked.
- Master the Double Coating
- Set up your coating station like a pro: beaten eggs in one bowl, cornstarch in another. Dip each chicken piece first in egg, letting the excess drip back into the bowl. Then roll it in cornstarch, pressing gently so it adheres well. Shake off any excess – too much cornstarch can make the coating thick and doughy. The key is a light, even coating that will puff up and crisp beautifully in hot oil.
- Get Your Oil Temperature Perfect
- Heat your oil to exactly 350°F and maintain this temperature throughout frying. Use a thermometer – it's the only way to be sure. Too hot and your coating burns before the chicken cooks through; too cool and the chicken absorbs oil and becomes greasy instead of crispy. Fry in small batches to keep the temperature steady. When chicken goes in, the temperature drops, so wait for it to come back up between batches.
- Create That Glossy Lemon Sauce
- While your chicken fries, make the sauce that brings everything together. Combine fresh lemon juice, honey, soy sauce, rice vinegar, minced garlic, and grated ginger in a saucepan. Bring it to a gentle simmer and let those flavors meld together. The cornstarch slurry you whisk in at the end is what transforms thin liquid into that gorgeous, glossy coating. Stir constantly as it thickens – you want it smooth with no lumps. When it coats the back of a spoon, it's ready. That final drizzle of sesame oil adds an incredible aromatic finish.
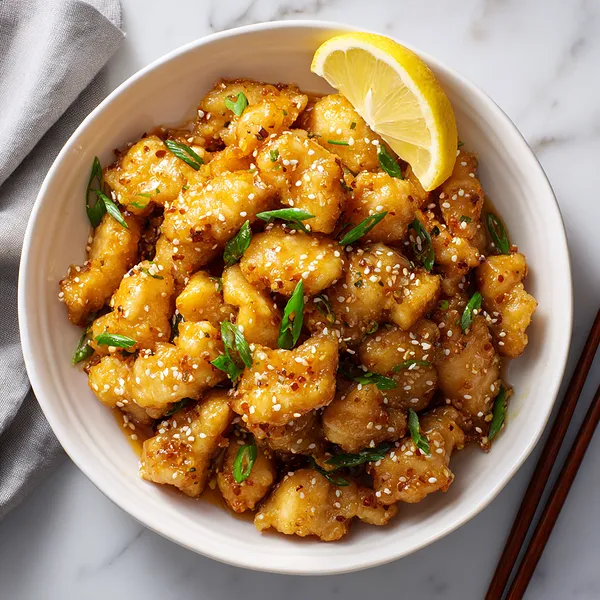
- The Perfect Toss
- This is where magic happens. Your chicken is golden and crispy, your sauce is glossy and fragrant. Put all the chicken in a large bowl and pour that warm sauce over it. Toss gently but thoroughly – you want every single piece coated in that tangy-sweet glaze. The sauce should cling to the crispy coating, creating a perfect balance. Work quickly so you can serve it immediately while the coating is at its crispiest. Garnish with sesame seeds and green onions for that final restaurant-worthy touch.
 pin it
Switch Things Up
I'll never forget the first time I attempted Chinese Lemon Chicken at home. I was skeptical that I could recreate that restaurant-quality crispy coating, but wow, was I wrong. The secret is in the double coating and getting your oil to the right temperature. When those first pieces hit the hot oil and started sizzling, turning that beautiful golden color, I knew I was onto something special. The sauce came together so quickly – just a few minutes of simmering and it transformed into this glossy, thick glaze. When I tossed the crispy chicken in that tangy lemon sauce and watched it coat every piece perfectly, I actually did a little victory dance in my kitchen. Now it's my go-to when I'm craving Chinese food but want something made with fresh ingredients I can trust. The leftovers (if there are any) are absolutely incredible too.
Perfect Pairings
This Chinese Lemon Chicken pairs beautifully with steamed jasmine rice or fried rice to soak up that amazing sauce. For vegetables, try steamed broccoli, snap peas, or bok choy on the side – their mild flavors let the tangy chicken shine. If you want to make it a full Chinese feast, serve alongside vegetable spring rolls, egg drop soup, or some crispy wontons. For drinks, jasmine tea is traditional and wonderful, but an ice-cold lemonade or ginger ale also complements the citrus notes perfectly. A simple cucumber salad with rice vinegar dressing adds a refreshing crunch that balances the richness of the fried chicken.
 pin it
Frequently Asked Questions
- → Can I use chicken thighs instead of breast?
Absolutely! Boneless, skinless chicken thighs work wonderfully in this recipe and some people prefer them for their juicier texture. Just cut them into similar bite-sized pieces and follow the same coating and frying process. Thighs may take an extra minute or two to cook through since they're slightly denser than breast meat.
- → How do I keep the chicken crispy after adding the sauce?
The key is serving immediately after tossing with sauce. The double coating technique helps maintain crispiness longer, but once sauced, the coating will gradually soften. For meal prep, keep the fried chicken and sauce separate, then toss together just before eating. You can also try the double-fry method mentioned in the recipe for extra-durable crispiness.
- → Can I make this recipe gluten-free?
Yes! Use tamari or gluten-free soy sauce instead of regular soy sauce, and cornstarch is naturally gluten-free. Just make sure all your other ingredients don't contain hidden gluten. The recipe is otherwise naturally gluten-free since cornstarch is used for coating instead of flour.
- → What if I don't have rice vinegar?
Apple cider vinegar or white wine vinegar work as substitutes for rice vinegar. Use slightly less (about 2 teaspoons instead of 1 tablespoon) as they can be more acidic than rice vinegar. In a pinch, you can also use additional lemon juice, though this changes the flavor profile slightly.
- → Can I bake the chicken instead of frying?
While baking is an option, you won't get the same ultra-crispy texture that frying produces. If you prefer to bake, coat the chicken as directed, place on a greased wire rack over a baking sheet, and bake at 425°F for about 20-25 minutes, flipping halfway through. The coating will be crispy but different from the traditional fried version. An air fryer also works well at 400°F for 12-15 minutes.
- → How do I know when the oil is hot enough?
A kitchen thermometer is the most reliable method – you want 350°F. Without a thermometer, drop a small piece of bread or a pinch of cornstarch into the oil. If it sizzles immediately and turns golden in about 60 seconds, your oil is ready. If it browns too quickly, the oil is too hot; if it doesn't sizzle right away, it needs more time to heat up.
- → Can I make the sauce ahead of time?
Yes! The lemon sauce can be made up to 2 days in advance and stored in an airtight container in the refrigerator. Reheat it gently on the stove or in the microwave before tossing with freshly fried chicken. You may need to add a splash of water if it's thickened too much during storage, then whisk to restore the glossy consistency.
Conclusion
This Chinese Lemon Chicken is everything you love about takeout, but better. The crispy coating stays crunchy even under that gorgeous glossy sauce, and the bright lemon flavor cuts through the richness perfectly. It's one of those dishes that looks impressive but is surprisingly straightforward to make. Serve it over steamed rice or with stir-fried vegetables for a complete meal that'll have everyone asking for seconds. The combination of textures and flavors – crispy, tender, sweet, tangy, savory – makes this a crowd-pleaser every single time.